
User guide


Page 5 of 10
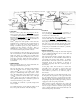
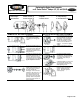
1. Motor 4. Tube Fitting 7. Rotary Seal Assembly 10. Housing Gasket
2. Water Slinger 5. Motor Screws (4) 8. Impeller 11. Pump Housing
3. Motor Bracket 6. Pump Screws (4) 9. Impeller Screw 12. Threaded Inlet Casting
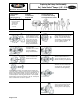
REMOVAL OF OLD SEAL ASSEMBLY INSTALLATION OF NEW SEAL ASSEMBLY
A) Remove pump housing from
motor bracket and impeller
assembly by removing pump
screws
.
F) Coat outside edge of new seat
with seal lubricant and slip it into
the bracket. Press into bracket
with thumbs or wooden dowel.
Handle seat carefully so seating
surfaces are not scratched or
chipped . . . be sure it is squarely
seated.
B) Remove impeller screw and
motor screws. (Note: opposite
end of motor shaft is fitted with
screwdriver slot to hold shaft
securely while impeller screw is
being removed.)
G) Remount bracket on motor.
C) Insert two of the pump screws
into the two threaded holes in the
bracket. Tighten them slowly
and evenly to force the impeller
and bracket off the shaft. Do not
pry the impeller or bracket!
H) Lubricate impeller hub with
seal lubricant. Slip new bellows
and spring onto impeller hub. Be
sure bellows slides freely on
impeller hub.
I) Replace impeller on motor shaft
and secure with impeller screw.
Hold shaft with screw driver slot
while tightening screw.
D) Remove old seal parts from
impeller hub and bracket. Be
sure water slinger is in place.
E) Clean impeller hub
thoroughly…remove all loose
particles of dirt, grease, etc. Use
fine emery cloth if necessary.
Also clean the recess in the
bracket so the new seat will fit
perfectly. Remove all particles
and dirt on gasket surfaces of
the two castings.
J) Replace pump housing onto
bracket, using a new housing
gasket. Secure with pump
screws. Be certain gasket is
seated properly.
Operation & Installation
Replacing the Rotary Seal Assembly
on G Series Sterlco
®
Pumps: 1/3, 1/2, and 3/4 HP