Installation and Care Guide Guide d’installation et d’entretien Guía de instalación y cuidado Self-Rimming or Undercounter Kitchen Sink Évier de cuisine sous comptoir ou à rebord intégré Fregadero de cocina de borde terminado o bajo cubierta 1042 1043 USA: 1-800-STERLING (1-800-783-7546) México: 001-877-680-1310 SterlingPlumbing.com 1106144-2-C ©2009 Kohler Co.
Thank You For Choosing Sterling We appreciate your commitment to Sterling value. Please take a few minutes to review this manual before you start installation. If you encounter any installation or performance problems, please don’t hesitate to contact us. Our phone numbers are listed within this manual. Thanks again for choosing Sterling. Merci d’avoir choisi Sterling Nous apprécions votre engagement envers la qualité Sterling.
Important Information (cont.) Undercounter sinks should be installed by experienced installers. To ensure a safe and damage-free installation, two people should install the sink. Prior to installation, unpack the new sink and inspect it for damage. Return the sink to its protective carton until you are ready to install it. Plan the sink installation so future removal from underneath the countertop is possible without damaging the countertop. Do not use adhesive sealants.
Información importante (cont.) AVISO: Si este producto no se instala según los pasos indicados en esta guía, se podrían producir daños a este producto. AVISO: Para instalaciones bajo cubierta: Para asegurar que el peso del fregadero es soportado correctamente, el perímetro completo del borde del fregadro debe descansar en la estructura de madera. AVISO: Para instalaciones bajo cubierta: Utilice técnicas y herrajes apropiados para que la estructura de madera pueda soportar al menos 300 libras (136 kg).
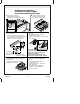
Installation/Installation/Instalación Drill Accessory Holes (Optional) Percer les orifices des accessoires (optionnel) Taladre los orificios para el accesorio (optional) 1 Drill pilot holes at desired accessory hole locations. Percer des orifices pilotes aux emplacements souhaités pour les orifices des accessoires. Taladre orificios guía en los lugares que desee para el accesorio. Drill Point Point de forage Lugar a taladrar 2 Using a 1-1/2" diameter hole saw, cut the accessory holes.
Installation/Installation/Instalación Self-Rimming Installations Installations à rebord intégrés Instalaciones de borde terminado 1 Verify cabinet clearance. 2 Position and trace the sink. Positionner et tracer l'évier. Coloque y trace el fregadero. Vérifier l'espace du meuble. Verifique el espacio libre del gabinete. Drill pilot hole and cut the countertop 3 Draw the cut-out line 3/4" (1.9 cm) inside 4 opening. the sink outline.
Installation/Installation/Instalación 7 Install the faucet, accessories 8 Apply silicone sealant around the rim. (if applicable), and the strainers. Installer le robinet, les accessoires (le cas échéant) et les crépines. Instale la grifería, los accesorios (si aplica) y las coladeras. 9 Appliquer de l'étanchéité autour du rebord. Aplique sellador alrededor del borde. Wipe away the excess sealant and allow to dry. Essuyer l'excès d'étanchéité et laisser sécher.
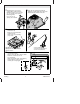
Installation/Installation/Instalación Undercounter Installations Installations sous comptoir Instalaciones bajo cubierta 1 Verify cabinet clearance. 2 Install the strainers. Installer les crépines. Instale las coladeras. Vérifier l'espace du meuble. Verifique el espacio libre del gabinete. 3 Verify all required holes correspond with the countertop cutout and/or faucet installation. S'assurer que tous les orifices correspondent à ceux du découpage du comptoir et/ou de l'installation du robinet.
Installation 4 Apply silicone sealant. Appliquer du mastic à la silicone. Aplique sellador de silicona.
Installation (cont.) NOTICE: Utiliser des fixations et des techniques appropriées afin d’assurer que le cadre en bois supporte un minimum de 300 lbs (136 kg). Localiser les fixations pour un accès facile dans l’éventualité où l’évier doit être retiré. Positionner le cadre de support en bois avec le meuble et sécuriser. Localiser les fixations pour un accès facile dans l’éventualité où l’évier doit être retiré. Appliquer un boudin de mastic de 1″ (2,5 cm) à chaque coin du cadre en bois qui touche l’évier.
Installation 5 6 Apply silicone sealant. Appliquer du Wipe away excess. Essuyer tout excédant. mastic à la Limpie el exceso. silicone. Aplique sellador de silicona. Lower the sink into the cabinet. Verify the entire perimeter of the sink rim is supported by the wood frame. Verify the sink is level. Make any adjustments as needed. Apply a thin bead of silicone sealant where the sink meets the countertop. Immediately wipe away any excess sealant with a damp cloth. Fill any voids if needed.
Instalación Baje el fregadero dentro del gabinete. Verifique que todo el perímetro del borde del fregadero descanse en la estructura de madera. Verifique que el fregadero esté a nivel. Haga los ajustes necesarios. Aplique una tira delgada de sellador de silicona donde el fregadero hace contacto con la cubierta. Limpie de inmediato el exceso de sellador con un trapo húmedo. Rellene los vacíos si es necesario. Antes de continuar, deje secar el sellador durante 30 minutos como mínimo.
Installation/Installation/Instalación 7 Wipe away the excess sealant and allow to dry. Essuyer l'excès d'étanchéité et laisser sécher. Limpie el exceso de sellador y deje secar. 8Install the faucet and accessories, if applicable. Installer le robinet et les accessoires le cas échéant. Instale la grifería y los accesorios, si aplica. Apply silicone sealant (optional). Appliquer du mastic à la silicone (optionnel). Aplique sellador de silicona (opcional). 9 a Make the drain connections.
Care and Cleaning For best results, keep the following in mind when caring for your STERLING product: Always test your cleaning solution on an inconspicuous area before applying to the entire surface. Wipe surfaces clean and rinse completely with water immediately after applying cleaner. Rinse and dry overspray that lands on nearby surfaces. Do not allow cleaners to sit or soak. Use a soft, dampened sponge or cloth. Never use an abrasive material such as a brush or scouring pad to clean surfaces.
Cuidado y limpieza Para obtener los mejores resultados, tenga presente lo siguiente al limpiar su producto STERLING: Siempre pruebe la solución de limpieza en un área oculta antes de aplicarla a toda la superficie. Limpie con un trapo las superficies y enjuague completa e inmediatamente con agua después de aplicar el limpiador. Enjuague y seque las superficies cercanas que se hayan rociado. No deje por tiempo prolongado los limpiadores en la superficie. Utilice una esponja o trapo suave y húmedo.
Warranty (cont.) and seller hereby disclaim any liability for special, incidental, or consequential damages. Some states/provinces do not allow limitations on how long an implied warranty lasts, or the exclusion or limitation of special, incidental or consequential damages, so these limitations and exclusions may not apply to you. This warranty gives you specific legal rights. You may have other rights, which vary from state/province to state/province. This is Sterling’s exclusive written warranty.
Garantía Bañeras y lavabos - Garantía limitada de 10 años para uso residencial / de 3 años para uso comercial Fregaderos de cocina - Garantía limitada de por vida para el consumidor / limitada de 3 años para uso comercial De acuerdo a la clasificación arriba descrita, Sterling®, una división de Kohler Co.
1106144-2-C Sterling
Sterling 1106144-2-C
1106144-2-C