
Installation Instructions

21172319-2-C
5 YEARS LIMITED
SP2375, 5100 Series, 5300 Series, 5400 Series, 6300 Series, 6500 Series
3 YEARS LIMITED
1500 Series, 1900 Series, 2200 Series, 4600 Series, 4700 Series, 4800 Series, 4900 Series, 5900 Series
1 YEAR LIMITED
500 Series, 600 Series, 660 Series, 670 Series, 690 Series, 950 Series, 2300 Series, 3100 Series
Based on the classification specified above, STERLING bath and shower doors are warranted to be free of
manufacturing defects within the time of the specified model's limited warranty from date of sale.
Kohler Co. will, at its election, repair, rectify or replace a fixture when inspection by Kohler Co. discloses any such
defects occurring in normal usage within the time period of coverage stated above. Kohler Co. is not responsible for
removal or installation costs where replacement is indicated. Damages due to improper handling, installation or
maintenance are not considered manufacturing defects and are not covered by this warranty. This warranty is valid
for the original, consumer purchaser only.
To obtain warranty service, contact Sterling, either through your plumbing contractor, home center, wholesaler or
dealer, or by calling or writing Sterling, Consumer Services, 444 Highland Drive, Kohler, Wisconsin 53044,
1-800-783-7546.
TO THE EXTENT PERMITTED BY LAW, ALL IMPLIED WARRANTIES INCLUDING THOSE OF
MERCHANTABILITY AND FITNESS FOR A PARTICULAR PURPOSE ARE HEREBY DISCLAIMED.
KOHLER CO. AND SELLER HEREBY DISCLAIM ANY LIABILITY FOR SPECIAL, INCIDENTAL, OR
CONSEQUENTIAL DAMAGES. Some states/provinces do not allow limitations on how long an implied warranty
lasts, or the exclusion or limitation of special, incidental or consequential damages, so these limitations and
exclusions may not apply to you. This warranty gives you specific legal rights. You may have other rights which
vary from state/province to state/province.
This is the exclusive written warranty for Kohler Co.
WARRANTY
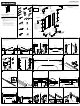
TROUBLESHOOTING
Recommended Action
A. Loosen the nearest door panel screw. Pull the door panel frame away from the glass far enough to allow the bolt
head to pass through. Retighten the screw.
A. Remove the strike side header screw. Lift the header slightly. Insert the top bolt.
A. Repeat steps 9 and 10. Fill the incorrectly positioned hole with silicone sealant.
Recommended Action
A. Adjust the door panel to increase the gap between the door panel and the bottom track. Adjust the bottom pivot pin
and tigthen securely. See steps 20, 21, 22, 23, and 24.
A. Adjust the door panel to increase the gap between the door panel and the strike jamb. See steps 20, 21, 22, 23, and 24.
B. Adjust the strike jamb so the door panel makes contact with the strike jamb magnet. See steps 20, 21, 22, 23, and 24.
C. Trim the ends of the seal to be flush with the door.
Recommended Action
A. From the outside the shower, apply silicone sealant where the fixed glass panel meets the U-channel.
A. From the outside the shower, apply silicone sealant where the fixed glass panel frame meets the wall jamb.
A. Verify the seal is in place. See step 21.
A. Adjust the door to decrease the gap between the door panel and the strike jamb. See steps 21, 22, 23, and 24.
B. Adjust the strike jamb so the door panel makes contact with the strike jamb magnet seal. See steps 21, 22, 23, and 24.
Symptom: Installation
1. The pivot bolts do not slide into the door channels.
2. Fitting the top bolt into the pivot block is difficult.
3. If the bottom track pivot hole is drilled in the wrong location.
Symptom: Door Functionality
1. The door contacts the bottom track.
2. Opening or shutting the door panel is difficult.
Symptom: Water Leaks
1. Water leaks under the fixed glass panel.
2. Water leaks between fixed glass and wall jamb.
3. Water leaks under the door panel.
4. Water leaks past the strike jamb.
© 2013 Kohler Co.
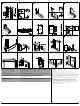
24
30
2725
Top
Hole
#10-16 x
3/8"
Strike Jamb
Strike Jamb
18
363534
33
32
312928
26
2221
2019
Sealant
U-Channel
Sealant
Sealant
Header
Channel
Front
Front
23
Confirm the pivot side hole has been drilled in
the bottom track. If the hole has not been drilled,
perform step 14 now.
Pivot Hole
Apply sealant to the entire length of the groove
in the pivot jamb and the entire length of the
U-channel. Apply sealant in the header channel
only where the fixed panel inserts.
Install the strike jamb. Align the top holes in the strike
jamb with the slots. Level the strike jamb and loosely
tighten the three screws.
37
Inside of Shower
Inside of Shower
Sealant
Unsealed
Sealant
On the inside of the shower, apply sealant where the
fixed panel and the pivot jamb edges meet and between
the strike jamb and the bottom track only where shown
below.
Sealant
Sealant
Inside of Shower
On the inside of the shower, apply sealant where the
wall jambs meet the wall.
Outside of Shower
On the outside of the shower, apply sealant where the
strike jamb and pivot jamb meet the wall and where the
bottom track meets the receptor ledge.
Pivot Jamb
Inside of Shower
Header
1/8"
#8-18 x 3/8"
Strike Jamb
With the header in the final position, drill a 1/8" hole on
the inside of the shower. Secure the header to the strike
jamb with the screw.
Strike Side
Check the gap between the header and the door. If the
gap is uneven, adjust the header up or down on the
strike side until the gap is even.
Strike
Jamb
Pivot Block
Bolt
To adjust the door panel alignment, either reposition
the top and bottom pivot bolts or shift the pivot block
bolt to either side of the center hole. Adjust the strike
jamb alignment and tighten the screws.
Inside of Shower
Check for smooth operation. Binding or catching
against the bottom track will damage the seal.
Adjust if needed.
1/4"
11/32"
Pivot Block Bolt
#8-32 x 1-1/8"
Insert the 1-1/8” pivot block bolt through the center
hole in the header and into the small hole in the pivot
block. Insert and tighten the lock nut onto the pivot
block bolt.
Pivot Side
Large Hole
Insert the bottom door bolt into the bushing on bottom
track. Insert the top door bolt into the large hole in the
pivot block. If needed, lift the header slightly. Close the
door and adjust the door panel for a consistent gap
between the door handle and the strike jamb.
Seal
Press the seal into the bottom of the door frame.
Top
Bottom
7/16"
7/16"
Bushing
On the top and bottom of the door panel opposite the
handle, insert the bolt heads into the door channels.
Center and tighten the pivot bolts at dimension “C.“
1/4"-20
x 3/4"
1/4"-20
x 1-1/2"
Bushing
Assemble the bushing and nut on the 1-1/2" bolt.
Partially thread a nut onto the 3/4" bolt.
Top of Door
C
C
Door Handle
Starting from the handle, transfer and mark dimension
"C" along the top and bottom of the door panel.
Top View
Strike SidePivot Side
U-Channel
C
Bushing
On the bottom track insert the bushing into the hole on
the pivot side. Measure dimension ”C” from the base of
the strike jamb to the edge of the bushing.
Fixed Panel
Fixed
Panel
Header
Channel
Bottom
Top
U-Channel
Insert the fixed panel into the header channel and
the U-channel. If textured, install the texture
facing the outside of the shower.
Slide the fixed panel into the pivot jamb. The edge of the
panel will not be flush with the end of the U-channel
U-Channel
Pivot Jamb
Untextured Side
Sealant
Bumper Plug
Place a small amount of sealant into the
U-channel and insert the bumper plug.
U-Channel