
Installation Guide

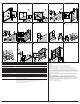


Reversible
Hanger
Bracket
x2
Gasket
No Gap
at Top
Sex Bolt
Hanger
Bracket
Barrel
Nut
8-32 x 1/4"
x2
Label Side
Roller
Screw
Label
x2
#8-32 x 3/8"
x2
Label
Side
#8-32 x 3/8"
Label
Screw
Rollers
Lower the glass.
Raise the glass.
Center of the
Bottom Track
Guide
Bottom Track
Bottom Track
Guide
Doors
Guide
Bottom Track
Bottom Track
Self-Tapping
Screws
Guide
Bracket
Towel Bar
x2
Bushing
1/4"-10 Screw
Rubber
Mallet
Cover
Troubleshooting
Symptom: Alignment Recommended Action
1. The top of the door panel is tilted away from
the wall.
A. Remove the door panel from the top track and lower the roller that is closest to the wall. See step 18.
2. The bottom of the door panel is tilted away
from the wall.
A. Remove the door panel from the top track and raise the roller that is closest to the wall. See step 18.
3. The door panel does not touch the bumper. A. Determine whether the door panel top or bottom is closer to the wall, and then adjust the roller closest to the wall.
4. The bottom track is miscut or skewed. A. The notched wall jamb fits over the bottom track to cover any miscut or skewed cuts. Seal as directed to ensure
proper watertight seal. See step 23.
Symptom: Water Leaks Recommended Action
1. Water leaks between panels. A. When showering, make sure the inside panel is against the showerhead wall.
2. Water leaks between the wall jamb and the
door panel.
A. Adjust the door panel to line up with the wall jamb. Add the optional seal. See step 24 and 25.
3. Water leaks under the bottom track. A. Check for proper silicone sealant application. See steps 22 and 23. Apply more silicone sealant in the leak location.
Symptom: Operation (open/close) Recommended Action
1. The outside panel is difficult to move. A. Ensure a gap exists between the bottom track and the door panel. If no gap exists, lower the rollers to the next hole.
B. Ensure the inside center guide is properly secured with the self-tapping screws. See step 21.
C. Ensure the rollers are properly installed. See steps 16 and 17.
D. Clean any debris in the top track groove.
2. The inside panel is difficult to move. A. Ensure a gap exists between the bottom track and the door panel. If no gap exists, lower the rollers to the next
hole.
B. Ensure the inside center guide is properly secured with the self-tapping screws. See step 21.
C. Ensure the rollers are properly installed. See steps 14 and 15.
D. Clean any debris in the top track groove.
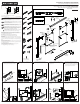
Position the top track over the wall jambs. Either
side of the top track may face out.
For both doors, slide a gasket over the top of the
glass panel and into each mounting hole. Press
the hanger bracket over the gasket and align the
hanger brackets with the mounting holes.
While pressing downward on the hanger
brackets, use screwdrivers to thread the bolt into
the barrel nut. Tighten until the hanger brackets
are secured firmly in place.
On the inside panel, assemble a roller to the
middle hole of each hanger bracket. Install
the rollers on the side of the door panel that is
opposite the label.
Lift the inside panel onto the inside track. The
label faces the outside of the shower.
On the outside panel, assemble a roller to the
middle hole of each hanger bracket. Install the
rollers on the same side of the door panel as the
label.
Lift the outside panel onto the outside track. The
label faces the outside of the shower.
If either panel needs adjustment, remove the
door and position the rollers in new holes to raise
or lower the glass.
Measure and mark the center of the bottom track.
Center the guide on the bottom track and align
the door panels with the guide.
On the inside of the shower, hold the guide
against the bottom track and slide the doors from
wall to wall. If the doors bind, refer to step 18 for
the adjustment procedure.
Hold the guide in place and secure with the two
self-tapping screws. Do not overtighten!
With a rubber mallet, tap the brackets into both
towel bars. Insert the bushings into the door
panel holes and secure the towel bars with the
screws. Do not overtighten! Snap the covers over
the bushings.
Outside the shower, use silicone sealant to seal
along the entire length of the wall jambs and the
bottom track.
Inside the shower, use silicone sealant to seal
along the entire length of the wall jambs and
where the wall jambs meet the bottom track.
21204886-2-C ©2014 Kohler Co.
11 12
17
22
13
18
23
16
21
14
19
24
15
20
STERLING® Warranty – Bath and Shower Doors
5-Years Limited
SP2375 5100 Series 5300 Series 5400 Series 6300 Series 6500 Series
3-Years Limited
1500 Series 1900 Series 2200 Series 4600 Series 4700 Series 4800 Series 4900 Series 5900 Series
1-Year Limited
500 Series 600 Series 660 Series 670 Series 690 Series 950 Series 2300 Series 3100 Series
Based on the classification specified above, STERLING bath and shower doors are warranted to be free of
manufacturing defects within the time of the specified model’s limited warranty from date of sale.
Kohler Co. will, at its election, repair, rectify or replace a fixture when inspection by Kohler Co. discloses any such
defects occurring in normal usage within the time period of coverage stated above. Kohler Co. is not responsible
for removal or installation costs where replacement is indicated. Damages due to improper handling, installation or
maintenance are not considered manufacturing defects and are not covered by this warranty. This warranty is valid
for the original, consumer purchaser only.
To obtain warranty service, contact Sterling, either through your plumbing contractor, home center, wholesaler or
dealer, or by calling or writing Sterling, Consumer Services, 444 Highland Drive, Kohler, Wisconsin 53044, 1-800-
783-7546.
TO THE EXTENT PERMITTED BY LAW, ALL IMPLIED WARRANTIES INCLUDING THOSE OF
MERCHANTABILITY AND FITNESS FOR A PARTICULAR PURPOSE ARE HEREBY DISCLAIMED.
KOHLER CO. AND SELLER HEREBY DISCLAIM ANY LIABILITY FOR SPECIAL, INCIDENTAL, OR
CONSEQUENTIAL DAMAGES. Some states/provinces do not allow limitations on how long an implied warranty
lasts, or the exclusion or limitation of special, incidental or consequential damages, so these limitations and
exclusions may not apply to you. This warranty gives you specific legal rights. You may have other rights which
vary from state/province to state/province.
This is the exclusive written warranty for Kohler Co.