
Installation Guide


9. Secure the Wall Surrounds
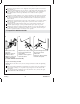
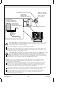
CAUTION: Risk of property damage. Wall surrounds must rest within 1/32″ (1
mm) (the thickness of a credit card) from the bath rim to ensure proper water
management and to prevent leakage.
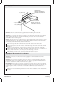
Remove the temporary roofing nail from the back wall.
Ensure that the wall surrounds are properly secured and seated on the bath. The
front edges of the end walls must be flush with the front edge of the bath. If a gap
exists, pull the end walls slightly forward.
CAUTION: Risk of product or property damage. Do not overtighten the screws.
Excessive tightening of the truss head screws can damage the wall flange.
Starting from the bottom of the end walls and working up, secure the end walls to
the studs approximately every 12″ (30.5 cm). Fasten the truss head screws through
the dimples on the wall flanges. Do not overtighten the screws.
NOTE: Leave a 1/8″ (3 mm) gap between the edge of the wall surround and the
finished wall material. When sealed, this gap will reduce the possibility of water
seeping into the wall material.
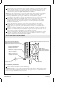
Ensure fiber or other soft insulation does not drop down into the water channel.
Cover or seal any loose material. Failure to do so may cause wicking of water
from the water channel into the insulation which may induce mold, leakage, or
mildew. Ensure the channels are free of debris after installation.
Secure the wall flanges across the top of the wall surrounds at every stud location.
Add shims if necessary to bring the studs into contact with the bath flange.
Cover the framing around the wall surrounds and over the bath flanges with
water-resistant wall material. Leave a 1/8″ (3 mm) gap between the wall
surrounds and the wall material.
1/32"
(1 mm)
Wall Surround
Mur avoisinant
Paredes circundantes
Bath
Baignoire
Bañera
Stud/Montant/Poste de madera
Wall Flange
Bride du mur
Reborde de la pared
Bath Flange
Bride de la baignoire
Reborde de la bañera
Shim if necessary.
Caler si nécessaire.
Utilice cuñas de
ser necesario.
Screw/Vis/Tornillo
1064906-2-C 26 Sterling