
Continuous Loss-in-Weight Blenders Instruction Manual

Continuous Loss-in-Weight Blenders Chapter 3: Installation 36
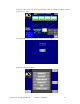
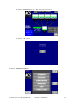
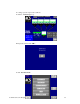
Touch “Feeder” button
Feeder Calibration is carried out as follows:
1. Select the feeder you want to calibrate and enter the value in Feeder# by
touching the adjacent box.
2. Determine the calibration weight and enter it in the box for Cal Wt. (This should
be about 10% of the hopper size.)
3. Enter the Calibration speed by touching the box adjacent to Cal Spd. (This
should be 60)
4. Touch the Press Here to Begin Box. The selected feeder will now start
dispensing resin until it reaches the calibration weight entered above.
5. Pressing Abort will stop the calibration if you have a problem.
6. Repeat this process for all feeders.
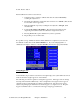
It is possible to forgo calibration after the initial calibration is complete if you note down
the calibration values listed in the CAL VALUES box. If you are changing back to a
calibrated resin simply touch the box under Cal Values and enter the appropriate number.
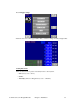
Setting Hopper Size
As the blenders are provided in several sizes and output ranges, the system will need to know
what size all of the weigh hoppers are on the blender.
The following is a reference guide for setting the hopper sizes. The hopper size can change
based upon the material’s bulk density. After a weight has been assigned to the hopper, it
should be monitored the first time it is filled to check the level. The hopper size can be
adjusted, depending upon whether the level in the hopper is too high or too low. Keep the
hopper level full at least 2 to 3 inches below the upper surge hopper refill valve.