
Granulators Operation and Installation Manual


Important!
Before carrying out any maintenance on the cutting chamber, the operator must
wear work gloves thick enough to avoid injury to the hands while touching sharp
parts or the cutting edges of the blades.
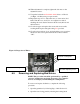
To inspect blades, remove the screen by following steps 1-0 in
Section 6-3. Then, proceed as follows:
1. Open the rear-closing panel by releasing the locking latch.
2. Pivot the in-feed hopper completely back to gain clear access
to the cutting chamber, and clear any process material or
foreign objects between the knives.
3. Turn the rotor slowly until the first row of rotor knives are in
close proximity to the bed knife cutting edge. Turn the rotor
backwards, keeping hands and fingers from directly contacting
sharp knife-edges.
4. Using a feeler gauge, measure the gap between the rotor and
knife cutting edges. Check each rotor knife to find the “high
knife” or the knife that measures the smallest gap. If the gap is
substantially greater than the specified 0.006” - 0.008” (0.15
mm – 0.2 mm), the knives need readjustment.
5. Loosen the bed knife shield hold down screws and remove the
shield. (See Error! Reference source not found..)
6. Leave the screws that hold the bed knife just tight enough to
allow the bed knife to move.
7. Loosen the adjustment screws and lock nuts. (See Error!
Reference source not found..)
8. Insert a 0.006” – 0.008” (0.15 mm – 0.2 mm) thickness gauge
between the cutting edge of the bed knife and that of the high
rotor knife.
9. Adjust the bed knife into the rotor knife using the adjustment
screws, so as to leave enough space for the thickness gauge to
move.
NOTE: Check that the distance between the fixed and rotating
knife is the same at both ends of each knife. Move the bed
knife using the push adjusting screws a little at a time on each
end.
Page 35 of 54