
Installation Guide


6. Install the Bath with a Drain Elbow
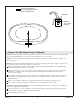
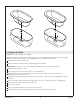
NOTE: To provide access for securing the faucet connections, position temporary blocks between the
apron and the bath rim.
With help, carefully lift the bath into place over the shroud and onto the temporary blocks.
For a rim-mount faucet, install the faucet and trim according to the faucet and trim instructions.
Make sure that there is adequate support under the bath rim to support the faucet. Refer to the
″Prepare the Rim-Mount Faucet (Optional)″ section.
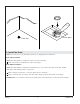
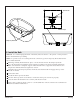
Carefully remove the temporary blocks. Make sure that the bath rim engages the top of the shroud
on all sides, and that the bottom of the bath contacts the elbow drain gasket.
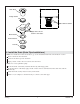
Unscrew the drain cap from the drain.
Apply a bead of 100% silicone sealant to the drain hole.
NOTE: Do not use plumbers putty.
NOTE: The friction washer, mack washer, and locknut are not required when installing a drain elbow.
Install the flange gasket and drain body to the drain hole.
Thread the drain body into the drain elbow.
Thread the drain cap into the drain.
Press the drain cap down several times to ensure the drain opens and closes properly.
Close the drain. Fill the bath to the overflow, and check for leaks.
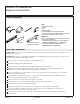
Apply a thin, continuous bead of clear or color-matched 100% silicone sealant to the seam between
the shroud and the finished floor.
Temporary Blocks
Sterling 9 1383921-2-B