
Installation Guide


1. Prepare the Rim-Mount Faucet (Optional)
NOTICE: Before installing a rim-mount bath faucet, refer to the specification sheet on the bath product
page at sterlingplumbing.com for faucet location dimensions for your model.
NOTICE: To accommodate the bath shroud, use flexible connections to attach the water supplies to a
rim-mount faucet.
NOTICE: For rim-mount faucet installations, route the water supply lines high enough to permit access
for making the final connections from above the shroud.
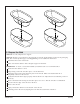
Refer to the specification sheet on the bath product page at sterlingplumbing.com to determine the
recommended faucet location for your bath.
Measure and cut a piece of 1/2″ (13 mm) exterior grade plywood to support the faucet. The board
should be 3″ (76 mm) wide. The length should extend beyond the width of the faucet holes to
ensure proper support.
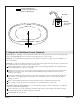
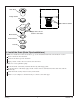
Locate the faucet in the desired location on the bath rim. Make sure the faucet trim fits on the bath
rim without overhanging. Make sure that there is no interference above or below the rim before
drilling any holes.
Refer to the installation instructions packed with the faucet to determine faucet hole size.
Use a pencil to mark the faucet hole centerlines. Do not drill the holes at this time.
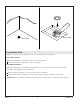
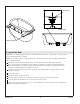
CAUTION: Risk of product damage. To avoid scratching the bath, position a thin piece of cardboard
under any clamps before tightening.
Position the plywood on the underside of the rim, then clamp in place. Make sure that the clamps
do not directly contact the finished surface of the bath.
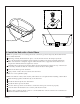
Carefully drill the faucet holes.
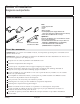
Bath Rim
3" (76 mm)
Minimum
1/2" (13 mm)
Plywood
Recommended Faucet
Location (See Specification
Sheet for Dimensions)
Sterling 3 1383921-2-B