
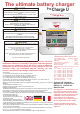
Product Manual


INSTALLATION OF THE BATTERY CHARGER sulphation light will flash, continue to the next setting, the 2 x
voltmeters will display “FAC” “DEF” for factory default.
- Position the charger in a cool, dry and well ventilated space, ensuring a reasonable airflow
4. Press the “Setup/Enter” button to confirm selection, the charger will re-
around the charger. Do not install in a cupboard or sealed compartment.
boot.
Charger MUST be installed vertically.
POWER LEVEL ADJUSTMENT
Install as close to the batteries as possible, preferably within 2 meters of the batteries.
1. Hold the“↑” and “↓” buttons simultaneously for about 20 sec
2. Volts will display “PL” for Power Level, and the amps 100 for 100%
To obtain maximum waterproof/ingressproof rating (IP42) mount the charger vertically.
However, the unit will work just as well in any fastening orientation so long as it is dry.
3. Press the “↓” to adjust the amperage display from 100, 75, 50, 25%
With regards charging cooling, the unit has thermostatically controlled force draft cooling and
output.
is thus able to remain cool whether fastened in any orientation.
4. Press the “Setup/Enter” button to confirm selection.
NOTE: If no action is taken after 15 seconds, the unit reverts to 100%
Always isolate the A/C power before working on it
power.
- - Before switching on the charger it is important to set up the battery type. Please choose a
OPTIONAL REMOTE
battery type from the table (at the bottom of page 2). There are so many different profiles, and
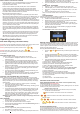
When the optional remote is installed, it will display the current status of the
battery companies change them all the time. It is impossible to keep up, so in order to assist
charger along with the voltage and amperage.
our customers we offer the option of preset battery types: Flooded, sealed, AGM, Gel,
1. The Blue LED is illuminated when the power is ON
LiFePO4, calcium and custom. Each type has 2 preset algorithms, for instance: Gel preset 1 is
2. BACK LIGHT can be set to ON or OFF by toggling the on/off button,
the USA Gel spec (absorption 14.0V and float 13.7V) and Gel preset 2 is the Europe Gel spec
with short sharp action. The default is ON.
(absorption 14.4V and float 13.7V). We also provide the charge voltages related to this cycle.
3 To switch the product off hold the button for about 3 seconds and
In most cases these are correct; however, if in doubt install on the lower voltage setting until
release, the unit will shut down, to switch back on again simply push
you have checked with your battery supplier.
the button and the unit will restart.
- In the event of different types of batteries, the lowest battery voltage type must be selected.
4 ALARM can be silenced or made audible by toggling the ALARM
Never charge a battery on a higher setting than it should. If a bespoke battery is being used
button, default is audible
then use the CUSTOM setting, this gives the user the ability to set their own absorption/float
PROGRAMMING USING THE OPTIONAL REMOTE.
voltages.
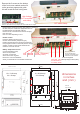
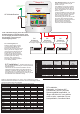
- Connect the cables as in the diagram. Ensure that all the terminals are used. In the event of
only one battery being charged, connect the surplus positive output to another used output.
This ensures correct regulation. Failure to do this will reduce the charging performance.
- IMPORTANT: Always connect the cables to the charger first then run them to the batteries.
Never connect to the batteries first and then run to the charger.
Operating Instructions
Remote control operation. When installing the remote control from new,
if the charger is already on and you add the remote control the remote will not
the unit can be switched off using the controls on the charger main control
work, you must add the remote control then switch the charger off for 1 min then
panel ( it can also be switched on/off on the remote ( see later )
switch on again to reset the software, the charger will then pick up the remote’s
presence and the remote will work.
press setup and the up button, hold for 10 sec.
Pressing SETUP/ENTER displays “SCROLLING”
press setup / enter and down for 10 sec.
1. using the and directional keys scroll through the below menu
The blue A/C power LED will flash to show the power is available but the unit is
items.
not activated
2. Pressing SETUP/ENTER . Enter scroll mode and it will display
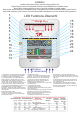
SELECTING BATTERY TYPE
automatically each option every 10 seconds, or you can use the arrow
To select a battery type/charging profile perform the following:
buttons to speed up the scroll time if you need to get to information
1. Press and hold the “Setup/Enter” button for over 10 seconds, then
faster.
release the button
3. Using the directional keys again will display additional options to be
2. The current battery type and Voltage/Amperage displays will flash. The
selected, press SETUP/ENTER when done.
voltage and ammeter will now display voltage, the left hand screen
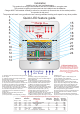
1) Charger name = displays charger model.
(marked voltmeter) will show the high charge voltage setting and the
2) Charger status = displays charging /absorbation/float status.
right hand screen (marked ammeter) will show the low charge / float /
3) Battery type selection, scroll through the battery types.
power pack voltage setting.
4) Time to absorption= displays the time left in absorption mode.
5) Run Time = displays units total running time.
3. Use the “↑” and “↓” keys to scroll through all the different battery types.
6) Power Level= displays current output power levels, allows for power
The LED display on the charger in the battery type section will move
reduction in this screen, push enter again to power reduce.
through the different types.
7) Charger temperature
4. The Volts and Amps readout will display the charge/conditioning and
8) Battery temperature = displays battery temperature
float voltages for each profile highlighted.
10) Transformer temperature = displays the transformer temperature
5. Press the “Setup/Enter” button to confirm selection, the LED will remain
11) Faults = displays any faults active or simply ”No faults displayed”
solid or leave for 30 seconds and the selection will be locked in
12) Company information
automatically .
13) Total run time
ADJUSTING THE CUSTOM BATTERY TYPE SELECTION
14) Software version = the installed software version
NOTE: *Damage can result to your batteries from improper use of the custom
setting. Any damage experienced while using this setting is the responsibility
of the user and not covered by any Sterling warranty. ALWAYS consult the
IMPORTANT SAFETY INSTRUCTIONS
battery manufacturer if you are unsure of the battery chemistry and charge
SAVE THESE INSTRUCTIONS - this manual contains important safety
profile required.
instructions for the
1. Follow above steps and select the “Custom” option on the battery
1) Do not expose this unit to rain or snow
type display and press enter to enter it.
2) Use of attachments not recommended or sold by Sterling Power, LLC will void
2. The “Fast charge & Adsorption” LEDs will be blinking, indicating you are
warranty and may result in the risk of fire.
in the adjustment mode
Remote control short cuts
4. The left hand meter will blink and the right hand meter will go out. The
By pressing the below sequence on the remote control you can quickly
numbers on the left hand meter will be the high voltage setting, adjust
access the most used functions
as required by using the “↑” and “↓” to select voltage up to 15.1V,
press enter when you have selected the correct voltage, then the right
press and hold for 10 seconds to force into “Float Mode”.
hand screen will flash, this is the float voltage settings again using the
arrows to set this voltage then press enter to finish.
press and hold for 15 seconds for direct access to power
NOTE: During this process, real-time voltage and amperages will not be
displayed.
reduction mode.
SELF TEST MODE
1. Press and hold the “Setup/Enter” and the “↑” and “↓” buttons
press these 3 and hold for 5 seconds to start a self test
simultaneously for 10 seconds then release
2. The “Self Test” LED will flash until the test is complete
press and hold for 3 seconds- restores factory
3. OK or Fault LED's will be displayed, see the Troubleshooting section if
defaults.
the Fault LED is illuminated.
SHOCK OR PERSONAL INJURY.
FACTORY RESET
3) Do not operate the unit if it has been dropped or visibly damaged in any way
To return the unit to original factory settings (Flooded Lead Acid)
4) Do not disassemble the unit. If service or repair is required please contact
1. Enter battery type selection as above
Sterling at www.sterling-power.com or www.sterling-power-usa.com
2. Use the “↓” key until you leave the battery type LED panel then the de-
5) To reduce the risk of electrical shock, remove connection to AC shore / station
From main charge only (not remote control)
On/off
Unit On
Unit Off
Pro Charge Ultra
Setup
Enter
Setup
Enter
Setup
Enter
Setup
Enter
Alarm
Setup
Enter