
Extreme Duty Shredder Instruction Manual


BJ5-620 Maintenance 48 of 73
3. Put in the cutter holder mounting bolts (DIN912 – M10x30 – 12.9) and put some
Loctite on them.
4. Make sure that the cutter holder fits properly.
5. Tighten the cutter mounting bolts using a torque wrench.
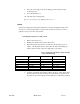
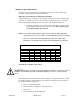
NOTE: The required torque for the cutter holder mounting bolts is 83
Nm
(also see the table under “Replacing and checking the cutting knife
mountings”).
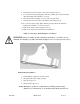
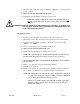
WARNING! Danger of cutting caused by sharp knives at all times—even when rotor
is at standstill. Serious Injury especially to the hands and fingers can
occur. Wear protective gloves!
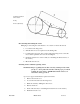
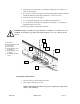
Mounting the Cutters
1. Clean the cutter supporting surface and the hole on the cutter holder.
2. Insert sharp cutter or turn old cutter and push against the cutter holder surface.
3. Put in the cutter mounting bolt (DIN912 – M16x50 – 12.9) and the washer
(DIN433 – 17 – 300HV).
4. Screw in the mounting screws and tighten lightly first.
5. Make sure the cutter fits planar in the seat.
6. Tighten the cutter mounting bolts using a torque wrench.
NOTE: The required torque for all cutter mounting bolts is 355 Nm (also see
the table under “Replacing and checking the cutting cutter mountings”).
7. Check if the cutting gap is correct and if the cutting knives do not collide as
the rotor turns.
8. Remove tools and other objects from the cutting chamber.
9. Put back screen and fix it.
10. Switch on the shredder for a short time without grinding material, and listen for
noises. If there are unusual noises, determine the cause and eliminate it.
NOTE: The cutting knives, in particular the cutters, should only be sharpened
or replaced in sets. There is a danger of balance error if a combination
of rotor knives from different cutter sets is used.
Cutters are reversible and have four symmetrical cutting edges. This
makes it possible to turn the knives and only to sharpen after every
fourth cutter change.