
Installation Guide

Install
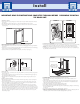
FIGURE A:
Caulk
Pre-hanging Plug:
Leave in place until unit
is temporarily fastened.
Pre-hanging Plug Screw:
Remove the screw
before fastening the unit.
FIGURE B:
FIGURE E:
Bottom Door Sweep
Threshold Screws:
Adjust all sill screws
half turn up or down,
only if necessary.
FIGURE C:
Security Plate
(Do not remove)
FIGURE D:
Shim at every arrow location.
(Be sure to shim
behind each hinge)
IMPORTANT: READ THE INSTRUCTIONS COMPLETELY THROUGH BEFORE BEGINNING TO INSTALL
THE DOOR UNIT.
1. PREPARE THE OPENING
• Thethreesidesoftheroughopeningmustbeinthesameplaneforproperinstallationandoperationofthedoor
(See figure A).
• Theroughframedopeningshouldbeabout1to2incheswiderandtallerthanthedoorunititself.
• Theoorareashouldbeclean,dryandlevel.Applygenerousamountsofcaulktooorwherethethresholdwill
rest (See figure A).
2.BEFOREYOUINSTALLTHEDOORUNIT
• Ifyourunithasanytypeofbraceunderthesillorskidprotectors,pleaseremoveatthispoint.
• Beforeinstallingthedoorunityoumustremovethescrewfromthepre-hangingplugbeforeyoubegininstallation
(See figure B).
• However,donotremovethepre-hangingplugitselfuntiltheunitistemporarilyfastenedinplace.ThePre-hanging
plug is necessary to hold the door closed during installation.
• Ifyourdoorunithasasecurityplatefastenedtothelockjamb,donotremoveit(SeegureC).
5.PERMANENTLYFASTENTHEUNIT
• Important:Werecommendreplacingonescrewoneachjamb-sidehingewitha3”or3-1/2”screw(notprovided)
to securely fasten the unit on the hinge side of the door unit. Be sure you have shimmed behind each hinge.
• Besureyouhaveshimmedthelocksideofthedoorunitinatleast3placesalongtheverticallockjamb(See
figure D).
• Oncealignmentiscorrect,permanentlyscrewtheunitintoplaceusing2”drywallscrews(notprovided)through
the jamb and the shims then into the stud.
3.SETTINGTHEUNIT
• Fromoutsideyourhome,centerthedoorunitintheopeningandtiltintoposition.Assureuniformspacingaround
theunit(SeegureC).
• Shimunitinplacebydrivingtheshimsfromtheinteriorside.Besuretoshimbehindeachhinge(SeegureD).
Note: shimming the header is not necessary.
• Plumbandsquareoneverticaljamb,thentemporarilyfastentheunitintoplaceusing3”drywallscrews(not
supplied).
4.CHECKFORPROPERALIGNMENT
• Plumbandsquaretheotherverticaljamb.Shimbetweenjambandroughopeningtoassureproperalignment.
Also shim behind each hinge.
• Removepre-hangplugfromtheborehole.Openandclosethedoor.Thereshouldbeuniformspacing(1/8”)
betweendoorandjambonthetwosidesandthetopofthedoor.Makeanynecessaryadjustmentstotheunit
now, to assure uniform spacing around the door, before proceeding.
• Besurethedoorsweepcontactsthethresholdevenly.Makenecessaryadjustmentsnow,beforeproceeding.
• Testtheadjustablethreshold(SeegureE).Totest,placeasheetofpaperoverthethresholdandclosethedoor
then, pull on the paper. If the threshold adjustment is correct there will be some tension on the paper as you pull it.
If the paper tears, the threshold is too high. If there is no tension at all on the paper when you pull it, the threshold
istoolow.Toadjustthethreshold,tightenorloosenallscrewsonthesill,1/2aturnatatime(lefttoloosenand
right to tighten. Then repeat the paper test. Remember you want the paper to have some tension as you pull it,
without tearing the paper.
6.COMPLETIONSTEPS
• Installlocksethardwareinaccordancewithhardwaremanufacturer’sinstructions.
• Applyinteriorandexteriorcasingormoldingasdesired.Note:Yourdoorunitmayalreadyhaveexterior
brickmoldapplied.
• Caulkaroundtheentireframe/brickmoldoftheexteriorwall,usingahighqualityexteriorgradecaulk.Caulk
wherethejambsandthresholdmeet,andontheexterioredgeofthethreshold.Thenifneededaddabeadof
caulkbetweenthejambandthethreshold(SeegureE).
• Followthepaintmanufacturer’sinstructionsforpaintingornishingthejamb.
• Removeadhesivebackingfromdustpad(includedwiththeseinstructions).
• Placedustpadrightabovethesillwiththethickeredgeundertheweather-stripping,makingsurethethinneredge
does not protrude past the jamb.
(See figure E).
• Donotpaintornishthebottomdoorsweep,weather-stripping,ordustpad.
If these pieces are painted or finished your door will not seal properly.
• Makesureyouleavethedooropenlongenoughtoensureproperdryingafterpaintingornishingthejamb.This
isimportant,wetpaintornishwillsticktotheweather-strippingthenalteritsperformance.