
Instructions / Assembly

IMPORTANT BEFORE YOU BEGIN
SHOULD YOU NEED ANY PARTS ASSISTANCE, PLEASE CALL 1-800-617-8586.
SERVICE HOURS: WEEKDAYS 8:00 am - 5:00 pm CST
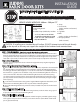
Box Contents:
1 Barn Door
1 Mounting Board
1 Rail
2 Roller Straps (with bolts, washers
and nuts)
Note: 2 sets of roller
strap bolts provided for use with
1-3/4” or 1-3/8” (most common
size) door thickness
DO NOT RETURN DOOR TO STORE FOR MISSING PARTS.
BARN DOOR KITS
SLIDING
INSTALLATION
GUIDE
2 Stops
1 Door Guide
(with 2 anchors and screws)
5 Spacers
5 Lag Bolts
5 Bolts
(with 5 washers and anchors)
2 Anti-jump Blocks
(with 2 screws)
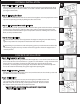
Step 1. Door Preparation
Step 2. Door Preparation
Position each anti-jump block at least 1” from the edge of the straps. Tighten slightly to
secure in place..
2
Position each strap to the front side of the door and center to the stile or a minimum of 2”
from the edge of the door. Cut a piece of cardboard 2-1/4” high and place between the wheel
(inner groove) and the top of the door to correctly position the height of the straps. Mark
holes with a pencil and pre-drill 3/8” holes, then secure into place. Repeat for second strap.
DRYWALL INSTALLATION
1
!
CAUTION If installing on a standard drywall surface, DO NOT attempt to install the rail directly
to the drywall as this may not support the weight of the hardware and mounted door.
See back page for door nishing information.
!
4
3
Step 5. Rail Installation - Drywall
Install rail centered onto the Mounting Board and wall using the provided lag bolts. Align
each lag bolt and spacer to the rail holes, secure with a wrench. (Note: Wide end of round
spacer goes toward wall)
Step 3. Wall & Mounting Board Preparation - Drywall
A. The solid wood Mounting Board (included in Barn Door Kit) is required to be mounted to
the drywall before proceeding with the rail installation. Position the Mounting Board by
measuring up from the door height (H) + 1-3/4” to the center of the track/Mounting Board.
Ensure there is a gap of 3/8” at the bottom. Lastly, ensure the Mounting Board is level and
leave a minimum of 2” from the end of the Mounting Board to the side of the opening
(as shown). (Note: If installing with an opening for 80” standard door size with low ceiling,
you may need to remove the top trim and cut the side trim horizontally along the height
of the opening.)
Step 4. Wall Preparation - Drywall
Position the rail on top of the Trim Board ensuring levelness, mark the holes using a pancil
and pre-drill 5/16” holes into the Mounting Board.
B.
Locate the wall stud locations along entire length of Mounting Board above door, mark
stud locations on Mounting Board. Drill 1/8” pilot holes in Mounting Board.
C.
Install the Mounting Board using 3” wood screws (included in kit) into the marked stud
locations.
2-1/4”
Center of stile or
a minimum of 2”
Mounting Board (x1)
Barn Door (x1)