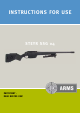
Instructions for Use STEYR SSG 04 IMPORTANT READ BEFORE USE!
WARNING: Cleaning liquids or lubricants or insect repellents which contain solvents, may damage the synthetic parts of the weapon or even may damage them. CAUTION! Before unpacking and using the rifle read this Operator’s manual; it will warn the owner/user against possible dangers that could be caused by misuse, which might lead to accidents. This manual will familiarize you with the rifle’s function and safe handling characteristics.
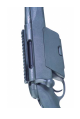
STEYR SSG 04 with optional optic
MAINTENANCE NOTES: PERSONAL NOTES:
Edition US 02 STEYR ARMS, Inc. P.O. BOX 2609 CUMMING, GA. 30028 U.S.A. Tel. (770) 888-4201 Fax. (770) 888-4863 www.steyrarms.com STEYR MANNLICHER GmbH & Co KG Ramingtal 46 4442 Kleinraming Austria office@steyr-mannlicher.com www.steyr-mannlicher.
Dear Customer, With the purchase of the repeating rifle manufactured by STEYR MANNLICHER, you have acquired a hunting rifle which meets the highest quality standards. This rifle has been conceived to stateof-the-art requirements of today‘s hunting sports. Unsurpassed performance, superb quality, optimum user comfort in handling, and long service life have been the parameters this new development has been designed for.
OWNER’S MANUAL STEYR SSG 04 PREFACE This manual and the warnings contained herein must be read and understood before using your rifle. This manual familiarizes the user with the function and the handling of the rifle and warns against the potential dangers of misuse that may lead to accidents or injuries. This manual should always accompany this firearm and be transferred with it upon change of ownership, or when the firearm is loaned or presented to another person.
DECLARATION OF CONFORMITY
TABLE OF CONTENTS 1. Special Notes and Warnings ............................................ 5 2. Definition of Terms .......................................................... 11 3. Technical Data .................................................................. 12 4. Before Shooting ............................................................... 12 5. Safety Features ................................................................ 13 6. Trigger ......................................................
1. SPECIAL NOTES AND WARNINGS INTRODUCTION CAUTION The higher level of preparedness required of law enforcement and military personnel may override several of the following safety instructions. To provide safety while operating at a higher level of preparedness, proper oriented training and a reasonable amount of periodic training, which stresses safe tactical procedures, is recommended.
THE USER SHOULD EXERCISE EXTREME CAUTION AFTER REMOVING THE MAGAZINE AND PERSONALLY MUST VERIFY THAT THE CHAMBER IS ALSO EMPTY BEFORE FIELD STRIPPING THE FIREARM FOR CLEANING OR ANY OTHER REASON. WARNING IF THE STEYR RIFLE OR ANY OTHER FIREARM IS CARELESSLY OR IMPROPERLY HANDLED, THE USER COULD CAUSE AN UNINTENTIONAL DISCHARGE, WHICH COULD RESULT IN DEATH, SERIOUS INJURY AND/OR PROPERTY DAMAGE. SAFETY INSTRUCTIONS We want you to enjoy shooting your STEYR RIFLE, but we want you to enjoy it safely.
WARNING In case any of the rifle’s safeties proves to be ineffective for any reason, DANGER of an unintentional discharge exists. THE RIFLE IS THEN TO BE IMMEDIATELY UNLOADED AND RESTRICTED FOR ANY FURTHER USE. MAKE SURE THAT YOUR RIFLE IS PROPERLY REPAIRED AND CHECKED BY STEYR AUTHORIZED PERSONNEL BEFORE USING IT AGAIN! GENERAL PRECAUTIONS 1 ALWAYS HANDLE YOUR RIFLE AS IF IT WERE LOADED SO THAT YOU NEVER FIRE ACCIDENTALLY. 2 NEVER POINT YOUR RIFLE AT ANYTHING YOU DO NOT INTEND TO SHOOT.
8 ALWAYS BE SURE YOUR BACKSTOP IS ADEQUATE TO STOP AND CONTAIN BULLETS BEFORE BEGINNING TARGET PRACTICE SO THAT YOU DO NOT HIT ANYTHING OUTSIDE THE SHOOTING RANGE AREA. 9 ALWAYS BE ABSOLUTELY SURE OF YOUR TARGET AND THE AREA BEHIND IT BEFORE YOU SQUEEZE THE TRIGGER. A BULLET COULD TRAVEL THROUGH OR PAST YOUR TARGET UP TO 3,5 MILES (APPR. 5,6 KM). IF IN DOUBT DO NOT SHOOT.
INDENT ON PRIMER APPEARS NORMAL (IN COMPARISON WITH SIMILAR PREVIOUSLY FIRED ROUNDS) ASSUME FAULTY AMMUNITION. SEPARATE ROUND FROM OTHER LIVE AMMUNITION AND EMPTY CASES, RELOAD AND CARRY ON FIRING. NOTE: Dispose of misfired rounds in accordance with ammunition manufacturer’s instruction. 16 NEVER FIRE YOUR RIFLE NEAR AN ANIMAL UNLESS IT IS TRAINED TO ACCEPT THAT NOISE, AN ANIMAL’S STARTLED REACTION COULD INJURE IT OR CAUSE AN ACCIDENT.
ENOUGH FORCE TO CAUSE INJURY. NEVER PLACE FINGERS IN EJECTION PORT OR ON HOT SLIDE OR BARREL DURING OR AFTER FIRING, AS THEY COULD BE BURNED BY HOT METAL. 23 NEVER PLACE FINGERS IN EJECTION PORT. THEY COULD BE INJURED BY THE BOLT MOVING FORWARD UNINTENTIONALLY. 24 ONLY USE HIGH QUALITY COMMERCIALLY MANUFACTURED AMMUNITION IN EXCELLENT CONDITION AND IN THE CALIBER OF YOUR RIFLE.
2.
3. TECHNICAL DATA Calibre: STEYR SSG 04 ..................................... .308 Win., 300 Win.Mag. Overall length of rifle: Barrel 600mm / 23,6” ......................... 1117mm / 44“ Barrel 508mm / 20” ............................ 1083mm / 42,6“ Barrel length: Calibre .308 Win. ................................. 600mm / 23,6” Calibre .308 Win. ................................. 508mm / 20” Calibre 300 Win.Mag ...........................
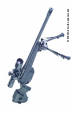
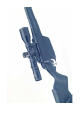
5. SAFETY The safety can be operated only when the weapon is cocked or the bolt handle is open! The „2 + 1 positions STEYR MANNLICHER safety“ Firing Position: CAUTION The cocked weapon is ready for firing, when the red dot is visible. The rotary slide is rotated fully forward. Safety Position: By turning the rotary safety backward until a noticeable click can be felt, the safety is brought into loading position.
Optional Lock Position: Trigger is locked, bolt cannot be opened. To put the weapon on safe, the rotary safety slide on the butt neck must be rotated backward until the gray lock engages. The gray lock and the white dot on the safety are visible; the gray lock can also be felt as a protrusion for operation in darkness. In this position, the bolt cannot be opened. The set trigger is automatically uncocked when safety is on. The set trigger cannot be moved into set position.
6. TRIGGER The STEYR SSG 04 comes with a direct trigger. 6.1 Direct Trigger The weapon has been factory-set to optimal trigger characteristics.
7. REMOVING THE MAGAZINE Press the two snap latches at the right and the left of the magazine fully together using thumb and index finger of one hand and remove the magazine while pressing. 8. LOADING/INSERTING THE MAGAZINE Loading Place cartridge on top of the magazine and push in by thumb pressure. Magazine Capacity: Calibre .308 Win.: 10 cartridges HC magazine Calibre 300 Win.Mag.
Inserting the magazine into the rifle The magazine can be locked in the rifle in 2 positions: Normal position Insert the magazine into the rifle and press it in until it locks with an audible click. If the magazine is to be inserted without any noise, the two snap latches must be pressed against each other and the magazine pressed in until the two latches lock. The inserted magazine will be flush with the stock. When the bolt is operated, a cartridge will be chambered from the magazine.
9. LOADING / UNLOADING Loading: Move rotary safety of the rifle to position “Safety“. Turn bolt handle 70° upwards to unlock the bolt. Pull bolt all the way to the back by the bolt handle. When moving the bolt forward, a cartridge will be fed into the cartridge chamber of the barrel and by turning the bolt handle down, the action will be locked.
Release safety only shortly before firing the shot. If the weapon has to be reloaded after firing a shot, the bolt handle must be opened. By retracting the bolt, the spent cartridge shell will be extracted and ejected. Moving the bolt forward will feed a new cartridge into the cartridge chamber of the barrel. Relock the bolt by turning the bolt handle. Move rotary safety back to position “Safe“. The rifle is loaded, cocked, and safe, again.
Unloading: Move rotary safety in position “Safe“ (only white dot is visible). Remove magazine or lock it in second position (magazine protrudes by approx. 5 mm/ 0,19“). By opening the bolt handle and retracting the bolt, the cartridge located in the loading chamber of the barrel will be extracted and ejected. Make certain that no cartridge is in the chamber. Close the bolt.
10. REMOVING THE BOLT Removal of the bolt is recommended to facilitate proper cleaning of the barrel. 1. With your right hand, turn bolt handle 70° to the left (unlocking). 2. Move rotary safety to position “Lock“ (gray lock snaps out). 3. Hold bolt by the bolt handle and extract it from the receiver.
In the Steyr SSG 04 model, the cheek piece first has to be brought in the uppermost position. Turn rotary safety in Lock position (gray lock will snap out), retract bolt from receiver and turn bolt handle downwards, so that the rear part of the bolt disappears in the cheek piece.
Removing the cheek piece: The cheek piece is connected to the stock with a screw and by means of a snap-on mechanism.
11. REINSERTING THE BOLT INTO THE RECEIVER First, make certain that the magazine has been removed or locked in second position and the weapon is unloaded! When reinserting the bolt into the receiver the rotary safety will be in “Lock“ position. Hold the bolt by the bolt handle and insert it into the receiver. When inserting the bolt, rotate the bolt so that the bolt handle slides into the slot of the receiver.
13. DISASSEMBLING THE RIFLE Complete disassembly of the rifle by the user usually is not required. The two screws at the bottom side of the rifle connect the HC-adapter to the stock. If these screws are loosened, they have to be retightened again with a torque wrench (7 Nm). WARNING: When removing the action from the rifle, the hex screw at the front bottom side of the receiver must never be loosened. The screw has been factory-tightened with a torque of 10 Nm.
14. DISASSEMBLING THE BOLT Under normal circumstances, the bolt doesn’t need to be disassembled. It has been permanently lubricated by the factory. As a rule, occasional inspection by the gunsmith of your franchised MANNLICHER Dealer should be sufficient to ensure adequate maintenance. If you wish, you may ask an expert gunsmith to instruct you in the disassembly and reassembly of the bolt.
CAUTION: When disassembling, never rotate the bolt sleeve in counterclockwise direction. Otherwise, the bolt could not be reinserted into the receiver. Reassembling the bolt: Grip the bolt with your left hand. Insert firing pin assembly into bolt with the cocking piece aligned directly opposite to the bolt handle. Using your right hand, slide the bolt sleeve on the cocking piece until it stops, simultaneously pressing the catch lever with your thumb.
15. FIXING THE BIPOD The unloaded and safe rifle (Lock position) is pointed in a safe direction.
16. ADJUSTING LENGTH OF PULL The butt plate can be removed using a screw driver. The length of pull may be adjusted individually by means of spacers. 17. ADJUSTING THE BUTT PLATE The butt plate of the Steyr SSG 04 model can be adjusted for height to meet the shooter’s individual requirements. Loosen fastening screw, move butt plate to desired position, retighten fastening screw. 18.
19. ACCESSORIES The following optional accessories are available: • Stock spacers • HC magazine 20. MOUNTING OF HC-ADAPTER Disassembling: Remove magazine and bolt. Remove both screws with Allen key, wrench size 5 mm. Assembling: Slip on HC- adapter to the front and rear screw, ensure correct alignment. Turn in screws and tighten it with a torque wrench (7 Nm).
21. CLEANING AND MAINTENANCE The action of the STEYR SSG 04 has been designed to require no maintenance for prolonged periods. Never use steel brushes to clean the barrel. The recommended cleaning material is silk noil or cotton wool which should be soaked with a special barrel oil or a high quality gun oil for pre-cleaning or final oiling. Special agents for removing copper deposits may be used as directed. Make sure to always clean the barrel from rear to front.
The synthetic stock should be cleaned with mild soap and water. All external metal surfaces should be treated with a gun oil that creeps under moisture and does not emulsify. For the scope mount and all movable parts, special permanent lubricants are recommended. Make sure to always keep the scope mount free of any contamination, in particular, the pivot pin of the front base and the mechanical parts. Grease slightly from time to time.
22. SERVICE Prior to shipment, your rifle has been subjected to thorough quality assurance inspections. If your rifle should require a replacement of parts or repair, such replacement or repair work may be done only by an authorized and qualified gunsmith. Please contact one of our authorized STEYR MANNLICHER dealers.
23. DEALING WITH STOPPAGES If the STEYR rifle is kept clean and given proper care it will function very reliably. Nevertheless if jams occur, follow this procedure: • • • • Keep the STEYR rifle pointed in a safe direction. Put the STEYR rifle on safe and remove the magazine. Pull back bolt entirely, in order to throw out jammed cartridge. Be sure there is no obstruction in the barrel before attempting to chamber another cartridge. • Push forward the bolt.
35 Failure to feed cartridge Bolt cannot be locked Cartridge did not ignite Cartridge case is not extracted Cartridge case is extracted, but 1 2 3 4 5 ejected faultily or not at all Nature of blockage No.
Guaranteed Steyr Mannlicher accuracy Steyr Mannlicher barrels are made from high quality barrel steel and are produced according to the latest findings in barrel production technology. Our weapons are well known for their outstanding accuracy. However, the accuracy of a weapon depends on several factors. The correct holding of the rifle without additional force onto the free floating barrel or the optical sight and a not excessively hard rifle rest are pre-condition to get an excellent accuracy.
37
38
24. PARTS LIST ITEM DENOMINATION STANDARD QUANTITY BARREL - RECEIVER 1 BARREL 1 pcs. 2 RECEIVER 1 pcs. 3 MAGAZINE WELL 1 pcs. 4 LOCKING BUSH 1 pcs. 5 BEDDING BLOCK 1 pcs. 6 BEDDING BLOCK SCREW 1 pcs. 7 SAFETY BUSHING 1 pcs. 8 SOCKET HEAD CAP SCREW 1 pcs. 9 NUT 1 pcs. 10 COMPENSATOR 1 pcs. 11 PICATINNY RAIL 1 pcs. 12 SCREW 4 pcs.
40
24. PARTS LIST ITEM DENOMINATION STANDARD QUANTITY BOLT GROUP 1 HEADLESS SET SCREW 2 BOLT 1 pcs. 1 pcs. 3 BOLT HANDLE SCOUT SPORT 1 pcs. 4 HEADLESS SET SCREW 3 pcs. 5 HANDLE GRIP SCOUT 1 pcs. 6 FIRING PIN 1 pcs. 7 CAM SLEEVE 1 pcs. 8 FIRING PIN LUG 1 pcs. 9 EXTRACTOR 1 pcs. 10 SPRING 1 pcs. 11 EJECTOR 1 pcs. 12 RATCHET LEVER 1 pcs. 13 PRESSURE SPRING 1 pcs. 14 RATCHET LEVER SPRING 1 pcs.
TRIGGER GROUP 1 MAGAZINE GROUP HIGH CAPACITY 1 42
24. PARTS LIST ITEM DENOMINATION STANDARD QUANTITY TRIGGER GROUP 1 DIRECT TRIGGER 1 pcs. MAGAZINE GROUP 1 MAGAZINE HC (HIGH CAPACITY) 43 1 pcs.
44
24. PARTS LIST ITEM DENOMINATION STANDARD QUANTITY STOCK GROUP 1 2 4 5 6 8 9 10 11 13 14 15 18 19 20 21 22 23 24 26 27 28 29 30 31 32 33 34 STOCK SSG 04 SUB-ASSY. SCREW SLING SWIVEL HOLDER SLING SWIVEL MILLETT ABSORBER SCREW BUTT PLATE JOINING PIECE ASSY. BASE PLATE SSG 04 CLAMPING LEVER ASSY. CLAMPING PLATE LEFT CLAMPING PLATE RIGHT ADAPTER SCREW FRONT SCREW REAR INSERT SCREW SCREW BASE PLATE ASSY.
46
47
48