
Installation Instructions


OPERATION
CLEANING, CARE AND MAINTENANCE
WWW.STIEBEL-ELTRON-USA.COM CNS E| 5
ENGLISH
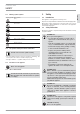
» To limit the temperature setting range, set the minimum and
maximum values at the temperature selector, and push a pin for
each into the slightly offset hole opposite (see diagram).
26_07_31_0171
1
1
2
1 Pin
2 Temperature selector
5.4 Shutting down
» Move the switch on the right of the appliance to OFF.
6. Cleaning, care and maintenance
!
WARNING
Before cleaning, make sure the power has been turned
off at the circuit breaker panel and that the heating
element of the heater is cool. Failure to do so could
result in serious burns, electrocution, serious bodily
injury, or death.
If a pale brownish discolouration appears on the appliance casing,
wipe this off as soon as possible with a damp cloth. Clean the
appliance when cold with ordinary cleaning products. Avoid
abrasive or corrosive cleaning products.
CAUTION Fire
Never spray cleaning spray into the air slot.
Ensure that no moisture can enter the appliance.
As part of regular maintenance, we recommend also having the
control components checked. The safety and control components
should be checked by a contractor no more than ten years after
commissioning.
7. What to do if ...
... the appliance does not heat up:
Check the temperature set at the appliance and the circuit breaker
box.
The appliance has a safety temperature controller that shuts
the appliance down if it overheats. After the cause has been
removed (for example air outlet or inlet apertures covered) and
the appliance has cooled down for a few minutes, operation starts
again.
If you cannot remedy the fault, contact your contractor. To facilitate
and speed up your enquiry, please provide the number on the type
plate (Nr. XXXXXX - XXXX - XXXXXX)
8. Safety
Only qualified contractors should carry out installation,
commissioning, maintenance and repair of the appliance.
8.1 General safety instructions
We guarantee trouble-free function and operational reliability
only if the original accessories and spare parts intended for the
appliance are used.
DANGER Electrocution
If you mount the appliance on the wall, do so in such
a way that control equipment cannot be touched by a
person in the bath or shower.
!
CAUTION
— Only fi t the wall mounted appliance to a vertical
wall that is temperature-resistant to at least 185 °F
/ 85 °C.
— Observe the minimum clearances to adjacent
object surfaces (for minimum clearances see
specifi cation chapter).
— Never install the appliance directly below a wall
socket.
— Ensure that the power cable is not in contact with
any appliance components.
8.2 Instructions, standards and regulations
Observe all applicable national and regional regulations
and instructions.
Observe the Building and Garage Regulations [or local
regulations].
9. Appliance description
9.1 Standard delivery
Wall mounting bracket (hooked into the appliance)
10. Installation
10.1 Installing the wall mounting bracket
You can also use the wall mounting bracket as a template for wall
mounting; this ensures the required fl oor clearance.
» Unhook the wall mounting bracket.
» Place the centred wall mounting bracket level on the ground
and mark holes 1 and 2.
» Lift up the wall mounting bracket so that its lower holes match
up with the markings you have just made on the installation wall.
» Mark holes 3 and 4 on the installation wall.