
Operating Instructions and Installation Instructions


10 | DHB-E AU www.stiebel-eltron.com
INSTALLATION
Installation
10.2 Completing the installation
Open the shut-off valve in the cold water inlet line.
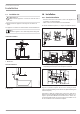
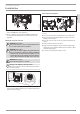
Fitting the sealing elements for the appliance cover
1
2
3
D0000040777
1 Pipe aperture
2 Cover guides
3 Back panel guides
!
Material losses
If you cut open the wrong knock-out in the appliance
cover by mistake, you must use a new appliance cover.
Cleanly cut or break out the knock-out openings in the appli-
ance cover. If necessary, use a file.
Note
You can compensate for a slight connection pipe offset
using the tabs on the cover guides. If the connection pipes
are offset, do not fit any back panel guides.
When installing connection pipes that are not offset, break
off the tabs on the cover guides.
Click the cover guides into place in the pipe apertures.
Position the back panel guides on the extensions. Push them
together. Then push the guides until they are resting against
the back panel.
10.3 Installation options
- Electrical connection from above on unfinished walls
- Electrical connection for finished walls
- Large cross-section for electrical connection from below
- Water installation on unfinished walls
- Wall mounting bracket when replacing an appliance
- Installation with offset tiles
- Pivoting appliance cover
- Operation with preheated water
- Temperature limitation / Anti-scalding protection
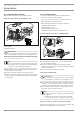
Electrical connection from above on unfinished walls
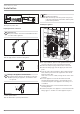
26�02�02�1123�
Cut open the cable grommet for the power cable.
Push down the locking hook to secure the mains terminal.
Pull out the mains terminal.
Reposition the mains terminal in the appliance from the
bottom to the top and secure the mains terminal by sliding it
under the locking hook.
Lay the control wires below the wire guide.
Power cable for finished walls
!
Material losses
If you cut open the wrong knock-out in the appliance
cover by mistake, you must use a new appliance cover.
Cut or break out the required entries in the back panel and
appliance cover cleanly (for positions, see chapter "Specifica-
tion/ Dimensions and connections"). If necessary, use a file.
Route the power cable through the cable grommet. Connect
the power cable to the mains terminal.
Note
This type of connection changes the protection rating of
the appliance.
Change the type plate. Cross out "IP 25" and mark
the box "IP 24". Please use a ballpoint pen to do this.
Large cross-section for electrical connection from below
If you use cables with a large cross-section, you can fit the cable
grommet after the appliance has been installed.