
Operation Manual


18
User’s manual
EN
USE AND OPERATION
RECOMMENDATIONS FOR USE
Important
-
When using the robot for the fi rst time, it is recommended to carefully read the whole manual and to fully understand
it, especially the safety information.
-
The product must only be used for its intended purpose as described by the Manufacturer. Do not tamper with any
device to obtain different operating performances.
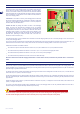
DESCRIPTION OF ROBOT COMMANDS
The illustration shows the position of the control functions on the machine.
A. DISPLAY: lights up to show all the functions.
B. ON: press to turn on the lawnmower.
C. OFF/STOP: press this key to stop the robot, the display turns off.
D. START/PAUSE: press to stop the mower, leaving the display on
“stand-by”; in this way, the mower can be programmed. Press again
to restart the mower. If the key is pressed while the mower is charging,
the mower does not resume working until it is pressed again and the
word “PAUSE” disappears from the display.
E. CHARGE: press this key to allow the mower to return to its station and,
consequently, to start the battery charging process. If pressed while
the robot is being charged, the robot interrupts the charging cycle and
starts operating again.
ENTER
“ON” KEY (B)
(G) ENTER/MENU KEY
7+,6.(<%2$5',621/<$1(;$03/(
OFF - STOP (C) KEY
CHARGE (E) KEY
“START/PAUSE” KEY (D)
“
– ” (H) KEY
“
+ ” (F) KEY
DISPLAY (A)
STOP KEY (I)
F. “+” KEY: during operation, press this key to restart the blade which was previously stopped. During programming, press this key to increase
the values shown in the menu.
G. ENTER/MENU: during operation, press this key to turn on the spiral function. During programming, press to confi rm and memorise the
selection.
H. “-” KEY: during operation, press to stop the blade. During programming, press to decrease the values shown in the menu.
I. STOP: Press to stop the mower safely. Only use in case of imminent danger and to perform maintenance on the robot.
MENU ACCESS
The robot functions can be programmed via the different functions of each menu. The table reports the list of menus available with the relative
functions.
To program the robot, proceed as follows.
1. Press the "ON" key.
2. Enter the password (if prompted) (See “Password Entry”).
3. If the robot is turned on when inside the charging station, after a few seconds the message “CHARGING”appears on the display, then press
the “Start/Pause” key.
4. The “PAUSE” function now appears on the display.
5. Press the “ENTER/MENU” key. This allows entering into programming menu and the “SETTINGS” function appears on the display.
NAVIGATION
Follow these instructions to navigate through the programming menu:
- “+” and “-”: allows scrolling through the menu items in a cyclical manner or changing the value of the function displayed.
- “ENTER/MENU”: moves to the next menu level or confi rms and memorises the value shown in the display and skips to the next function.
- “START/PAUSE”: goes back to the previous menu level until exiting from the programming menu.
- “OFF/STOP”: turns off the robot without confi rming the last function displayed.
The menu has a tree structure. Follow the introduction summarising the programming functions available. A detailed explanation of each function
is found in the pages following the fl ow diagram.
Some functions are not available on all the models. See the “Technical Specifi cations”.