BA_U1_MS_210_230_250_01.fm Seite 0 Donnerstag, 11. Dezember 2003 11:06 11 STIH) STIHL 026 Instruction Manual Warning! To reduce the risk of kickback injury use STIHL reduced kickback bar and STIHL PM 1 (3/8" Picco) or RM 2 (0,325") chain depending on sprocket or other available low kickback components. Read and follow all safety precautions in Instruction Manual – improper use can cause serious or fatal injury.
,PSRUWDQW 6DIHW\ 3UHFDXWLRQV IRU &KDLQ 6DZ 8VHUV $ .LFNEDFN 6DIHW\ 3UHFDXWLRQV :DUQLQJ Kickback may occur when the nose or tip of the guide bar touches an object, or when the wood closes in and pinches the saw chain in the cut. Tip contact in some cases may cause a lightning fast reverse reaction, kicking the guide bar up and back towards the operator. Pinching the saw chain along the top of the guide bar may push the guide bar rapidly back towards the operator.
&RQWHQWV Main Parts of the Saw Definitions Safety Precautions The Operator The Saw The Use of the Saw Maintenance, Repair and Storing Mounting the Bar and Chain Tensioning the Saw Chain Checking chain tension Fuel Mix Fueling Chain lubricant Fill chain Oil Tank Chain Brake Information Before You Start Starting the Saw Checking Chain Lubrication Oil Quantity Control During Break- in Period During Operation After Finishing Work Spark Arresting Screen in Muffler Air Filter System Winter Operation 2 3 4 4 6 6
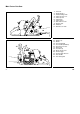
0DLQ 3DUWV RI WKH 6DZ 2 1 6 5 9 8 11 7 15 16 17 13 21 19 Oil filler cap Muffler Front hand guard Front handle (handlebar) Decompression valve Starter grip Fuel filler cap Master Control lever Throttle trigger Throttle trigger interlock Rear handle Rear hand guard 18 23 145BA026 K 22 20 12 12 = 13 = 14 = 15 = 16 = 17 = 18 = 19 = 20 = 21 = 22 = 23 = 10 4 14 Twist lock Spark plug boot Handle heating switch Chain sprocket cover Chain sprocket Chain brake Chain catcher Side chain tensioner Bum
'HILQLWLRQV 2LORPDWLF 6DZ &KDLQ A loop consisting of cutters, tie straps and drive links. 7KURWWOH 7ULJJHU ,QWHUORFN Must be depressed before the throttle trigger can be activated. 6SDUN 3OXJ %RRW Connects the spark plug with the ignition wire. 2LO )LOOHU &DS For closing the oil tank. +DQGOH +HDWLQJ 6ZLWFK For switching the electric handle heating on and off 0XIIOHU Reduces engine exhaust noise and directs the exhaust gases.
DIHW\ 3UHFDXWLRQV The use of any chainsaw may be hazardous. The saw chain has many sharp cutters. If the cutters contact your flesh, they will cut you, even if the chain is not moving. At full throttle, the chain speed can reach 45 mph (20 m/s). It is important that you read, fully understand and observe the following safety precautions and warnings. Read the Owner’s Manual DQG the safety instructions periodically. Pay special attention to the section on reactive forces.
reduce the hand’s ability to feel and regulate temperature, produce numbness and burning sensations and may cause nerve and circulation damage and tissue necrosis. All factors which contribute to whitefinger disease are not known, but cold weather, smoking and diseases or physical conditions that affect blood vessels and blood transport, as well as high vibration levels and long periods of exposure to vibration are mentioned as factors in the development of whitefinger disease.
Wear an approved safety hard hat to protect your head. Chainsaw noise may damage your hearing. Always wear sound barriers (ear plugs or ear mufflers) to protect your hearing. Continual and regular users should have their hearing checked regularly. 7+( 86( 2) 7+( 6$: 7+( 6$: Accidental acceleration of the engine can cause the chain to rotate. During operation, the powerhead muffler and the material around it reach extremely high temperatures.
3UHSDUDWLRQ IRU WKH XVH RI WKH VDZ Take off the chain guard and inspect for safety in operation. For assembly, follow the procedure described in the chapter “Mounting the Bar and Chain” of your Owner’s Manual. STIHL Oilomatic chain, guide bar and sprocket must match each other in gauge and pitch. Before replacing any bar and chain, see the sections on “Specifications”, "Kickback" and the "ANSI B 175.1-1991 chainsaw kickback standard" in this manual.
:DUQLQJ Unit vibrations can cause an improperly tightened fuel filler cap to loosen or come off and spill quantities of fuel. In order to reduce the risk of fuel spillage and fire, tighten fuel filler cap by hand with as much force as possible. :DUQLQJ Your chainsaw is a one-person saw. Do not allow other persons to be near the running chainsaw. Start and operate your saw without assistance. For specific starting instructions, see the appropriate section of the Owner’s Manual.
:DUQLQJ Be sure that the guide bar and chain are clear of you and all other obstructions and objects, including the ground. When the engine is started, the engine speed with the starting throttle lock engaged will be fast enough for the clutch to engage the sprocket and, if the chainbrake is not activated, turn the chain. If the upper quadrant of the tip of the bar touches any object, it may cause kickback to occur (see section on reactive forces).
eliminated, the operator and any bystanders should always wear a respirator approved by NIOSH / MSHA for the type substance at issue. :DUQLQJ Breathing asbestos dust is dangerous and can cause severe or fatal injury, respiratory illness or cancer. The use and disposal of asbestos containing products have been strictly regulated by OSHA and the Environmental Protection Agency. Do not cut or disturb asbestos, asbestos containing products (e.g.
001BA018 LA 001BA087 LÄ &XWWLQJ ,QVWUXFWLRQV Grip: Always hold the saw firmly with both hands when the engine is running. Place your left hand on front handle bar and your right hand on rear handle and throttle trigger. Left-handers should follow these instructions too. :DUQLQJ Wrap your fingers tightly around the handles, keeping the handles cradled between your thumb and forefinger.
5HDFWLYH IRUFHV LQFOXGLQJ NLFNEDFN :DUQLQJ Reactives forces may occur any time the chain is rotating. Reactives forces can be dangerous! In any chainsaw, the powerful force used to cut wood can be reversed (and work against the operator). If the rotating chain is suddenly stopped by contact with any solid object like a log or branch or is pinched, the reactive forces may occur instantly. These reactive forces may result in loss of control which may, in turn, cause serious or fatal injury.
It may also occur during limbing. The greater the force of the kickback reaction, the more difficult it becomes for the operator to control the saw. Many factors influence the occurrence and force of the kickback reaction. These include chain speed, the speed at which the bar and chain contact the object, the angle of contact, the condition of the chain and other factors. The type of bar and saw chain you use is an important factor in the occurrence and force of the kickback reaction.
:DUQLQJ 'HYLFHV IRU UHGXFLQJ WKH ULVN RI NLFNEDFN LQMXU\ Never operate your chainsaw without a front hand guard. In a kickback situation this guard helps protect your left hand or other parts of your body. In addition, removal of the hand guard on a saw equipped with a chain brake will deactivate the chain brake. STIHL recommends the use of the STIHL Quickstop chain brake on your powerhead with green labeled reduced kickback bars and low kickback chains.
:DUQLQJ An improperly maintained chain brake may increase the time needed to stop the chain after activation, or may not activate at all. :DUQLQJ Never run the chainsaw above idle speed for more than 3 seconds when the chain brake is engaged or the chain is pinched or otherwise caught in the cut. Clutch slippage can cause excessive heat, leading to severe damage of the motor housing, clutch and oiler component and may interfere with the operation of the chain brake.
/RZ NLFNEDFN FKDLQ Some types of saw chain have specially designed components to reduce the force of nose contact kickback. STIHL has developed low kickback chain for your powerhead. “Low kickback saw chain” is a chain which has met the kickback performance requirements of § 5.12.2.4 of ANSI B 175.1-1991 (Safety Requirements for Gasoline-Powered ChainSaws) when tested on a selected representative sample of chainsaws below 3.8 cubic inch displacement specified in ANSI B 175.1-1991.
&XWWLQJ 7HFKQLTXHV )HOOLQJ 001BA038 LÄ 001BA037 LÄ Felling is cutting down a tree. Before felling a tree, consider carefully all conditions which may affect the direction of fall, including: $ 3XOO LQ % 3XVKEDFN The intended direction of the fall. Pull-in occurs when the chain on the bottom of the bar is suddenly stopped when it is pinched, caught or encounters a foreign object in the wood. The reaction of the chain pulls the saw forward and may cause the operator to lose control.
1/ 2 1 21/2 001BA088 LÄ 1 )HOOLQJ ,QVWUXFWLRQV 001BA041 LÄ 001BA040 LÄ When felling, maintain a distance of at least 21/2 tree lengths from the nearest person. When felling in the vicinity of roads, railways and power lines, etc., take extra precautions. Inform the police, utility company or railway authority before beginning to cut. (VFDSH SDWK %XWWUHVV URRWV :DUQLQJ The noise of your engine may drown any warning call.
001BA042 LÄ 001BA019 KN *XQQLQJ VLJKW &RQYHQWLRQDO FXW 2SHQ IDFH WHFKQLTXH When making the felling notch, use the gunning sight on the shroud and housing to check the required direction of fall: $ $ = felling notch - determines the direction of the fall • For a conventional cut: For an open-face cut: • • Position the saw so that the gunning sight points exactly in the direction you want the tree to fall.
• • • For medium sized or larger trees make cuts at both sides of the trunk, at same height as subsequent felling cut. Cut to no more than width of guide bar. This is especially important in soft wood in summer - it helps prevent sapwood splintering when the tree falls. % )HOOLQJ FXW Conventional and open-face technique: Begin 1 to 2 inches higher than center of felling notch Cut horizontalIy towards the felling notch Leave approx.1/10 of diameter uncut.
Be extremely careful with partially fallen trees which are poorly supported. When the tree hangs or for some other reason does not fall completely, set the saw aside and pull the tree down with a cable winch, block and tackle or tractor. If you try to cut it down with your saw, you may be injured. )HOOLQJ FXW IRU VPDOO GLDPHWHU WUHHV VLPSOH IDQ FXW Engage the bumper spikes of the chainsaw directly behind the location of the intended hinge and pivot the saw around this point only as far as the hinge.
First, cut a large, wide felling notch. Make a plunge cut in the center of the notch. The plunge cut is made with the guide bar nose. Begin the plunge cut by applying the lower portion of the guide bar nose to the tree at an angle. Cut until the depth of the kerf is about the same as the width of the guide bar. Next, align the saw in the direction in which the recess is to be cut. With the saw at full throttle, insert the guide bar in the trunk. Enlarge the plunge cut as shown in illustration.
0$,17(1$1&( 5(3$,5 $1' 6725,1* 2. Cut only one log at a time. 3. Shattered wood should be cut very carefully. Sharp slivers of wood may be caught and flung in the direction of the operator of the saw. 4. When cutting small logs, place log through “V” - shaped supports on top of a sawhorse. Never permit another person to hold the log. Never hold the log with your leg or foot.
changing the saw chain or cleaning the saw. Do not attempt any maintenance or repair work not described in your Owner’s Manual. Have such work performed at your STIHL service shop only. :DUQLQJ Never test the ignition system with ignition wire terminal removed from spark plug or with unseated spark plug, since uncontained sparking may cause a fire. :DUQLQJ To reduce the risk of fire and burn injury, use only spark plugs authorized by STIHL.
0RXQWLQJ WKH %DU DQG &KDLQ 143BA004 143BA034 KN 3 1 You can run chains of different pitches on this chainsaw - depending on the chain sprocket (see "Specifications") The chain pitch must match the guide bar. The drive link gauge must match the guide bar groove width. • • 'LVHQJDJH WKH FKDLQ EUDNH Pull hand guard toward the front handle. Wear work gloves to protect hands Fit the chain - start at the bar nose.
7HQVLRQLQJ WKH 6DZ &KDLQ &KHFNLQJ &KDLQ 7HQVLRQ 145BA004 K 143BA007 KN 1 Retensioning during cutting work: Shut down the engine and then slacken the nuts. • 145BA003 K 7 Now turn tensioning screw clockwise until there is very little chain sag on the underside of the bar and the drive link tangs are located in the bar groove. • • Refit the sprocket cover and screw on the nuts only finger-tight.
)XHO PL[ Your two-stroke engine requires a mixture of brand-name gasoline and quality two-stroke engine oil with the FODVVLILFDWLRQ 7& Use regular branded unleaded gasoline with a minimum octane rating of 90 ROZ (U.S.A./Canada: pump octane min. 89!). If the octane number of the regular grade gasoline in your area is lower, use premium unleaded fuel. Fuel with a lower octane rating may result in preignition (causing “pinging”) which is accompanied by an increase in engine temperature.
&KDLQ /XEULFDQW )LOOLQJ &KDLQ 2LO 7DQN For automatic and reliable lubrication of the chain and guide bar: 8VH RQO\ D TXDOLW\ HQYLURQPHQWDOO\ FRPSDWLEOH FKDLQ DQG EDU OXEULFDQW 67,+/ FKDLQ OXEULFDQW ZLWK QRQ IOLQJ DGGLWLYH RU WKH UDSLGO\ ELRGHJUDGDEOH 67,+/ %LRSOXV LV UHFRPPHQGHG Change the fuel pick up body every year. Before storing your machine for a long period, drain and clean the fuel tank and run engine until carburetor is dry.
&KDLQ %UDNH 7KH FKDLQ EUDNH LV DOVR DFWLYDWHG E\ WKH LQHUWLD RI WKH IURQW KDQG JXDUG if the kickback force of the saw is high enough: The hand guard is accelerated toward the bar nose - even if your left hand is not behind the hand guard, e.g. during felling cut. The chain brake will operate only if the hand guard has not been modified in any way. 143BA011 KN 143BA012 KN &KHFN RSHUDWLRQ RI FKDLQ EUDNH /RFNLQJ FKDLQ ZLWK FKDLQ EUDNH - in an emergency - when starting - at idling speed.
,QIRUPDWLRQ %HIRUH
6WDUWLQJ WKH 6DZ STOP 0 1 133BA001 K 143BA018 KN 2 • Press in the button Compression pressure is released when the button is pressed in. This helps reduce the effort required to pull the starter rope. • For this reason the botton should be pressed in before each starting attempt. • • Observe safety precautions see section "Safety Precautions".
STOP 0 5 • • Alternative method of starting: Hold the rear handle tightly between your legs, just above the knees grip the front handle firmly with your left hand your thumb should be under the handle - 143BA020 KN 143BA019 KN 3 • Pull the starter grip slowly with your right hand until you feel it engage then give the grip a brisk strong pull and push down the front handle at the same time do not pull out starter rope more than 70 cm (about 28 in) it might otherwise break.
133BA009 KN • • • Pull the hand guard back toward the front handle: the chain brake is now disengaged your saw is ready for operation. Observe safety precautions. Always check operation of chain lubrication before starting work. 6KXW GRZQ HQJLQH Move Master Control lever to "Stop" E Always disengage the chain brake before opening the throttle. Running the engine at higher revs with the chain brake engaged (saw chain at a standstill) will quickly damage the engine and chain drive (clutch, chain brake).
&KHFNLQJ &KDLQ /XEULFDWLRQ • • Set the Master Control lever to G Crank the engine several times with the starter to clear the combustion chamber Refit the spark plug and connect the spark plug terminal reassemble all other parts Set Master Control lever to "Warm Start" Q even if engine is cold Now start the engine. )XHO WDQN UXQ XQWLO GU\ DQG WKHQ UHIXHOHG • Pull starter rope several times until fuel line is primed. The saw chain must always throw off a small amount of oil.
'XULQJ %UHDN LQ 3HULRG 'XULQJ 2SHUDWLRQ A factory new machine should not be run at high revs (full throttle off load) for the first three tank fillings. This avoids unnecessary high loads during the break-in period. &KHFN FKDLQ WHQVLRQ IUHTXHQWO\ A new chain has to be retensioned more often than one that has been in use for some time. As all moving parts have to bed in during the break-in period, the frictional resistances in the engine are greater during this period.
$LU )LOWHU 6\VWHP 2 1 133BA011 KN 1 143BA036 KN 1 2 133BA008KN 6SDUN $UUHVWLQJ 6FUHHQ LQ 0XIIOHU 3 &OHDQLQJ $LU )LOWHU If engine is down on power, check the spark arresting screen in the muffler: • • • • • Take out the screw . Remove the spark arresting screen . Clean spark arresting screen if necessary. If screen is damaged or coked up, fit a new one. Refit the spark arresting screen in the reverse sequence.
:LQWHU 2SHUDWLRQ U 3 133BA012 KN 133BA009 KN 2 133BA005 KN 1 1 $W WHPSHUDWXUHV EHORZ & ) 3UHKHDW WKH FDUEXUHWRU • • Turn knob or lever above rear handle 90° counterclockwise. Lift off the carburetor box cover vertically. 0DFKLQHV ZLWK VKXWWHU LQ VKURXG • • Remove the screw (1) Pull out the shutter (2) and refit it in the "winter" position (bottom illustration) Insert screw and tighten it down.
(OHFWULF +DQGOH +HDWLQJ 7DNH &DUH RI *XLGH %DU $W WHPSHUDWXUHV EHORZ & ) It is advisable to fit the optional intake air preheating kit if you use your saw in extremely cold conditions (temperatures below -10 ° C /+14 ° F, in powder or drifting snow). 2 If your saw is very cold (frost or ice on machine), start the engine and keep it at a high idle speed (with chain brake disengaged) until it reaches normal operating temperature.
&KHFNLQJ DQG 5HSODFLQJ &KDLQ 6SURFNHW Chain type Pitch Rapid Picco Rapid 0.325" 3/8" 3/8" Minimum groove depth 6.0 mm (0.24") 6.0 mm (0.24") 6.0 mm (0.24") If groove depth is less than specified: 5HSODFH WKH JXLGH EDU The drive link tangs will otherwise scrape along the bottom of the groove the cutters and tie straps will not ride on the bar rails. 5HSODFH WKH FKDLQ VSURFNHW DIWHU XVLQJ WZR 2LORPDWLF FKDLQV or sooner if the wear marks on the sprokket are deeper than approx. 0.
$GMXVWLQJ &DUEXUHWRU 6SXU VSURFNHW • • Use a screwdriver to remove the E-clip. Pull washer, spur sprocket and needle cage off the crankshaft. Clean the crankshaft stub and needle cage, and lubricate with STIHL grease (tube 0781 120 1111). Reassemble with new spur sprocket After fitting the clutch drum, rotate it about one turn to engage oil pump drive refit washer and E-clip on the crankshaft. Use only original STIHL chain sprockets to ensure correct operation of the chain brake.
&KHFNLQJ 6SDUN 3OXJ Idle setting is too lean. Turn the low speed screw / counterclockwise until engine runs and accelerates smoothly. A 000BA039 KN (UUDWLF LGOLQJ EHKDYLRXU SRRU DFFHOHUDWLRQ HYHQ WKRXJK ¶/¶ VFUHZ LQ RQH WXUQ RSHQ Wrong fuel mix (too much engine oil in the gasoline), a dirty air filter and unfavorable running conditions (mostly at part throttle etc.) affect the condition of the spark plug.
5HSODFLQJ 6WDUWHU 5RSH DQG 5HZLQG 6SULQJ 1 5 1 1 133BA014 KN 1 6 5HSODFLQJ 6WDUWHU 5RSH • • • • • • Take out the screws . Remove four screws Push the hand guard upward Pull underside of fan housing away from crankcase and remove it downward Ease the spring clip off the starter post. Carefully slip the washer and pawl off the starter post. :DUQLQJ Take particular care to avoid injury - the rewind spring may pop out and unwind.
2 1 133BA017 KN • • • • • %RWK YHUVLRQV • • Coat rope rotor bearing bore with non-resinous oil slip rotor over starter post - turn it back and forth so that anchor loop of rewind spring engages Refit the pawl in the rotor fit the washer on the starter post - use screwdriver or suitable pliers to install spring clip on starter post and engage it on the pawl’s peg - the spring clip must point clockwise - see illustration.
0DLQWDLQLQJ DQG 6KDUSHQLQJ 6DZ &KDLQ &RUUHFWO\ VKDUSHQHG FKDLQ A Do not work with a dull or damaged chain as it will increase the physical effort required, produce unsatisfactory results and a higher rate of wear. &OHDQ DQG FKHFN \RXU FKDLQ for cracks in the links and damaged rivets replace any damaged or worn parts of the chain and match the new parts to the shape and size of the original parts. ,PSRUWDQW It is absolutely imperative to comply with the angles and dimensions specified below.
689BA025 KN 90° )LOH FRUUHFWO\ As these requirements can be met only after sufficient and constant practice: 8VH D ILOH KROGHU * A file holder must be used for manual resharpening of Super chain. The correct filing angle is marked on the file holder. • • • • • 80° 30° 35° 10° 0° 689BA022 KN 90° 85° 70° 60° 689BA018 KN • • )RU FKHFNLQJ DQJOHV STlHL filing gauge* (see table) A universal tool for checking the filing and side plate angles, depth gauge setting and cutter length.
689BA023 KN a 'HSWK JDXJH VHWWLQJ The depth gauge determines the height at which the cutter enters the wood and thus the thickness of the chip removed. Distance between depth gauge and cutting edge = D Depth gauge distance “D” Inch (mm) mm (Inch) 1/4 3/8-PM 3/8-PMN 0.325 3/8 0.404 (6.35) (9.32) (9.32) (8.25) (9.32) (10.26) 0.65 0.65 0.45 0.65 0.65 0.80 (0.026) (0.018) (0.026) (0.026) (0.026) (0.031) This setting may be increased by 0.2 mm (0.
Chain brake Filter in fuel tank Fuel tank Chain oil tank Chain lubrication Saw chain Guide bar Chain sprocket Air filter Cooling inlets Cylinder fins Carburetor Spark plug All accessible screws and nuts (not adjusting screws) Rubber vibration buffers Muffler Chain catcher x Check operation Check operation Clean by STIHL dealer Check Clean, Replace filter element Clean Clean Check Inspect, also check sharpness Check chain tension Sharpen Check (wear, damage) Clean and turn over Deburr Replace Check C
6SHFLILFDWLRQV (QJLQH STIHL single cylinder two-stroke engine Displacement: 48.7 cm3 (2.97 cu.in) Bore: 44 mm (1.73 in) Stroke: 32 mm (1.26 in) Idle speed: 2.800 r.p.m. ,JQLWLRQ 6\VWHP Type: Electronic magneto ignition (breakerless) Spark plug (suppressed): Bosch WSR 6 F or NGK BPMR 7 A Electrode gap 0.5 mm (0.02 in) Spark plug thread: M 14x1.25; 9.5 mm (0.
2UGHULQJ 6SDUH 3DUWV Please enter your saw model, machine number as well as the part numbers of the guide bar, saw chain and chain sprocket in the spaces provided on the right 6WRULQJ WKH 0DFKLQH For recommended STIHL reduced kickback cutting attachments see section "Specifications" of this Owner's Manual. This will make re-ordering simpler. When purchasing these parts, always quote the saw model, the part numbers and names of the parts.
67,+/ ,QFRUSRUDWHG )HGHUDO (PLVVLRQ &RQWURO :DUUDQW\ 6WDWHPHQW
:DUUDQW\ 3HULRG The warranty periods will begin on the date the utility equipment engine is purchased by the initial purchaser and you have signed and sent back the warranty card to STIHL. If any emission related part on your engine is defective, the part will be replaced by STIHL Incorporated at no cost to the owner.
Continuation of Important Safety Precautions 4. Use caution when handling fuel. Move the chainsaw at least 10 feet (3 m) from the fueling point before starting the engine. 5. Do not allow other persons to be near the chainsaw when starting or cutting with the chainsaw. Keep bystanders and animals out of the work area. 6. Do not start cutting until you have a clear work area, secure footing, and a planned retreat path from the falling tree. 7.
BA_U4_86_01.fm Seite 1 Donnerstag, 11. Dezember 2003 11:11 11 ! WARNING! The engine exhaust from this product contains chemicals known to the State of California to cause cancer, birth defects or other reproductive harm.