
Instruction Manual


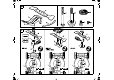
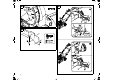


Table Of Contents
- 1. Zu Ihrer Sicherheit
- 2. Lieferumfang
- 3. Montage
- 4. Anleitung für das Mulchen
- 5. Wartung
- 6. Übliche Ersatzteile
- 1. For your safety
- 2. Standard equipment
- 3. Assembly
- 4. Mulching instructions
- 5. Maintenance
- 6. Standard spare parts
- 1. Consignes de sécurité
- 2. Contenu de l’emballage
- 3. Montage
- 4. Instructions pour le mulching
- 5. Entretien
- 6. Pièces de rechange courantes
- 1. Voor uw veiligheid
- 2. Leveringsomvang
- 3. Montage
- 4. Instructie voor het mulchen
- 5. Onderhoud
- 6. Standaard reserveonderdelen
- 1. Per la vostra sicurezza
- 2. Equipaggiamento fornito
- 3. Montaggio
- 4. Istruzioni per il mulching
- 5. Manutenzione
- 6. Ricambi standard
- 1. Para su seguridad
- 2. Contenido del suministro
- 3. Montaje
- 4. Instrucciones para el mulching
- 5. Mantenimiento
- 6. Piezas de recambio habituales
- 1. Para sua segurança
- 2. Fornecimento
- 3. Montagem
- 4. Instruções para o mulching
- 5. Manutenção
- 6. Peças de reposição comuns
- 1. For din egen sikkerhet
- 2. Produktkomponenter
- 3. Montering
- 4. Veiledning for bioklipping
- 5. Vedlikehold
- 6. Vanlige reservedeler
- 1. För din säkerhet
- 2. Leveransens omfattning
- 3. Montering
- 4. Anvisning för bioklippning
- 5. Underhåll
- 6. Vanliga reservdelar
- 1. Turvallisuutesi vuoksi
- 2. Toimitussisältö
- 3. Asennus
- 4. Ohjeita allesilppuavaan leikkuuseen
- 5. Huolto
- 6. Varaosat
- 1. Sikkerhed
- 2. Medfølgende dele
- 3. Montage
- 4. Vejledning i granulering
- 5. Vedligeholdelse
- 6. Standardreservedele
- 1. Zasady bezpiecznej pracy
- 2. Wyposażenie standardowe
- 3. Zamontowanie
- 4. Instrukcja mulczowania
- 5. Konserwacja
- 6. Typowe części zamienne
- 1. Za vašo varnost
- 2. Obseg dobave
- 3. Namestitev
- 4. Navodila za mulčanje
- 5. Vzdrževanje
- 6. Običajni nadomestni deli
- 1. Pre vašu bezpečnosť
- 2. Rozsah dodávky
- 3. Montáž
- 4. Návod na mulčovanie
- 5. Údržba
- 6. Bežné náhradné diely
- 1. Güvenliğiniz için
- 2. Teslimat kapsamı
- 3. Montaj
- 4. Parçalama-yayma talimatı
- 5. Bakım
- 6. Sık kullanılan yedek parçalar
- 1. A biztonság érdekében
- 2. Szállítási terjedelem
- 3. Felszerelés
- 4. Mulcsozási útmutató
- 5. Karbantartás
- 6. Általános pótalkatrészek
- 1. Za vašu bezbednost
- 2. Sadržaj paketa
- 3. Montaža
- 4. Uputstvo za usitnjavanje
- 5. Održavanje
- 6. Uobičajeni rezervni delovi
- 1. Za vašu sigurnost
- 2. Opseg isporuke
- 3. Montaža
- 4. Upute za malčiranje
- 5. Održavanje
- 6. Uobičajeni rezervni dijelovi
- 1. Pro vaši bezpečnost
- 2. Rozsah dodávky
- 3. Montáž
- 4. Návod k mulčování
- 5. Údržba
- 6. Běžné náhradní díly
- 1. Jūsu drošībai
- 2. Piegādes komplekts
- 3. Montāža
- 4. Smalcināšanas instrukcija
- 5. Apkope
- 6. Parastās rezerves daļas
- 1. Jūsų saugumui
- 2. Komplektas
- 3. Montavimas
- 4. Mulčiavimo instrukcija
- 5. Techninė priežiūra
- 6. Įprastos atsarginės dalys
- 1. Pentru siguranţa dvs.
- 2. Conţinutul pachetului
- 3. Montaj
- 4. Instrucţiuni pentru răspândire
- 5. Întreţinerea
- 6. Piese de schimb cerute mai frecvent
- 1. Για τη δική σας ασφάλεια
- 2. Περιεχόμενα συσκευασίας
- 3. Συναρμολόγηση
- 4. Οδηγίες για το άλεσμα
- 5. Συντήρηση
- 6. Συνηθισμένα ανταλλακτικά
- 1. Техника безопасности
- 2. Комплект поставки
- 3. Монтаж
- 4. Руководство по мульчированию
- 5. Техническое обслуживание
- 6. Стандартные запчасти
- 1. За Вашата безопасност
- 2. Окомплектовка
- 3. Монтаж
- 4. Инструкция за рекултивиране
- 5. Поддръжка
- 6. Обичайни резервни части
- 1. Техніка безпеки
- 2. Комплект постачання
- 3. Монтаж
- 4. Вказівки для мульчування
- 5. Обслуговування
- 6. Замінювані запчастини
- 1. Ohutusnõuded
- 2. Tarnekomplekt
- 3. Paigaldamine
- 4. Multšimisjuhend
- 5. Hooldus
- 6. Tavalised varuosad
- 1. Sizin təhlükəsizliyiniz üçün
- 2. Çatdırılma həcmi
- 3. Montaj
- 4. Mulça üçün təlimat kitabçası
- 5. Texniki baxış
- 6. Qalıq ehtiyat hissələri
- 1. Қауіпсіздік шаралары
- 2. Жеткізілім жиынтығы
- 3. Монтаждау
- 4. Жабындау жөніндегі нұсқаулық
- 5. Техникалық қызмет көрсету
- 6. Басқа да қосалқы бөлшектер

0478 909 9907 A - EN
6
B Removing mulch insert:
● Open the discharge flap and hold it
open.
● Lift the detent catch (2). Pull the mulch
insert diagonally upwards out of the
discharge chute.
● For use as a rear discharge mower,
close the discharge flap. For grass
collecting, attach the grass catcher box.
4.1 General information
During mulching, the cut grass is chopped
up several times through a special air flow
guidance system in the mower blade area
and then blown back into the turf. The
clippings remain on the lawn.
The decomposing clippings return organic
nutrients to the soil, serving as a natural
fertiliser.
Emptying the grass catcher box and
disposal of the clippings are dispensed
with. Weed growth is slowed down and
significant amounts of fertilizer are saved.
4.2 How should mulching be
performed?
● Frequency:
At least twice a week in the spring (main
period of growth) and at least once a
week in the summer and autumn.
● Cutting height:
Remove approximately one third of the
grass height, only use cutting heights 4
to 7.
● Mulch the lawn when dry.
● Work with well-sharpened blades.
● Vary the mowing direction and ensure
that the mowing strips overlap.
● Always cut very high grass in stages.
5.1 Blade maintenance
● Instructions on blade
maintenance can be found in the
instruction manual for the lawn mower
and also apply to the multi-blade.
Installation of the multi-blade is
described in the "Assembly" section.
(Ö 3.1)
● Before each use, place the machine in
the cleaning position, clean the multi-
blade and check it for damage
(notches, cracks) and wear; replace if
necessary.
● Check blade thickness A at a
minimum of 5 points using a slide
calliper.
A > 2 mm
● Check minimum width B of the blade
at the narrowest point behind the blade
wings using a slide calliper.
B > 55 mm
Multi-blade:
6340 702 0120
MB blade fastening screw:
9008 319 9075
MB 545 VS blade fastening screw:
9008 341 2360
ME blade fastening screw:
6340 760 2800
Retaining washer:
0000 702 6600
4. Mulching instructions
5. Maintenance
6. Standard spare parts
5