STIHL BG 56, 66, 86, SH 56, 86 Instruction Manual Manual de instrucciones WARNING Read Instruction Manual thoroughly before use and follow all safety precautions – improper use can cause serious or fatal injury. ADVERTENCIA Antes de usar la máquina lea y siga todas las precauciones de seguridad dadas en el manual de instrucciones – el uso incorrecto puede causar lesiones graves o mortales.
Instruction Manual 1 - 35 Manual de instrucciones 36 - 75
English © ANDREAS STIHL AG & Co. KG, 2020 0458-296-8621-D. VA6.L20. 0000008483_005_GB Printed on chlorine-free paper Printing inks contain vegetable oils, paper can be recycled.
English Guide to Using this Manual Pictograms The meanings of the pictograms attached to or embossed on the machine are explained in this manual. Depending on the model concerned, the following pictograms may be on your machine. Fuel tank for gasoline and engine oil mixture Press to operate manual fuel pump Symbols in Text Many operating and safety instructions are supported by illustrations.
English WARNING Minors should never be allowed to use this power tool. Bystanders, especially children, and animals should not be allowed in the area where it is in use. WARNING To reduce the risk of injury to bystanders and damage to property, never let your power tool run unattended. When it is not in use (e.g. during a work break), shut it off and make sure that unauthorized persons do not use it.Most of these safety precautions and warnings apply to the use of all STIHL blowers.
English WARNING To reduce the risk of injury to your eyes never operate your power tool unless wearing goggles or properly fitted protective glasses with adequate top and side protection complying with ANSI Z87 "+" (or your applicable national standard). Power tool noise may damage your hearing. Wear sound barriers (ear plugs or ear mufflers) to protect your hearing. Continual and regular users should have their hearing checked regularly.
English WARNING Gasoline is an extremely flammable fuel. If spilled and ignited by a spark or other ignition source, it can cause fire and serious burn injury or property damage. Use extreme caution when handling gasoline or fuel mix. Do not smoke or bring any fire or flame near the fuel or the power tool. Note that combustible fuel vapor may escape from the fuel system.
English – In hot environments, cooling will take longer. – The engine is air cooled. When it is shut off, cooling air is no longer drawn across the cylinder and the engine temperature will rise for several minutes before starting to cool. After the power tool has cooled appropriately, follow the safety instructions in this chapter for removing the cap. Never remove the fuel filler cap by turning it directly to the open position.
English To relieve vapor lock: – – – Press the manual fuel pump bulb at least 20 to 30 times – even if the bulb is already filled with fuel – to clear the vapor and send liquid fuel into the carburetor. Then start the power tool. For specific starting instructions, see the appropriate section of your instruction manual. If the manual fuel pump bulb will not be filled, place the Choke Knob to the cold start position g and pull the starter cord until the engine runs.
English WARNING Operate the unit only with a properly mounted blower tube. Save water by using a blower instead of a water hose for lawn and garden work wherever possible, e.g. for cleaning yards and patios. The round nozzle is particularly suitable for use on uneven surfaces (e.g. fields and lawns). – If conditions are very dusty, dampen surfaces slightly before blowing. – Pull out the nozzle to full length so that the airstream is at ground level.
English Operate and start your power tool only outdoors in a well ventilated area. Operate it under good visibility and daylight conditions only. Work carefully. WARNING As soon as the engine is running, this product generates toxic exhaust fumes containing chemicals, such as unburned hydrocarbons (including benzene) and carbon monoxide, that are known to cause respiratory problems, cancer, birth defects, or other reproductive harm. Some of the gases (e.g. carbon monoxide) may be colorless and odorless.
English can injure eyes and can blow small objects at great speed. Do not direct airblast towards pets. WARNING The blower fan between the air intake and output openings rotates whenever the engine is running. Never insert any foreign object into the air intake of the machine or into the nozzle of the blower. It will damage the fan wheel and may cause serious injury to the operator or bystanders as a result of the object or broken parts being thrown out at high speed.
English WARNING 295BA053 KN In order to reduce the risk of injury from contact with rotating parts and damage to the engine, the intake screen must always be closed and the locking tab engaged when the suction tube is not mounted. Stop engine and wait until the fan is stopped before opening the intake screen. The vacuum attachment is designed for two-handed operation. Hold and operate the unit with your right hand on the control handle and your left hand on the assist handle.
English WARNING Use the specified spark plug and make sure it and the ignition lead are always clean and in good condition. Always press spark plug boot snugly onto spark plug terminal of the proper size. A loose connection between spark plug terminal and the ignition wire connector in the boot may create arcing that could ignite combustible fumes and cause a fire. Keep spark plug clean, and make sure ignition lead is in good condition. Do not use a spark plug with a detachable SAE adapter terminal.
English BG 56, BG 86, SH 56, SH 86 N Push nozzle (5) onto blower tube (2) as far as lug (6), position (a) (long) or position (b) (short), and rotate nozzle in direction of arrow to lock in position. 296BA019 KN 6 a b 5 296BA031 KN 2 N Push the union nut (4) over the fan housing stub as far as stop. N Rotate the union nut (4) in direction of arrow until symbol ƒ is in line with the arrows – union nut snaps audibly into position.
English Assembling the Vacuum Shredder 8 Mounting the Elbow 296BA022 KN 2 295BA058 KN 4 269BA030 KN 2 3 1 1 Push the elbow (1) into the catcher bag (2) as far as the mark (smaller arrow). N Tighten strap (3) on catcher bag and press down the tab (4). Push the union nut (7) over the fan housing stub as far as stop. N Rotate the union nut (7) in direction of arrow until symbol ƒ is in line with the arrows – union nut snaps audibly into position.
English N Rotate union nut (5) in direction of arrow until it snaps audibly into position. N Continue turning the union nut in direction of arrow and tighten it down firmly. 296BA025 KN 296BA033 KN Fuel N Rotate the union nut in the direction of the arrow as far as the stop. N Insert a suitable tool through the opening in the union nut to press down the tab. N Continue turning the union nut in the direction of the arrow as far as the next stop. N Remove the suction tube.
English WARNING To reduce the risk of personal injury from loss of control and/or contact with the running cutting tool, do not use your unit with an incorrect idle adjustment. At correct idle speed, the cutting tool should not move. If your machine’s idle speed is incorrectly adjusted, have your authorized STIHL servicing dealer check your machine and make the proper adjustments and repairs.
English – Never remove the cap by turning it directly to the open position. Turn it first approximately 1/2 of a turn counter-clockwise to relieve any residual pressure. – Never open the fuel tank while the engine is still hot or running. – Never open the fuel tank or re-fuel the power tool near any sparks, flames or other ignition sources. – Pick the right fuel: use only good quality (89 octane or higher), fresh fuel blended for the season.
English 1/2 turn counter-clockwise. Never attempt to remove the cap while the engine is still hot or running. Opening Change the fuel pick up body every year 002BA447 KN Refueling Take care not to spill fuel while fueling and do not overfill the tank – leave approximately 1/2" (13 mm) air space. Closing N While maintaining steady, downward pressure, slowly turn the cap approximately a 1/2 turn counter-clockwise.
English Cranking Starting the Engine Observe safety precautions. The setting lever (2) allows the throttle trigger (3) to be locked in the full throttle position during operation. 296BA009 KN 1 N Adjusting the choke knob If the engine is cold 296BA006 KN N 3 296BA007 KN Starting / Stopping the Engine Press the manual fuel pump bulb (1) at least five times – even if the bulb is already filled with fuel.
English N Do not let the starter grip snap back. Guide it slowly back into the housing so that the starter rope can rewind properly. If engine does not start Stopping the Engine N Make sure all settings are correct (choke knob, setting lever in run position F). N Repeat the starting procedure.
English Version with Pleated Filter Material 3 2 Different Air Filters Different models are equipped with different air filters. The models can be identified by the filter housing and the air filter itself. N Pull off the retainer (3) and take the air filter element (4) out of the filter housing (5). N Replace the filter element. As a temporary measure you can knock it out on the palm of your hand or blow it out with compressed air – do not wash.
English from the inside outwards under a jet of water – do not use a pressure washer. N Dry the filter – do not expose to high temperatures. Place the filter in position. Install the filter element in the filter housing. N Fit the filter cover and tighten the filter cover lock clockwise. Exhaust emissions are controlled by the design of the engine and components (e.g. carburation, ignition, timing and valve or port timing).
English Checking the Spark Plug Spark Plug If there is a loss of engine power, the machine is difficult to start or runs poorly at idle, first check the spark plug. A The wrong fuel mix (too much engine oil in the gasoline), a dirty air filter and unfavorable running conditions (mostly at part throttle etc.) affect the condition of the spark plug. These factors cause deposits to form on the insulator nose, which may degrade performance. Removing the spark plug N Clean dirty spark plug.
English Installing the spark plug Engine Running Behavior 2 Storing the Machine If engine running behavior is unsatisfactory even though the air filter is clean and the carburetor is properly adjusted, the cause may be the muffler. For periods of 3 months or longer N Drain and clean the fuel tank in a well ventilated area. Have the muffler checked for contamination (carbonization) by your servicing dealer. N Dispose of fuel properly in accordance with local environmental requirements.
English Spark Arresting Screen in Muffler Spark arresting screen in muffler WARNING To reduce the risk of fire caused by hot particles escaping from the machine, never operate the machine without a spark arresting screen, or with the spark arresting screen damaged. Do not modify the muffler or spark arresting screen. To reduce the risk of fire from accumulated debris such as pine needles, branches or leaves, ensure that the muffler plugs are in place before taking up work.
English Complete machine Visual inspection (condition, wear, leaks) x Clean Control handle Air filter Manual fuel pump (if fitted) Filter in fuel tank Fuel tank Carburetor Spark plug Spark arresting screen2) in muffler x Check operation x x Clean x Replace x x Check Safety labels Have repaired by servicing dealer1) x Check x Replace filter x Clean x x Check idle setting x x x x Readjust idle x Readjust electrode gap x Replace after 100 hours of operation Check x x Clean
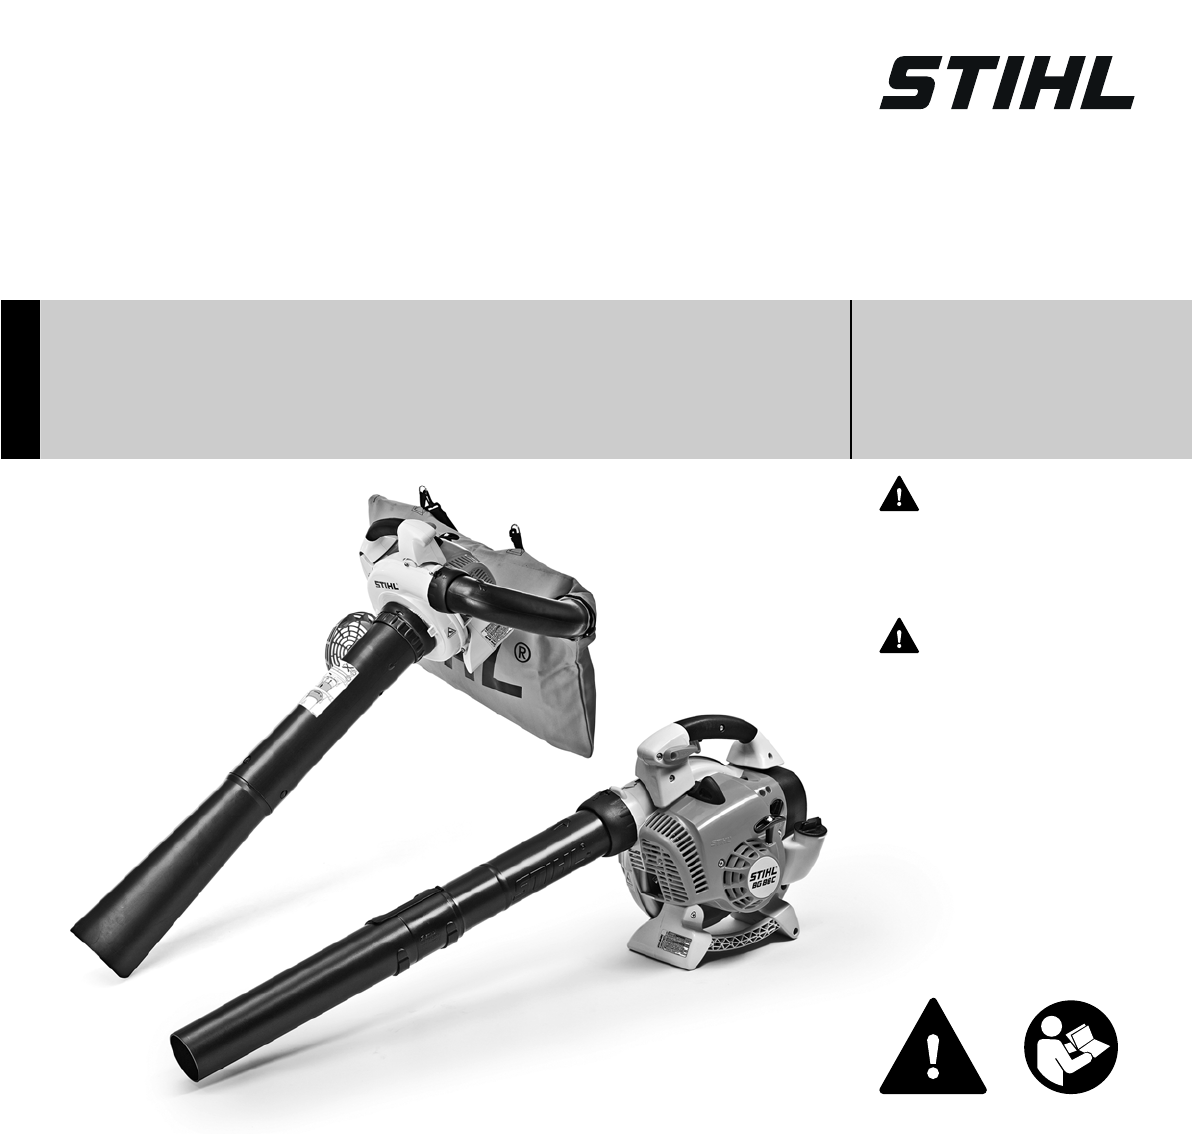
English Main Parts 1 2 3 4 5 6 7 8 9 10 11 12 13 14 15 16 17 18 1 2 24 4 5 3 16 8 9 10 7 11 12 13 14 15 6 17 20 18 19 # 19 20 21 22 23 24 # 21 22 Setting Lever (BG 86, SH 86) Spark Plug Boot Muffler Starter Grip Carburetor Adjusting Screws Manual Fuel Pump Choke Knob Filter Housing Filter Cover Lock Fuel Filler Cap Fuel Tank Assist Handle Control Handle Stop Switch (BG 56, BG 66, SH 56) Throttle Trigger Intake Screen Union Nut Blower Tube (BG 56, BG 86, SH 56, SH 86) Round Nozzle Fan Nozzl
English Definitions 1. Setting Lever (BG 86, SH 86) Holds the throttle trigger in position. 2. Spark Plug Boot Connects the spark plug to the ignition wire. 3. Muffler Attenuates exhaust noises and diverts exhaust gases away from operator. 4. Starter Grip The grip of the pull starter, which is the device to start the engine. 5. Carburetor Adjusting Screws For tuning carburetor. 6. Manual Fuel Pump Delivers fuel for cold start. 7. Choke Knob Eases engine starting by enriching mixture. 8.
English BG 86: SH 56: SH 86: 0.8 kW (1.1 hp) 0.7 kW (0.9 hp) 0.8 kW (1.1 hp) Ignition System SH 56: Electronic magneto ignition Spark plug (suppressed): Electrode gap: NGK CMR 6 H 0.020 in (0.5 mm) Fuel System All position diaphragm carburetor with integral fuel pump Fuel tank capacity: BG 56: BG 66: BG 86: SH 56: SH 86: 18.3 oz (0,54 L) 18.3 oz (0,54 L) 14.9 oz (0,44 L) 18.3 oz (0,54 L) 14.
English Users of this unit should carry out only the maintenance operations described in this manual. STIHL recommends that other repair work be performed only by authorized STIHL servicing dealers using genuine STIHL replacement parts. Genuine STIHL parts can be identified by the STIHL part number, the { logo and, in some cases, by the STIHL parts symbol K. The symbol may appear alone on small parts.
English STIHL Incorporated Federal Emission Control Warranty Statement Not for California Manufacturer's Warranty Coverage In the U.S., 1997 and later model year small off-road equipment engines are warranted for two years. If any emissionrelated part on your engine is defective, the part will be repaired or replaced by STIHL Incorporated free of charge. Your Warranty Rights and Obligations Owner's Warranty Responsibilities The U.S.
English scheduled only for regular inspection to the effect of "repair or replace as necessary" will be warranted for the warranty period. Any warranted part which is scheduled for replacement as required maintenance will be warranted for the period of time up to the first scheduled replacement point for that part.
English STIHL Incorporated California Exhaust and Evaporative Emissions Control Warranty Statement For California only Your Warranty Rights and Obligations The California Air Resources Board (CARB) and STIHL Incorporated are pleased to explain the emissions control system warranty on your 2021 and later small off-road equipment engine. In California, new equipment that uses small off-road engines must be designed, built, and equipped to meet the State's stringent anti-smog standards.
English that part. If the part fails prior to the first scheduled replacement, the part must be repaired or replaced by the engine manufacturer according to Subsection (4) below. Any such part repaired or replaced under warranty must be warranted for the remainder of the period prior to the first scheduled replacement point for the part. The warranty on emissions-related parts will be interpreted as follows: 1. 2. 3.
English Trademarks STIHL Registered Trademarks STIHL® { K The color combination orange-grey (U.S.
español / EE.UU Contenido 37 49 51 53 54 56 58 60 60 60 62 62 62 63 65 67 68 68 69 Comuníquese con su representante de STIHL o el distribuidor de STIHL para su zona si no se entiende alguna de las instrucciones dadas en el presente manual. ADVERTENCIA Dado que el soplador es una herramienta que funciona a gran velocidad, es necesario tomar medidas especiales de seguridad igual que con cualquier otra herramienta motorizada, para reducir el riesgo de lesiones.
español / EE.UU Acerca de este manual de instrucciones Pictogramas Todos los pictogramas que se encuentran fijados o grabados en la máquina se explican en este manual. Según el modelo, los pictogramas siguientes pueden aparecer en su máquina. Tanque de combustible que contiene la mezcla de combustible y aceite Presione para accionar la bomba manual de combustible Símbolos en el texto Muchas de las instrucciones de uso y seguridad vienen acompañadas de ilustraciones.
español / EE.UU jardines, campos deportivos, parques, veredas, calles, cocheras y estacionamientos, y para tareas similares. No lo use con otros fines, ya que su uso inadecuado podría provocar lesiones o daños materiales, incluidos daños en la máquina. ADVERTENCIA En ningún caso se debe permitir que usen esta herramienta motorizada menores de edad. No se debe permitir la presencia de otras personas, especialmente niños, ni de animales, en los lugares en los que se esté usando la máquina.
español / EE.UU ADVERTENCIA El sistema de encendido de la máquina STIHL produce un campo electromagnético de intensidad muy baja. Este campo puede interferir con algunos tipos de marcapasos. Para reducir el riesgo de sufrir lesiones graves o mortales, las personas portadoras de marcapasos deben consultar a sus médicos y al fabricante del marcapasos antes de usar esta máquina. Vestimenta adecuada ADVERTENCIA Para reducir el riesgo de lesiones, el operador debe usar el equipo protector adecuado.
español / EE.UU asegúrese de que está en buenas condiciones antes de reanudar el trabajo. Compruebe específicamente si el sistema de combustible es estanco (ausencia de fugas), y si los controles y dispositivos de seguridad funcionan como es debido. No siga manejando esta máquina si está dañada. En caso de duda, solicite una revisión a su concesionario de servicio de STIHL. ADVERTENCIA Las partículas pequeñas (p. ej.
español / EE.UU Para reducir el riesgo de incendio y explosiones, cargue la herramienta motorizada con combustible al aire libre, en una zona bien ventilada, alejada de llamas, pilotos, calentadores, motores eléctricos y otras fuentes de encendido. Una chispa o llama que está a varios metros de distancia puede encender los vapores. Elija una superficie despejada para llenar el depósito y aléjese por lo menos 10 pies (3 m) del lugar en que lo haya llenado antes de arrancar el motor.
español / EE.UU Nunca quite la tapa girándola directamente a la posición "abierta". Primero compruebe si hay presión residual en el depósito girando la tapa lentamente aproximadamente media vuelta en sentido contrahorario. La tapa debe permanecer en su lugar, retenida por sus roscas, y permitir que salga el vapor/la presión residual. Una vez que los vapores se han aliviado, siga girando la tapa hasta que pueda quitarla de la boca del depósito.
español / EE.UU en frío g, coloque la perilla del estrangulador en la posición de arranque en caliente < y arranque el motor en la posición de arranque en caliente <. – Si su herramienta motorizada no arranca, o si se produce de nuevo un bloqueo de vapor, la herramienta motorizada se está usando en condiciones demasiado extremas para el combustible elegido. Interrumpa el uso y espere a que el motor se enfríe completamente antes de intentar arrancar la herramienta motorizada.
español / EE.UU ADVERTENCIA Una vez que el motor haya arrancado, accione de inmediato, brevemente, el gatillo de aceleración: el acelerador de arranque debería soltarse y permitir que el motor se desacelere hasta la velocidad de marcha en vacío. ADVERTENCIA Esta unidad está equipada con un sistema de encendido que normalmente está listo para usar en todo momento. Después de usarla para detener el motor, la palanca de ajuste vuelve automáticamente a la posición "activada".
español / EE.UU Técnica recomendada de trabajo para reducir los ruidos al mínimo: – Utilice la herramienta motorizada solamente a horas razonables: ni muy temprano por la mañana, ni muy tarde por la noche, ni durante el descanso del mediodía, ya que podría molestar a otras personas. Respete los períodos de descanso establecidos en su localidad. – Al reducir el número de motores en marcha se reduce el ruido. Donde sea posible, no haga funcionar más de una herramienta motorizada a la vez.
español / EE.UU Organismo para la Protección del Medio Ambiente (EPA) de EE.UU. Si tiene motivos para pensar que está soplando asbesto o alterándolo de algún otro modo, póngase en contacto inmediatamente con su empleador o un representante local de OSHA. ADVERTENCIA El polvo que contiene sílice puede contener sílice cristalina. La sílice es un componente básico de la arena, el cuarzo, los ladrillos, la arcilla, el granito y numerosos minerales y rocas, incluyendo productos de mampostería y de hormigón.
español / EE.UU Una caja de cilindro dañada o mal instalada, o una envuelta del silenciador dañada/deformada, pueden perjudicar el proceso de enfriamiento del silenciador. Para reducir el riesgo de incendio o de lesiones por quemadura, no continúe trabajando si la carcasa de cilindro o la envuelta del silenciador están dañadas o deformadas. El silenciador tiene un chispero diseñado para reducir el riesgo de incendio debido a la emisión de partículas calientes.
español / EE.UU MANTENIMIENTO, REPARACIÓN Y ALMACENAMIENTO ADVERTENCIA Para reducir el riesgo de lesiones, nunca use la máquina a menos que esté completamente armada, con un tubo de aspiración y una bolsa recolectora colocados correctamente.
español / EE.UU ADVERTENCIA No pruebe nunca el sistema de encendido con el casquillo del cable desconectado de la bujía, o sin tener instalada la bujía, ya que las chispas al descubierto pueden causar un incendio. ADVERTENCIA Nunca maneje su herramienta motorizada si el silenciador está dañado, se ha perdido o si fue modificado. Un silenciador mal cuidado aumenta el riesgo de incendio y puede causar pérdida de audición.
español / EE.UU BG 56, BG 86, SH 56, SH 86 Retiro del tubo de soplado Empuje la boquilla (5) en el tubo de soplado (2) hasta el vástago (6), posición 'a' (larga) o posición 'b' (corta), y gírela en el sentido indicado por la flecha para trabarla en posición. N Empuje la tuerca de unión (4) sobre el tubo corto de la caja del soplador hasta el tope.
español / EE.UU Armado del tubo de aspiración Armado de la picadora aspiradora Montaje del codo 6 3 N N Alinee las flechas (5). N Coloque la tuerca de unión con el símbolo ‚ alineado con las flechas. N Meta el codo (1) en la bolsa recolectora (2) hasta la marca (flecha pequeña). Apriete la banda (3) en la bolsa recolectora y empuje hacia abajo la lengüeta (4). N Empuje el codo en la muesca del tubo corto de la caja del soplador (6) hasta el tope.
español / EE.UU 4 N Alinee las flechas (3). N Coloque la tuerca de unión (5) con la abertura alineado con las flechas (3). N Empuje el tubo de aspiración en el tubo corto de la caja del soplador (4) hasta el tope. Empuje la tuerca de unión (5) sobre el tubo corto de la caja del soplador. N Meta una herramienta adecuada a través de la abertura en la tuerca de unión para presionar hacia abajo la lengüeta. N Gire la tuerca de unión hasta el tope en el sentido indicado por la flecha.
español / EE.UU Combustible Este motor está certificado para funcionar con una mezcla de 50 a 1 de gasolina sin plomo y aceite STIHL para motores de dos tiempos. Su motor requiere una mezcla de gasolina de alta calidad y aceite para motores de dos tiempos enfriados por aire. Utilice gasolina sin plomo de grado intermedio con un octanaje mínimo de 89 ((R+M)/2) y un contenido de etanol no mayor que el 10%.
español / EE.UU Por ejemplo, el uso de una mezcla para invierno durante el verano aumenta la presión en el tanque. Siempre utilice la mezcla de gasolina apropiada para el tiempo, la altura y otros factores ambientales. No use aceites para mezclar con designaciones NMMA o TCW (para motores de dos tiempos enfriados por agua) ni otros aceites para mezclar diseñados para usar en motores enfriados por agua o por aire (por ejemplo, en motores marinos fuera de borda, motonieves, sierras de cadenas, bicimotos, etc.
español / EE.UU de modo que la presión que se pueda haber acumulado en el depósito se disipe lentamente. Siempre aténgase a las instrucciones para el llenado de combustible dadas en este manual: Trate todos los depósitos de combustible como estuvieran presurizados, especialmente si están llenos a la mitad o más. – Siempre permita que la herramienta motorizada se enfríe adecuadamente antes de abrir el depósito de combustible o llenarlo; esto tomará más tiempo en condiciones calientes.
español / EE.UU N ADVERTENCIA Nunca quite la tapa por medio de girarla directamente a la posición abierta. Primero permita que la herramienta motorizada se enfríe de modo adecuado y libere la presión acumulada por medio de girar la tapa lentamente aproximadamente 1/2 vuelta hacia la derecha. Nunca quite la tapa mientras el motor esté caliente o en marcha. Si no es posible apretar la tapa del depósito de combustible adecuadamente, la misma podría no ser la adecuada o está averiada.
español / EE.UU También utilice esta posición si el motor ha estado en marcha, pero todavía se encuentra frío. 3 296BA007 KN Arranque INDICACIÓN No tire de la cuerda de arranque totalmente hasta fuera, se podría romper. N La palanca de ajuste (2) permite bloquear el gatillo de aceleración (3) en la posición de aceleración máxima durante el funcionamiento. No deje que el mango de arranque salte bruscamente hacia atrás.
español / EE.UU Sugerencias adicionales para el arranque BG 56, BG 66, SH 56 La suciedad en el filtro de aire reduce la potencia del motor, aumenta el consumo de combustible y dificulta el arranque del motor. Si el motor se para con la perilla del estrangulador en la posición g o durante la aceleración 295BA072 KN N N Limpieza del filtro de aire Ponga el interruptor de parada en la posición 0, el motor se para y el interruptor regresa a la posición de marcha.
español / EE.UU Versión con material de filtro con pliegues N 2 N 2 1 Extraiga el retenedor (3) y saque el elemento del filtro de aire (4) de la caja de filtro (5). Cambien el elemento de filtro. Como una medida provisoria, límpielo golpeándolo en la palma de la mano o soplándolo con aire comprimido - ¡No lo lave! N Gire el cierre de la cubierta del filtro (1) en sentido contrahorario. N Quite la cubierta del filtro (2). N Limpie toda la suciedad de alrededor del filtro.
español / EE.UU Gestión del motor Bujía El carburador se ajusta en fábrica para garantizar que la mezcla de combustible/aire sea óptima bajo la mayoría de las condiciones de trabajo. El motor se para durante el funcionamiento a marcha en vacío N Si el motor pierde potencia, es difícil arrancarlo o funciona de modo irregular a marcha en vacío, revise la bujía primero. Instale una bujía nueva después de aprox. 100 horas de funcionamiento, o más temprano si los electrodos están muy gastados/corroídos.
español / EE.UU Revisión de la bujía Instalación de la bujía Limpie la bujía si está sucia. N Revise la separación entre electrodos (A) y ajústela de ser necesario – vea el capítulo "Especificaciones". N Utilice únicamente bujías tipo resistencia cuyo margen de rendimiento sea el aprobado.
español / EE.UU Funcionamiento del motor Almacenamiento de la máquina Si el funcionamiento del motor es insatisfactorio aunque el filtro de aire está limpio y el carburador ha sido debidamente ajustado, la causa puede hallarse en el silenciador. Para intervalos de 3 meses o más N Vacíe y limpie el tanque de combustible en una zona bien ventilada. Solicite al concesionario que revise si hay contaminación (coquización) en el silenciador.
español / EE.
si se requiere si presenta daños si hay problemas cada 12 meses mensualmente semanalmente después de cada parada para cargar combustible después de completar el trabajo o diariamente Los intervalos que se indican a continuación corresponden únicamente a condiciones normales de funcionamiento. Si la jornada diaria es más prolongada que lo normal, o bien si las condiciones son extremas (zonas con demasiado polvo, etc.), acorte apropiadamente los intervalos indicados.
español / EE.
español / EE.UU Definiciones 1. 2. 3. Palanca de ajuste (BG 86, SH 86) Mantiene el gatillo de aceleración en posición. Casquillo de bujía Conecta la bujía al alambre de encendido. Silenciador Atenúa los ruidos del tubo de escape y desvía los gases de escape lejos del operador. 12. Mango auxiliar Mango adicional para usar el tubo de aspiración como aspiradora sujetándolo con la mano izquierda. 13. Mango de control El mango del soplador sujetado con la mano derecha. 14.
español / EE.UU Especificaciones EPA / CEPA El período de cumplimiento de emisiones indicado en la etiqueta de cumplimiento de emisiones es la cantidad de horas de funcionamiento para la cual la máquina ha demostrado la conformidad con los requerimientos de emisiones del Gobierno federal de los EE.UU.
español / EE.UU Seco, en modo soplador BG 56: 4,1 kg (9,0 lb) BG 56 C: 4,2 kg (9,3 lb) BG 66: 4,4 kg (9,7 lb) BG 86: 4,4 kg (9,7 lb) BG 86 C: 4,5 kg (9,9 lb) Seco, en modo aspirador SH 56: 5,3 kg (11,5 lb) SH 86: 5,7 kg (12,2 lb) Información de reparación Los usuarios de esta máquina deben efectuar únicamente los trabajos de mantenimiento descritos en este manual.
español / EE.UU Garantía limitada Política de garantía limitada de STIHL Incorporated para piezas y componentes no relacionados con las emisiones Este producto se vende sujeto a la Política de garantía limitada de STIHL Incorporated, disponible en www.stihlusa.com/warranty.html. También puede obtenerlo de un concesionario de servicio STIHL autorizado o llamando al 1-800-GOSTIHL (1-800-467-8445).
español / EE.UU recibos o del incumplimiento del propietario de realizar todos los trabajos de mantenimiento programados. El uso de cualquier pieza de repuesto o servicio cuyo comportamiento y durabilidad sean equivalentes está permitido en trabajos de mantenimiento o reparación no contemplados en la garantía, y no reducirá las obligaciones de la garantía del fabricante del motor.
español / EE.
español / EE.UU Declaración de garantía de STIHL Incorporated sobre el control de emisiones de gases de escape y emisiones por evaporación para el Estado de California Solo para California Sus derechos y obligaciones de garantía El Consejo de Recursos del Aire del Estado de California (CARB) y STIHL Incorporated se complacen en explicarle la Garantía del sistema de control de emisiones instalado en el motor de su equipo de uso fuera de carretera para el año 2021 y posteriores.
español / EE.UU COBERTURA POR STIHL INCORPORATED, vea más arriba. Si uno de estos componentes falla durante el período de garantía, el fabricante debe repararlo o sustituirlo de acuerdo con la subsección (4), más abajo. Un componente reparado o sustituido bajo la garantía debe garantizarse durante el resto del período de garantía.
español / EE.UU pieza de repuesto aprobada por el fabricante o equivalente para llevar a cabo las tareas de mantenimiento o reparación cubiertas por la garantía en los componentes relacionados con el sistema de control de emisiones. La pieza de repuesto se facilitará al propietario sin costo alguno. STIHL Incorporated es responsable de los daños que sufran otros componentes del motor por la ausencia de una pieza cubierta por la garantía que todavía está bajo garantía.
español / EE.UU ROCK BOSS® STIHL OUTFITTERS ™ ® STIHL PICCO ™ STIHL Cutquik STIHL DUROMATIC® ® STIHL PowerSweep ™ STIHL Quickstop STIHL ROLLOMATIC STIHL WOOD STIHL PolyCut ™ ® BOSS® ® STIHL Precision Series ™ STIHL RAPID ™ TIMBERSPORTS STIHL SuperCut ™ WOOD BOSS® TapAction ™ YARD BOSS® TrimCut ™ Algunos de las marcas comerciales de STIHL por ley común STIHL Injection TM Esta lista de marcas comerciales está sujeta a cambios.
español / EE.
WARNING This product contains chemicals known to the State of California to cause cancer, birth defects or other reproductive harm. WARNING The engine exhaust from this product contains chemicals known to the State of California to cause cancer, birth defects or other reproductive harm. ADVERTENCIA Este producto contiene sustancias químicas consideradas por el Estado de California como causantes de cáncer, defectos de nacimiento u otra toxicidad reproductora.