STIHL BGA 57 2 - 17 Instruction Manual
English Introduction Dear Customer, Thank you for choosing STIHL. We develop and manufacture our quality products to meet our customers’ requirements. The products are designed for reliability even under extreme con‐ ditions. STIHL also stands for premium service quality. Our dealers guarantee competent advice and instruction as well as comprehensive service support. 2 2.1 Guide to Using this Manual Applicable Documentation Local safety regulations apply.
Overview 3 English Overview 3.1 12 Button Activates the LEDs on the battery. Blower, Battery and Charger 3 14 LED The LED indicates the operating status of the charger. 6 1 2 13 Charger Charges the battery. 7 4 15 Connecting Cable Connects charger to appliance plug. # 16 Appliance Plug Connects cable to wall outlet. 9 # Rating Label with Serial Number 3.2 13 10 Meanings of symbols that may be on the blower, battery and charger: 1 LED glows red. Battery too hot or too cold.
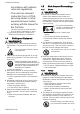
English 4 Safety Precautions Read, understand and save the instruction manual. Wear safety glasses. Confine long hair so that it cannot be sucked into the blower. 4.3 Protect blower and charger from rain and dampness. ■ Users without adequate training or instruction cannot recognize or assess the risks involved in using the blower, battery and charger. The user or other persons may sustain serious or fatal injuries. ► Read, understand and save the instruction manual. Maintain safe distance.
4 Safety Precautions accordance with national rules and regulations. – The user has received instruction from a STIHL servicing dealer or other experienced user before working with the blower for the first time. – The user must not be under the influ‐ ence of alcohol, medication or drugs. ► If you have any queries: Contact your STIHL servicing dealer for assistance. 4.4 Clothing and Equipment WARNING ■ Long hair can be sucked into the blower dur‐ ing operation. This can result in serious inju‐ ries.
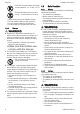
English 4 Safety Precautions ► Use and store the battery at temper‐ atures between ‑ 10 °C and + 50 °C. ► Protect the battery from rain and damp – do not immerse it in fluids. ► ► ► ► Keep battery away from metallic objects. Do not expose battery to high pressure. Do not expose battery to microwaves. Protect battery from chemicals and salts. 4.5.3 Charger WARNING ■ Bystanders, children and animals are not aware of and cannot assess the dangers of a charger or electric current.
4 Safety Precautions ► Never connect the battery terminals to met‐ allic objects and cause a short circuit. ► Do not open the battery. ► Replace worn or damaged warning signs. ■ Fluid may leak from a damaged battery. If the fluid contacts the skin or eyes, this may cause irritation. ► Avoid contact with the fluid. ► In the event of contact with the skin: wash the affected areas with plenty of soap and water.
English – Connecting cable plug or extension cable is damaged. – Wall outlet is not properly installed. DANGER ■ Contact with live components can result in an electric shock. This can result in serious or fatal injuries. ► Check that the connecting cable, extension cable and their plugs are not damaged. If the connecting cable or extension cable is damaged: ► Do not touch damaged areas. ► Disconnect the plug from the wall outlet.
4 Safety Precautions 4.10.3 Charger WARNING ■ The charger may turn over or move while being transported. This may result in personal injuries and damage to property. ► Disconnect the plug from the wall outlet. ► Remove the battery. ► Secure the charger with lashing straps, belts or a net to prevent it turning over and moving. ■ The connecting cable must not be used for carrying the charger. The connecting cable and the charger may be damaged. ► Wind up the connecting cable and attach it to the charger.
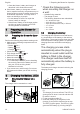
English 5 Preparing the Blower for Operation 5 5.1 Preparing the Blower for Operation 6.1 Check the following points when mounting the charger on a wall: – Suitable fixing materials. – The charger is level. The following dimensions are maintained: – a = at least 100 mm – b (for AL 101) = 75 mm – b (for AL 300 and AL 500) = 120 mm – c = 4.5 mm – d = 9 mm – e = 2.5 mm 6.
7 Assembling the Blower English State of Charge 1 2 3 4 80-100% 60-80% 40-60% 0-20% 1 0000-GXX-0629-A0 20-40% ► Press the button (1). The LEDs (5) glow green for about 5 seconds and indicate the state of charge. ► If the LED on the right flashes green: Charge the battery. 8 8.1 Fitting the Battery 1 LEDs on Battery The LEDs can show the state of charge or mal‐ functions. The LEDs can glow or flash green or red. The state of charge is indicated when the LEDs glow or flash green.
English 9 Switching the Blower On/Off ► Press the locking lever (1) with your other hand. The battery (2) is unlocked and can be removed. 9.1 Switching the Blower On/Off Switching On ► Hold the blower with one hand on the control handle - wrap your thumb around the handle. 1 3 0000-GXX-2383-A1 2 ► Push the release slide (1) in the direction of the blower tube with your thumb and hold it there. ► Depress the trigger lockout (2) with your hand and hold it there.
12 After Finishing Work 11.2 English Blow-Sweeping ► Wind up the connecting cable and attach it to the charger. ► Transporting the charger in a vehicle: Secure the charger with lashing straps, belts or a net to prevent it turning over and moving. ► Point the nozzle at the ground. ► Walk slowly and steadily forwards. 12 After Finishing Work 12.1 After Finishing Work ► ► ► ► ► Switch off the blower and remove the battery. If the blower is wet: Allow the blower to dry.
English 15 Cleaning ► Observe the following points when storing the charger: – Charger is out of the reach of children. – The charger is clean and dry. – Charger is in an enclosed space. – Charger is stored separately, away from the battery. – The charger is not suspended from the con‐ necting cable or the holder (3) for the con‐ necting cable. – Charger is in a temperature range between + 5°C and + 40°C. 15 15.1 ► ► ► ► Cleaning Cleaning the blower Switch off the blower and remove the battery.
18 Specifications Condition English LEDs on Bat‐ tery 4 LEDs flash red Blower cuts out 3 LEDs glow during operation red. Blower runtime is too short Charge process does not start when battery is inserted in the charger. 17.2 1 LED glows red. LED on Charger Battery not being LED flashes charged. red. 18.1 There is a malfunction ► Remove battery and insert it again. in the battery. ► Switch on the blower.
English 19 Spare Parts and Accessories If rated voltage on the rating label is 100 V to 127 V: – Cord length up to 10 m: AWG 14 / 2.0 mm² – Cord length 10 m up to 30 m: AWG 12 / 3.5 mm² Despite ongoing market observation, STIHL is unable to judge the reliability, safety and suitabil‐ ity of other manufacturers' spare parts and accessories; accordingly, STIHL cannot warrant for the use of those parts. 18.5 Original STIHL spare parts and original STIHL accessories are available from STIHL dealers.
21 EC Declaration of Conformity English pp Dr. Jürgen Hoffmann, Head of Product Data, Regulations and Licensing 21.2 STIHL AL 101 Charger Con‐ formity Notice This charger has been manufactured and put on the market in accordance with the following directives: 2014/35/EU, 2014/30/EU and 2011/65/EU. The year of manufacture, country of manufacture and serial number are applied to the blower. The complete EC Declaration of Conformity is available from ANDREAS STIHL AG & Co.
English 18 21 EC Declaration of Conformity 0458-807-8321-B
21 EC Declaration of Conformity 0458-807-8321-B English 19
0458-807-8321-B *04588078321B* www.stihl.