
Instruction Manual

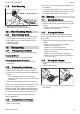


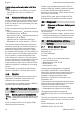


Table Of Contents
- STIHL BGA 57
- 1 Introduction
- 2 Guide to Using this Manual
- 3 Overview
- 4 Safety Precautions
- 5 Preparing the Blower for Operation
- 6 Charging the Battery, LEDs
- 7 Assembling the Blower
- 8 Removing and Fitting the Battery
- 9 Switching the Blower On/Off
- 10 Testing the Blower and Battery
- 11 Operating the Blower
- 12 After Finishing Work
- 13 Transporting
- 14 Storing
- 15 Cleaning
- 16 Maintenance and Repairs
- 17 Troubleshooting
- 18 Specifications
- 19 Spare Parts and Accessories
- 20 Disposal
- 21 EC Declaration of Conformity

► If the LED (4) and the LEDs (1) stop glowing:
The battery (2) is fully charged and can be
taken out of the charger (3).
► If the charger (3) is no longer required. Dis‐
connect the plug (6) from the wall outlet (7).
6.3 State of Charge
1
0000-GXX-0629-A0
20-40%
40-60%
60-80%
80-100%
0-20%
► Press the button (1).
The LEDs (5) glow green for about 5 seconds
and indicate the state of charge.
► If the LED on the right flashes green: Charge
the battery.
6.4 LEDs on Battery
The LEDs can show the state of charge or mal‐
functions. The LEDs can glow or flash green or
red.
The state of charge is indicated when the LEDs
glow or flash green.
► If the LEDs glow or flash red: Troubleshooting,
17.1.
Malfunction in blower or battery.
6.5 LED on Charger
The LED indicates the operating status of the
charger.
If the LED glows green, the battery is being
charged.
► If the LED flashes red: Rectify the malfunction.
Malfunction in charger.
7 Assembling the Blower
7.1 Mounting, Adjusting and
Removing the Nozzle
The nozzle can be mounted to the blower tube in
three positions to suit the height and reach of the
user. The positions are marked on the blower
tube.
► Switch off the blower and remove the battery.
2
0000-GXX-0625-A0
4
3
1
► Line up the lug (3) and the slot (2).
► Push nozzle (1) into required position on
blower tube (4).
► Rotate nozzle (1) until it engages.
8 Removing and Fitting the
Battery
8.1 Fitting the Battery
2
3
1
0000-GXX-0621-A0
► Insert the battery (1) in the battery compart‐
ment (2) and press it home until you hear a
click.
Arrows (3) on battery (1) are still visible and
battery (1) is held securely in battery compart‐
ment (2). There is no electrical contact
between blower and battery (1).
► Push the battery (1) into the battery compart‐
ment (2) as far as stop.
The battery (1) engages with a second click
and is flush with the blower’s housing.
8.2 Removing the Battery
► Stand the blower on a level surface.
► Hold one hand in front of the battery compart‐
ment to ensure the battery (2) does not fall
out.
0000-GXX-2384-A0
1
2
7 Assembling the Blower English
0458-807-8321-B 11