STIHL BGE 61, 71, 81, SHE 71, 81 2 - 16 Instruction Manual
English Dear Customer, Thank you for choosing a quality engineered STIHL product. It has been built using modern production techni‐ ques and comprehensive quality assurance. Every effort has been made to ensure your satis‐ faction and trouble-free use of the product. Please contact your dealer or our sales company if you have any queries concerning this product. Your 1.2 Symbols in text WARNING Warning where there is a risk of an accident or personal injury or serious damage to property.
2 Safety Precautions and Working Techniques WARNING – Minors should never be allowed to operate this power tool. Watch children to be sure that they do not play with the power tool. – This power tool may be operated only by per‐ sons who have been instructed in its use and proper handling. – Persons who are not able to operate the power tool safely due to limited physical, sen‐ sory or mental ability may work with it only under supervision or after being instructed appropriately by a responsible person.
English 2 Safety Precautions and Working Techniques STIHL can supply a comprehensive range of per‐ sonal protective equipment. 2.5 Accessories Only use parts and accessories that are explicitly approved for this power tool by STIHL or are technically identical. If you have any questions in this respect, consult your dealer. Use only high quality parts and accessories. In order to avoid the risk of accidents and damage to the unit. STIHL recommends the use of original STIHL parts and accessories.
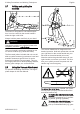
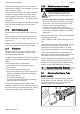
2 Safety Precautions and Working Techniques Holding and guiding the machine 290BA001 KN 2.7 English The blower is designed for one-handed opera‐ tion. It can be carried by the control handle in either the right or left hand. 290BA002 KN Always hold the power tool firmly in your hand. WARNING Operate the machine only with the blower tube completely mounted – risk of injury! The round nozzle is particularly suitable for use on uneven surfaces (e.g. fields and lawns).
English 2 Safety Precautions and Working Techniques line) or materials soaked in combusti‐ ble fluids. NOTICE Vacuuming abrasive material (such as grit, stone chips, etc.) causes the impeller wheel and impel‐ ler housing to wear at a rapid rate. This results in a considerable loss of suction power. In such a case you should contact your dealer. STIHL rec‐ ommends you have this work done by a STIHL servicing dealer.
3 Assembling the Blower If the machine continues to run (does not switch off) after the trigger switch is released, discon‐ nect the plug from the wall outlet and consult your STIHL servicing dealer. The machine has a malfunction. Before leaving the power tool unattended: Switch it off and disconnect the plug from the power supply. 2.10 After finishing work Disconnect the mains plug from the power sup‐ ply. Never jerk the connecting cord to disconnect it from the wall outlet.
English 4 Assembling the Vacuum Shredder ► Line up the recesses. The arrow (2) must be on the top of the blower tube (1). ► Push the blower tube (1) into the blower hous‐ ing stub (3) as far as the stop. ► Push the union nut (4) over the blower hous‐ ing stub (3) and turn it in the direction of the arrow until the tab (5) engages the opening (6) in the union nut. ► Disconnect the plug from the power supply. 4.1 Mounting the Elbow WARNING Make sure the zipper on the catcher bag is closed.
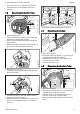
4 Assembling the Vacuum Shredder English ► Line up the arrows on the suction tube and extension tube. Push together and lock in position. 1 Lock button (arrow) must engage in position. 4.4 Removing the Elbow 290BA009 KN ► Switch off the motor. ► Press down the lock button (1) by inserting a suitable tool through the opening. ► Push lug (arrow) against blower housing and hold it there. ► Rotate the intake screen (2) in the direction of arrow as far as the stop and lift it away.
English 5 Connecting to Power Supply The cores in the cord must have the following minimum cross-section depending on the mains voltage and cord length. 5 0000-GXX-2556-A0 ► Position the intake screen (3) on the intake opening. ► Line up the arrows (4). ► Rotate the intake screen (3) in direction of arrow until the lug (5) engages audibly on the blower housing. Cord length 220 V – 240 V: Up to 20 m 20 m to 50 m 100 V – 127 V: Up to 10 m 10 m to 30 m 5.2 Minimum cross-section 1.5 mm2 2.
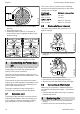
7 Switching Off English When the machine is not in use, shut it off so that it does not endanger others. BGE 61, BGE 71, SHE 71 1 Secure it against unauthorized use. BGE 61, BGE 71, SHE 71 290BA016 KN 290BA016 KN 1 ► Move switch (1) to I or II (position II depends on model). Units with single switch setting (I): I = full power ► Move the switch (1) to 0 BGE 81, SHE 81 Units with two switch settings (I and II): I = half power II = full power 2 3 ► Release trigger switch (2) on control handle.
English Complete machine Control handle Cooling inlets Safety labels 10 Visual inspection (con‐ x dition) Clean Check operation x Clean Replace Minimize Wear and Avoid Damage Observing the instructions in this manual helps reduce the risk of unnecessary wear and dam‐ age to the power tool. The power tool must be operated, maintained and stored with the due care and attention described in this instruction manual.
11 Main Parts 11 English Main Parts Power supply: 6 7 120 V, 60 Hz, 9.2 A Protect with a fuse 15 A Engine power 1100 W Protection class, safety class II E 8 5 4 3 1 9 2 240V version Power supply: # 10 11 240 V, 50 Hz, 4.8 A Protect with a fuse 10 A Engine power 1100 W Protection class, safety class II E 12.2 12 120V version Power supply: 120 V, 60 Hz, 9.
English 13 Maintenance and Repairs 12.5 Air velocity with nozzle BGE 61 BGE 71 BGE 81 SHE 71 SHE 81 Blower mode 66 m/s 66 m/s 76 m/s 58 m/s 67 m/s 12.6 Dimensions Width Altitude Depth SHE 81 Handle, right 2.6 m/s2 Handle, left 5.6 m/s2 The K‑factor in accordance with Directive 2006/42/EC is 2.0 dB(A) for the sound pressure level and sound power level; the K‑factor in accordance with Directive 2006/42/EC is 2.0 m/s2 for the vibration level. 210 mm 334 mm 330 mm 12.
EC Declaration of Conformity English Guaranteed sound power level BGE 71: BGE 81: SHE 71 SHE 81: 100 dB(A) 103 dB(A) 100 dB(A) 102 dB(A) 000BA073 KN Technical documents deposited at: STIHL products must not be thrown in the gar‐ bage can. Take the product, accessories and packaging to an approved disposal site for envi‐ ronment-friendly recycling. Contact your STIHL servicing dealer for the lat‐ est information on waste disposal. 15 ANDREAS STIHL AG & Co.
English 16 UKCA Declaration of Conformity netic Compatibility Regulations 2016 and has been developed and manufactured in accord‐ ance with the versions of the following standards valid on the date of manufacture: EN 50636‑2‑100, EN 55014‑1, EN 55014‑2, EN 60335‑1, EN 61000‑3‑2, EN 61000‑3‑3 The measured and guaranteed equivalent sound power level has been determined in accordance with the UK regulation Noise Emission in the Environment by Equipment for use Outdoors Regulations 2001, Schedule 8.
16 UKCA Declaration of Conformity 0458-290-0121-C English 17
English 18 16 UKCA Declaration of Conformity 0458-290-0121-C
16 UKCA Declaration of Conformity 0458-290-0121-C English 19
0458-290-0121-C *04582900121C* www.stihl.