
Instruction Manual
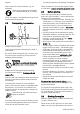

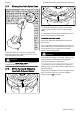

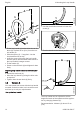
Table Of Contents
- STIHL FS 45
- 1 Guide to Using this Manual
- 2 Safety Precautions and Working Techniques
- 2.1 Clothing and equipment
- 2.2 Transporting the machine
- 2.3 Refueling
- 2.4 Before starting
- 2.5 Starting the engine
- 2.6 Holding and guiding the machine
- 2.7 While working
- 2.8 Vibrations
- 2.9 Maintenance and Repairs
- 2.10 Cutting Attachments and Deflectors
- 2.11 Mowing Head with Nylon Lines
- 2.12 STIHL PolyCut 6-3 Mowing Head with Polymer Blades
- 3 Approved Combinations of Cutting Attachment, Deflector, Handle and Harness
- 4 Mounting the Loop Handle
- 5 Mounting the Deflector
- 6 Mounting the Cutting Attachment
- 7 Fuel
- 8 Fueling
- 9 Starting / Stopping the Engine
- 10 Operating Instructions
- 11 Cleaning the Air Filter
- 12 Adjusting the Carburetor
- 13 Spark Plug
- 14 Engine Running Behavior
- 15 Storing the Machine
- 16 Maintaining the Mowing Head
- 17 Inspections and Maintenance by Dealer
- 18 Maintenance and Care
- 19 Main Parts
- 20 Specifications
- 21 Maintenance and Repairs
- 22 Disposal
- 23 EC Declaration of Conformity

4
6
5
232BA027 KN
1
2
3
A
► Fit the loop handle (1) on the drive tube at dis‐
tance (A) of about 20 cm (8 in.) from the con‐
trol handle (2).
► Slide the spacer (3) – if supplied – into the
loop handle as far as stop.
► Insert the screw (4) through the loop handle
and the spacer until the screw head locates in
the loop handle's hexagon recess.
► Fit the washer (5).
► Screw on the star knob (6) and tighten it down
firmly.
Adjusting loop handle to most comfortable posi‐
tion
► Loosen the star knob (6).
► Move the loop handle (1) along the drive tube
as required.
► Tighten down the star knob (6) firmly.
4.2 Version B
Your new power tool comes with the loop handle
mounted on the drive tube, but it must be turned
and lined up to suit your requirements.
Line up the loop handle.
1
239BA008 KN
► Use the combination wrench to loosen the
screw (1).
239BA009 KN
► Turn the handle to the vertical position.
234BA026 KN
A
The loop handle can be adjusted to suit the
height and reach of the operator and the applica‐
tion by changing distance (A).
Recommendation: distance (A): about 15 cm
(6 in)
English 4 Mounting the Loop Handle
10 0458-232-8321-F