STIHL FSA 57 2 - 19 Instruction Manual
English 1 Introduction Dear Customer, Thank you for choosing STIHL. We develop and manufacture our quality products to meet our customers’ requirements. The products are designed for reliability even under extreme con‐ ditions. STIHL also stands for premium service quality. Our dealers guarantee competent advice and instruction as well as comprehensive service support. IMPORTANT! READ BEFORE USING AND KEEP IN A SAFE PLACE FOR REFERENCE. 2 2.
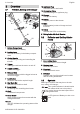
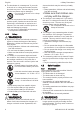
Overview Overview 3.1 13 Appliance Plug Connects cable to wall outlet. Trimmer, Battery and Charger 14 Connecting Cable Connects charger to appliance plug. 1 2 # 5 3 4 6 12 7 8 # 15 9 13 15 Charger Charges the battery. 14 # 16 17 18 16 Battery Supplies power to the trimmer. 17 LEDs Indicate battery’s state of charge and mal‐ functions. 18 Button Activates the LEDs on the battery. # Rating Label with Serial Number 10 3.
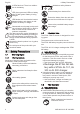
English 4 Safety Precautions 4 LEDs flash red. There is a malfunc‐ tion in the battery. 15m (50ft) Protect battery from heat and fire. LED glows green and LEDs on battery glow or flash green. Battery is being charged. Protect the battery from rain and mois‐ ture and do not immerse it in liquids. LED flashes red. No electrical contact between battery and charger or mal‐ function in battery or charger.
4 Safety Precautions English ► If you pass the trimmer, battery and charger on to another person: Always give them the instruction manual. ► Make sure the user meets the following requirements: – The user must be rested. – The user must be in good physical condition and mental health to operate and work with the trimmer, battery and charger. If the user’s physical, sensory or mental ability is restricted, he or she may work only under the supervision of or as instructed by a responsi‐ ble person.
English 4 Safety Precautions ■ The brushcutter is not waterproof. If you work in the rain or in a damp environment, an elec‐ tric shock may occur. The user may be injured and the brushcutter may be damaged. ► Do not work in the rain or in a damp environment. ■ Electrical components of the brushcutter can produce sparks. Sparks can cause fires and explosions in a flammable or explosive envi‐ ronment. This can result in serious injuries or death and damage to property.
4 Safety Precautions ► Work only with an undamaged brushcutter. ► If the brushcutter is dirty or wet: Clean the brushcutter and allow it to dry. ► Never attempt to modify your brushcutter. Exception: Mounting one of the combinations of cutting attachment and deflector recom‐ mended in this user manual. ► If the controls do not function properly: Do not use your brushcutter. ► Never mount metal cutting attachments. ► Fit genuine STIHL accessories for this brush‐ cutter.
English 4 Safety Precautions ► If the battery emits an unusual odour or smoke: do not use the battery and keep it away from flammable materials. ► If the battery catches fire: try to extinguish the battery using a fire extinguisher or water. 4.6.5 Charger The charger is in a safe condition if the following points are observed: – Charger is undamaged. – Charger is clean and dry.
4 Safety Precautions ► Never touch the connecting cable, extension cable or their plugs with wet hands. ► Insert the plug of the connecting cable or extension cable in a properly installed fused wall outlet with ground contact. ► Install the charger with a ground fault circuit interrupter (30 mA, 30 ms). ■ A damaged or unsuitable extension cable can cause an electric shock. This can result in serious or fatal injuries. ► Use an extension cable with the correct wire 20.4.
English 4 Safety Precautions 4.11 Storing 4.11.1 Trimmer WARNING ■ Children are not aware of and cannot assess the dangers of a trimmer and can be seriously injured. ► Remove the battery. ► Store the trimmer out of the reach of chil‐ dren. ■ Dampness can corrode the electrical contacts on the trimmer and metal components. This can damage the trimmer. ► Remove the battery. ► If the charger is hot: Allow charger to cool down. ► Store the charger in a clean and dry condi‐ tion.
5 Preparing Trimmer for Operation 5.1 Preparing Trimmer for Operation – – – – Preparing Trimmer for Opera‐ tion 6.2 Perform the following steps before starting work: ► Make sure the following components are in a safe condition: – Trimmer, 4.6.1. – Deflector, 4.6.2. – Mowing head, 4.6.3. – Battery, 4.6.4. – Charger, 4.6.5. ► Check the battery, 11.2. ► Fully charge the battery, 6.2. ► Clean the trimmer, 16.1. ► Mount the deflector, 7.1. ► Mount the loop handle, 7.3. ► Adjust length of shaft, 8.1.
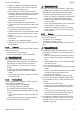
English 7 Assembling the Trimmer State of Charge The deflector (2) is tight against the housing. ► Insert and tighten down the screws (3) firmly. The deflector (2) must not be removed again. 80-100% 60-80% 40-60% 7.2 20-40% 0000-GXX-0629-A0 0-20% 1 7.2.1 Mounting the Mowing Head ► Switch off the trimmer and remove the battery. 1 ► Press the button (1). The LEDs (5) glow green for about 5 seconds and indicate the state of charge. ► If the LED on the right flashes green: Charge the battery.
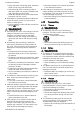
8 Adjusting Trimmer for User English 2 2 1 ► Line up the loop handle (2) so that the recess for the star knob nut (1) is on the right of the control handle and the openings in the loop handle (2) are facing the operator. ► Ease the ends of the loop handle (2) apart and push it onto the control handle until it engages in position. ► Insert the screw (3) through the hole. ► Fit the star knob nut (1) and tighten it down. 0000-GXX-2468-A0 0000-GXX-1488-A0 3 1 ► Loosen the star knob nut (1).
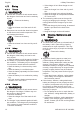
English 10 Switching the Trimmer On/Off ► Press the locking lever (1) with your other hand. The battery (2) is unlocked and can be removed. 10 10.1 Switching the Trimmer On/Off Switching On ► Hold the trimmer firmly with one hand on the control handle – wrap your thumb around the handle. ► Hold the trimmer firmly with the other hand on the loop handle – wrap your thumb around the handle. 2 3 ► Push the release slide (1) in the direction of the loop handle with your thumb and hold it there.
12 Operating the Trimmer 12 Operating the Trimmer The spool is empty. Holding and Controlling the Trimmer 0000-GXX-1494-A0 12.1 English ► Hold the trimmer with one hand on the control handle - wrap your thumb around the control handle. ► Hold the trimmer with the other hand on the loop handle - wrap your thumb around the loop handle. 12.2 13 After Finishing Work 13.1 After Finishing Work ► ► ► ► ► ► ► Switch off the trimmer and remove the battery.
English 15 15 Storing 16 Storing 15.1 Storing the Trimmer 15.2 Storing the Battery STIHL recommends that you store the battery with a charge between 40 % and 60 % (2 LEDs glow green). ► Observe the following points when storing the battery: – Battery is out of the reach of children. – Battery is clean and dry. – Battery is in an enclosed space. – Store the battery separately from the trim‐ mer and charger. – Battery is in non-conductive packaging.
19 Troubleshooting English ► If the charger has a malfunction or is dam‐ aged: Replace the charger. ► If the connecting cable has a malfunction or is damaged: Do not use the charger and have 19 19.1 Troubleshooting Troubleshooting Trimmer or Battery Condition Trimmer does not start when switched on. LEDs on Bat‐ tery 1 LED flashes green. Cause Remedy Battery has low charge. ► Charge the battery. 1 LED glows red. 3 LEDs flash red. Battery too hot or too cold.
English 20 Specifications Condition 20 20.1 LED on Charger Cause Remedy Malfunction in charger. ► Do not use the charger and contact your STIHL servicing dealer. Specifications STIHL FSA 57 Trimmer – Approved battery: STIHL AK – Weight without battery, cutting attachment and deflector: 2,4 kg – Length without cutting attachment: 1490 mm up to 1690 mm For battery life see www.stihl.com/battery-life. 20.2 – – – – – – 20.
22 Spare Parts and Accessories – with round, low-noise mowing line with a diameter of 1.6 mm or 2.0 mm 22 Spare Parts and Accesso‐ ries 22.1 Spare parts and accessories These symbols indicate original STIHL spare parts and original STIHL acces‐ sories. STIHL recommends the use of original STIHL spare parts and accessories.
0458-806-0121-B *04588060121B* www.stihl.