
Instruction Manual

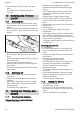
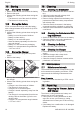


Table Of Contents
- STIHL FSA 57
- 1 Introduction
- 2 Guide to Using this Manual
- 3 Overview
- 4 Safety Precautions
- 5 Preparing Trimmer for Operation
- 6 Charging the Battery, LEDs
- 7 Assembling the Trimmer
- 8 Adjusting Trimmer for User
- 9 Removing and Fitting the Battery
- 10 Switching the Trimmer On/Off
- 11 Testing the Trimmer and Battery
- 12 Operating the Trimmer
- 13 After Finishing Work
- 14 Transporting
- 15 Storing
- 16 Cleaning
- 17 Maintenance
- 18 Repairing
- 19 Troubleshooting
- 20 Specifications
- 21 Combinations of Cutting Attachments and Deflectors
- 22 Spare Parts and Accessories
- 23 Disposal
- 24 EC Declaration of Conformity

► Press the locking lever (1) with your other
hand.
The battery (2) is unlocked and can be
removed.
10 Switching the Trimmer
On/Off
10.1 Switching On
► Hold the trimmer firmly with one hand on the
control handle – wrap your thumb around the
handle.
► Hold the trimmer firmly with the other hand on
the loop handle – wrap your thumb around the
handle.
2
3
1
0000-GXX-2469-A0
► Push the release slide (1) in the direction of
the loop handle with your thumb and hold it
there.
► Depress the trigger lockout (2) with your hand
and hold it there.
You can let go of the release slide (1).
► Pull the trigger (3) with your index finger and
hold it there.
The motor accelerates and the cutting attach‐
ment rotates.
10.2 Switching Off
► Release the trigger and lockout lever at the
same time.
► Wait for the cutting attachment to come to a
standstill.
► If the cutting attachment continues to rotate:
Remove the battery and contact your STIHL
servicing dealer.
The trimmer has a malfunction.
11 Testing the Trimmer and
Battery
11.1 Checking the Controls
Release slide, trigger lockout and trigger
► Remove the battery.
► Attempt to pull the trigger lever without
depressing the release slide and the trigger
lockout.
► If the trigger can be pulled: Do not use your
trimmer and contact your STIHL dealer for
assistance.
Release slide or trigger lockout is faulty.
► Push the release slide (1) in the direction of
the loop handle with your thumb and hold it
there.
► Depress the trigger lockout lever and hold it in
that position.
► Pull the trigger.
► Let go of the trigger, trigger lockout and
release slide.
► If the trigger, trigger lockout or release slide is
stiff or does not spring back to the idle posi‐
tion: Do not use your trimmer and contact your
STIHL dealer for assistance.
The trigger, trigger lockout or release slide has
a malfunction.
Switching on the trimmer
► Fit the battery.
► Push the release slide (1) in the direction of
the loop handle with your thumb and hold it
there.
► Depress the trigger lockout lever and hold it in
that position.
► Pull the trigger and hold it there.
The cutting attachment rotates.
► If 3 LEDs flash red: Remove the battery and
contact your STIHL dealer for assistance.
There is a malfunction in the trimmer.
► Release the trigger.
The cutting attachment stops rotating after a
brief delay.
► If the cutting attachment continues to rotate:
Remove the battery and contact your STIHL
dealer for assistance.
The trimmer has a malfunction.
11.2 Testing the Battery
► Press button on battery.
The LEDs glow or flash.
► If the LEDs do not glow or flash: Do not use
the battery and contact your STIHL servicing
dealer.
There is a malfunction in the battery.
English 10 Switching the Trimmer On/Off
14 0458-806-0121-B. VA0.M20.