
Instruction Manual


Table Of Contents
- 1 Introduction
- 2 Guide to Using this Manual
- 3 Overview
- 4 Safety Precautions
- 5 Preparing Hedge Trimmer for Operation
- 6 Charging the Battery, LEDs
- 7 Assembling the Hedge Trimmer
- 8 Removing and Fitting the Battery
- 9 Switching the Hedge Trimmer On/Off
- 10 Testing the Hedge Trimmer and Battery
- 11 Operating the Hedge Trimmer
- 12 After Finishing Work
- 13 Transporting
- 14 Storing
- 15 Cleaning
- 16 Maintenance
- 17 Repairing
- 18 Troubleshooting
- 19 Specifications
- 20 Spare Parts and Accessories
- 21 Disposal
- 22 EC Declaration of Conformity
- 23 General Power Tool Safety Warnings
0458-816-8321-A
12
English
6 Charging the Battery, LEDs
► Check the controls, @ 10.1.
► If 3 LEDs on the battery flash red while you are checking
the controls: Remove the battery and contact your
STIHL dealer for assistance.
There is a malfunction in the hedge trimmer.
► If you cannot carry out these steps: Do not use the hedge
trimmer and contact your STIHL dealer for assistance.
6.1 Charging the Battery
The charging time depends on several factors, e.g.
temperature of the battery or the ambient temperature. The
actual charging time may differ from the specified charging
time. For specified charging times see
www.stihl.com/charging-times.
► Recharge the battery fully as described in the instruction
manual for the STIHL AL 101, 300, 500 chargers.
6.2 State of Charge
► Press the button (1).
The LEDs (5) glow green for about 5 seconds and indicate
the state of charge.
► If the LED on the right flashes green: Charge the battery.
6.3 LEDs on Battery
The LEDs can show the state of charge or malfunctions. The
LEDs can glow or flash green or red.
The state of charge is indicated when the LEDs glow or flash
green.
► If the LEDs glow or flash red: Troubleshooting, @ 18.
There is a malfunction in hedge trimmer or battery.
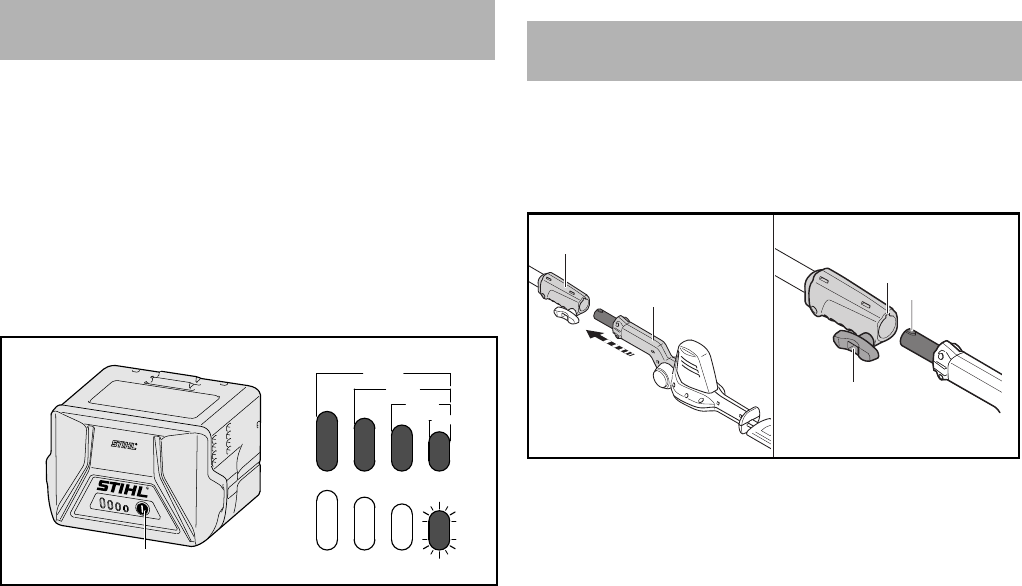
7.1 Mounting the Cutter Bar
► Remove the battery.
► Fit the blade scabbard so that it completely covers the
cutting blades.
► Line up the coupling sleeve (1) and cutter bar (2) so that
the groove (3) and lug (4) face upwards.
► Push the cutter bar (2) into the coupling sleeve (1).
► Turn the wing screw (5) clockwise and tighten it down
firmly.
7.2 Mounting the Loop Handle
► Switch off the hedge trimmer and remove the battery.
6 Charging the Battery, LEDs
1
0000-GXX-0629-A0
20-40%
40-60%
60-80%
80-100%
0-20%
7 Assembling the Hedge Trimmer
2
1
5
3
4
0000-GXX-7603-A0