STIHL MS 400 C-M 2 - 29 Instruction Manual
English Guide to Using this Manual 2.1 Symbols used with warnings in the text WARNING ■ This symbol indicates dangers that can cause serious injuries or death. ► The measures indicated can avoid serious injuries or death. NOTICE ■ This symbol indicates dangers that can cause damage to property. ► The measures indicated can avoid damage to property. 2.2 3 3.1 Symbols in Text This symbol refers to a chapter in this instruction manual.
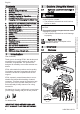
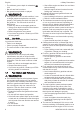
Overview 1 Front Hand Guard Helps protect operator’s left hand from con‐ tact with the saw chain, serves to engage the chain brake and activates the chain brake by inertia in certain kickback situations. 2 Muffler Reduces chainsaw noise emissions. 3 Spiked Bumper Toothed stop for holding saw steady against wood while cutting. 4 Saw Chain Cuts the wood. 5 Guide Bar Supports and guides the saw chain. 6 Chain catcher Reduces risk of operator contact with the chain if it comes off the bar or breaks.
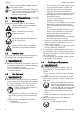
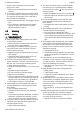
English 4 Safety Precautions Engine is started with the Master Control lever in this position. Guaranteed sound power level accord‐ LWA ing to directive 2000/14/EC in dB(A) in order to make sound emissions of products comparable. 4 4.1 Safety Precautions Warning Signs Meanings of warning signs on the chainsaw: Observe safety notices and take the necessary precautions. Read, understand and save the instruction manual. Wear safety glasses, hearing protec‐ tion and a hard hat.
4 Safety Precautions ■ Falling objects can cause head injuries. ► If there is a danger of falling objects during operation: Wear a safety hard hat. ■ Dust can be whipped up during operation: Whipped up dust can damage the respiratory passages and cause allergic reactions. ► If dust is whipped up and forms a cloud: Wear a dust respirator mask. ■ Inappropriate clothing can snag on wood, brush or the saw. Not wearing suitable cloth‐ ing may result in serious injury. ► Wear snug-fitting clothing.
English 4 Safety Precautions – The minimum groove depth is maintained, 19.3. – Bar rails are free from burrs. – Bar groove is not pinched or splayed. WARNING ■ If the guide bar is not in a safe condition, it can no longer support and guide the saw chain properly. The rotating saw chain can jump off the guide bar. This can result in serious or fatal injuries. ► Work only with an undamaged guide bar. ► If the groove depth is less than the minimum depth: Mount a new guide bar.
4 Safety Precautions rect mix ratio of gasoline and two-stroke engine oil is used. ► Mix the fuel as described in this instruction manual. ■ The mixture of gasoline and two-stroke engine oil can separate if it is stored for a long period. The saw can be damaged if it is used with a fuel mix that has separated. ► Before refueling the saw: Thoroughly mix the fuel. ► Use a mixture of gasoline and two-stroke engine oil that is not older than 30 days (STIHL MotoMix: 2 years). 4.8 Working 4.8.
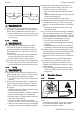
4 Safety Precautions 2 2 1 WARNING ■ The guide bar can be pinched when cutting wood that is under tension. The user can lose control of the saw and be seriously injured. ► Make a relieving cut in the compression side (1) first, then perform bucking cut at the ten‐ sion side (2). 4.8.2 Limbing WARNING ■ If the underside of the felled tree is limbed first, it will no longer be supported on the ground by branches. The tree can move dur‐ ing cutting work. This can result in serious or fatal injuries.
4 Safety Precautions English ► Keep the guide bar straight in the cut. ► Apply the spiked bumper properly. ► Always cut with the chain running at full speed. – The rotating saw chain is pinched at the bar nose. The chain brake cannot prevent kickback. WARNING 4.9.3 Pushback If kickback occurs, the saw can be thrown up in the direction of the operator. The operator can lose control of the saw and be seriously or fatally injured. ► Hold the saw firmly with both hands.
English 5 Preparing the Saw for Operation The muffler and engine may be hot after a period of operation. There is a risk of burn injuries. ► Carry the saw by holding the front handle in your right hand with the guide bar pointing to the rear. 4.11 Storing WARNING ■ Children are not aware of and cannot assess the dangers of a chainsaw and can be seri‐ ously injured. ► Shut off the engine. ► Engage the chain brake. ► Fit the scabbard so that it completely covers the guide bar.
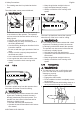
6 Assembling the Saw English 3 ► Rotate the nuts (1) counterclockwise until the chain sprocket cover (2) can be removed. ► Remove the chain sprocket cover (2). ► Turn the tensioning screw (3) counterclock‐ wise until the tensioner slide (4) butts against the left end of the housing. 0000-GXX-2928-A0 4 0000-GXX-2954-A0 ► Turn the tensioning screw (3) clockwise until the chain fits snugly against the bar. Make sure the drive link tangs engage the bar groove.
English 6 Assembling the Saw ► Hold the bar nose up and turn the tensioning screw (2) clockwise until the following points apply: – Chain sag ‘a’ in the center of the bar is 1 - 2 mm. – The chain can still be pulled easily along the bar with two fingers. ► Keep holding the bar nose up and tighten down the nuts (1) firmly. ► If chain sag ‘a’ in the center of the bar is not 1 - 2 mm: Readjust chain tension.
7 Engaging and Disengaging the Chain Brake 7.1 Engaging and Disengaging the Chain Brake Engaging the Chain Brake The saw is equipped with a chain brake. 0000-GXX-2932-A0 The chain brake is activated by the inertia of the front hand guard if the kickback force is high enough or can be engaged by the operator. ► Push the hand guard away from the front han‐ dle with your left hand. The hand guard engages with an audible click. The chain brake is engaged. Disengaging the Chain Brake 0000-GXX-2933-A0 7.
English 9 Starting and Stopping the Engine ► Check to see if the fuel tank cap can be pulled upwards and off. ► If the fuel tank cap cannot be pulled upwards and off: Fold the grip flush with the top of the cap. The fuel tank is closed. WARNING ■ The chainsaw becomes hot during operation, or in a very hot environment. Depending on the type of fuel, altitude, ambient temperature and the temperature of the saw, the fuel expands and can cause a pressure build-up in the tank.
10 Checking the Saw English ► If the engine does not start: Move the Master and try again to Control lever (3) to position start the engine. Stopping the Engine 0000-GXX-2936-A0 9.2 0000-GXX-7204-A0 2 ► Release the throttle trigger (2). The engine runs at idling speed. ► Move the Master Control lever (1) to posi‐ tion . The engine stops and the Master Control lever (1) springs back to position . 10 10.1 ► ► ► ► Checking the Saw Checking the Chain Sprocket Shut off the engine.
10 Checking the Saw 0000-GXX-1217-A0 English ► Measure depth of bar groove with scale on STIHL filing gauge. ► Install a new guide bar if one of the following points applies: – Guide bar is damaged. – Measured bar groove depth is less than specified minimum depth, 19.3. – Bar groove is pinched or splayed. ► If you have any queries: Contact your STIHL servicing dealer for assistance. 10.3 WARNING ► Try to pull the chain along the guide bar by hand.
11 Operating the Saw English ► If the engine does not stop: ► Move the Master Control lever to posi‐ tion . The engine stops. ► Do not use your chainsaw and contact your STIHL servicing dealer for assistance. Your saw has a malfunction. 3 Checking Chain Lubrication ► Start the engine and disengage the chain brake. ► Hold the guide bar over a light surface. ► Open the throttle. Chain oil is thrown off the chain and is visible on the light surface. Chain lubrication is oper‐ ating properly. 11 11.
English 11 Operating the Saw 11.3 Calibrating the Saw The chainsaw adjusts itself automatically for opti‐ mum performance during operation. Calibration enables the saw to be adjusted faster for opti‐ mum performance. ► If the outside temperature is below -10°C or the engine is cold: ► Start the engine and disengage the chain brake. ► Warm up the engine by opening and closing the throttle for about 1 minute. ► Shut off the engine.
11 Operating the Saw ► Hold and control your chainsaw with your left hand on the handlebar and your right hand on the control handle. Wrap thumb of left hand around the handlebar and thumb of right hand around the control handle. ► Support the chainsaw on the log. ► With the chain running a full speed, pivot the guide bar downward against the limb. ► Cut through the limb with the top of the guide bar. Sawing WARNING ■ If kickback occurs, the chainsaw can be thrown up in the direction of the operator.
English 11 Operating the Saw 11.8.2 Preparing work area at base of tree ► Remove obstacles from work area at tree base. ► Remove growth from tree base. 11.8.4 Cutting the felling notch ► If the tree has large, healthy buttress roots: Make vertical cut first and then a horizontal cut, and remove the resulting piece. Basic information on felling cut E Ø G C Felling notch The felling notch determines the direction of fall. D Hinge The hinge helps control the falling tree.
11 Operating the Saw English ► Cut until depth of kerf is twice the width of the guide bar. ► Swing the saw into plunge-cutting position. ► Perform the plunge cut ► Plunge the guide bar into the felling cut until it is visible at the other side of the trunk, 11.8.5. ► Apply the spiked bumper behind the hinge and use it as a pivot. ► Enlarge felling cut in direction of hinge. ► Enlarge felling cut in direction of stabilizing strap. 11.8.
English 12 After Finishing Work ► Enlarge felling cut in direction of stabilizing strap. The tree falls. 11.8.10 Felling a large diameter leaner A leaner is felled with a felling cut and holding strap. This felling cut must be performed if the tree diameter is greater than the guide bar’s length. ► Shout a warning. 0000-GXX-1257-A0 6. ► Insert a felling wedge. The felling wedge must match the tree diameter and the width of the felling cut. ► Shout a warning.
13 Transporting English ► ► ► ► Clean the saw. Clean the bar and chain. Loosen nuts on the chain sprocket cover. Turn the tensioning screw two full turns coun‐ terclockwise. The chain is now slack. ► Tighten down nuts on the chain sprocket cover. ► Fit the scabbard so that it completely covers the guide bar. 13.1 Transporting Transporting the Chainsaw ► Shut off the engine and engage the chain brake. ► Fit the scabbard so that it completely covers the guide bar.
English 16 Maintenance ► Rotate the shroud fasteners (1) a quarter turn counterclockwise. ► Remove the shroud (2). ► Clean the area around the air filter (3) with a damp cloth or a soft brush. ► Rotate the air filter (3) a quarter turn counter‐ clockwise by hand. ► Remove the air filter (3). ► Rinse away coarse dirt from the outside of the filter (3) under running water. ► If the filter (3) is damaged. Install a new filter (3). Cleaning the Spark Plug ► Shut off the engine and engage the chain brake.
17 Repairing English recommends the following maintenance inter‐ vals: Weekly ► Check the chain sprocket. ► Check and deburr the guide bar. ► Check and sharpen the saw chain. Monthly ► Clean the air filter. ► Have oil tank cleaned by a STIHL servicing dealer. ► Have fuel tank cleaned by a STIHL servicing dealer. ► Have pickup body (filter) in fuel tank cleaned by a STIHL servicing dealer. Every 12 months ► Have pickup body (filter) in fuel tank replaced by a STIHL servicing dealer. 16.
English 18 18.1 18 Troubleshooting Troubleshooting Troubleshooting Chainsaw Most malfunctions have the same causes. ► Perform the following operations: ► Clean the air filter. ► Clean or replace the spark plug. ► Adjust saw for winter or summer operation. ► If the malfunction still exists: Take the action described in the following table. Condition Engine does not start. Engine idles errati‐ cally. Engine stops while idling Poor acceleration Cause Insufficient fuel in the tank. Engine is flooded.
19 Specifications English 19.2 ► Rotate the shroud fasteners (1) a quarter turn counterclockwise. ► Remove the shroud (2). ► Pull off the spark plug boot (3). ► Unscrew the spark plug. ► Dry the spark plug. The following chain sprockets may be used: 7-tooth for 3/8" – Maximum chain speed according to ISO 11681: 28.9 m/s – Chain speed at maximum power: 21.7 m/s WARNING ■ Unconfined sparks may occur if the starter grip is pulled after the spark plug boot has been removed.
English 20 20.1 Pitch 20 Bar and Chain Combinations Bar and Chain Combinations STIHL MS 400 C-M Chainsaw Drive link Length gauge/groove width Guide bar Nose sprocket teeth Number of drive links Saw chain Rollomatic E 11 60 Rollomatic ES Rollomatic E 45 cm 11 66 Rollomatic ES 36 RS (Type 3621) Rollomatic E 36 RS3 (Type Rollomatic ES 3626) 11 50 cm 72 36 RM (Type Rollomatic ES 3/8” 1.
23 EC Declaration of Conformity English The measured and guaranteed sound power lev‐ els were determined according to Directive 2000/14/EC, Annex V, using the ISO 9207 standard. – Measured sound power level: 118 dB(A) – Guaranteed sound power level: 120 dB(A) Technical documents are deposited at ANDREAS STIHL AG & Co. KG Produktzulas‐ sung (Product Licensing). The year of manufacture and serial number are applied to the chainsaw. Waiblingen, 02/03/2020 ANDREAS STIHL AG & Co. KG pp Dr.
English 30 23 EC Declaration of Conformity 0458-788-0121-B. VA0.L20.
23 EC Declaration of Conformity 0458-788-0121-B. VA0.L20.
0458-788-0121-B *04587880121B* www.stihl.