STIHL MS 462 C-M R 2 - 26 Instruction Manual
English Guide to Using this Manual 2.1 Symbols used with warnings in the text WARNING ■ This symbol indicates dangers that can cause serious injuries or death. ► The measures indicated can avoid serious injuries or death. NOTICE ■ This symbol indicates dangers that can cause damage to property. ► The measures indicated can avoid damage to property. 2.2 3 3.1 Symbols in Text This symbol refers to a chapter in this instruction manual.
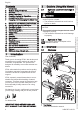
Overview 2 Front Hand Guard Helps protect operator’s left hand from con‐ tact with the saw chain, serves to engage the chain brake and activates the chain brake by inertia in certain kickback situations. 3 Muffler Reduces chainsaw noise emissions. 4 Guide Bar Supports and guides the saw chain. 5 Saw Chain Cuts the wood. 6 Chain Catcher Reduces risk of operator contact with the chain if it comes off the bar or breaks. 7 Tensioning Screw Adjusts chain tension.
English 4 Safety Precautions Master Control lever is moved to this posi‐ tion to stop the engine. Engine is operated with the Master Control lever in this position. Engine is started with the Master Control lever in this position. Guaranteed sound power level accord‐ LWA ing to directive 2000/14/EC in dB(A) in order to make sound emissions of products comparable. 4 4.1 Safety Precautions Warning Signs Meanings of warning signs on the chainsaw: Observe safety notices and take the necessary precautions.
4 Safety Precautions ► Wear face protection. ► Wear a long-sleeved, close fitting top. ■ Noise is generated during operation. Noise can damage your hearing. ► Wear ear protection. English ► Keep exhaust gas well away from easily flammable materials. 4.6 Safe Condition 4.6.1 Chainsaw The chainsaw is in a safe condition if the follow‐ ing points are observed: – The chainsaw is not damaged. ■ Falling objects can cause head injuries.
English 4 Safety Precautions ► Attach accessories as described in this User Manual or in the User Manual for the acces‐ sories. ► Never insert objects in the chainsaw’s open‐ ings. ► Replace worn or damaged labels. ► If you have any doubts, be sure to consult a STIHL dealer. 4.6.2 Guide Bar The guide bar is in a safe condition if the follow‐ ing points are observed: – Guide bar is not damaged. – Guide bar is not deformed. – The minimum groove depth is maintained, 19.3. – Bar rails are free from burrs.
4 Safety Precautions ► In case of contact with the eyes: Rinse eyes with plenty of water for at least 15 minutes and seek medical advice. ■ The saw’s ignition system produces sparks. Unconfined sparks may cause a fire or an explosion in an easily combustible or explo‐ sive environment. This can result in serious or fatal injuries and damage to property. ► Use the spark plugs described in this instruc‐ tion manual. ► Insert and tighten down the spark plug.
English 4 Safety Precautions ► If signs of circulation problems occur: Seek medical advice. ■ Sparks may occur if the rotating chain makes contact with a hard object. Sparks may cause a fire in an easily combustible location. This can result in serious or fatal injuries and dam‐ age to property. ► Do not work in an easily combustible loca‐ tion. ■ Note that the saw chain continues to rotate for a short period after you release the trigger. The rotating saw chain can cut the user.
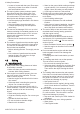
4 Safety Precautions English The muffler and engine may be hot after a period of operation. There is a risk of burn injuries. ► Carry the saw by holding the front handle in your right hand with the guide bar pointing to the rear. Pushback 0000-GXX-1349-A0 4.9.3 The saw is pushed back toward the operator when the top of the bar is used for cutting. WARNING ■ If the rotating chain makes contact with a hard object and is suddenly pinched, the saw can be abruptly pushed back toward the operator.
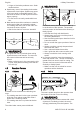
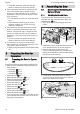
English 5 Preparing the Saw for Operation Mounting and Removing the Bar and Chain 6.1.1 Mounting the Bar and Chain The bar and chain combinations that can be used with the chain sprocket are listed in the 20.1. specifications, ► Shut off the engine and engage the chain brake. 3 2 1 4 ► Rotate the nuts (1) counterclockwise until the chain sprocket cover (2) can be removed. ► Remove the chain sprocket cover (2).
6 Assembling the Saw English ► Fit the guide bar and chain on the saw and check the following points: – Chain drive links are seated in teeth of chain sprocket (7). – Collar studs (5) are located in slot in tail of guide bar (6). – Peg of tensioner slide (4) engages hole (8) in guide bar (6). 2 The guide bar (6) may be either way round. The logo on the guide bar (6) may also be upside down. ► Disengage the chain brake. ► Push the guard (1) over the guide bar so that its opening faces down.
English 6 Assembling the Saw 3 0000-GXX-5887-A0 2 ► If the chain can no longer be pulled along the bar by hand: Turn the tensioning screw (2) counterclockwise until the chain can be pulled easily along the bar with two fingers. ► Hold the bar nose up and tighten down the nuts (1) firmly. 1 ► Swing the quick-release clamp (1) to straight position as shown. ► Unscrew the quick-release clamp (1). ► Pull the depth limiter (2) off the guard (3). 6.
7 Engaging and Disengaging the Chain Brake English The chain brake is activated by the inertia of the front hand guard if the kickback force is high enough or can be engaged by the operator. ► If the oil tank cap cannot be pulled upwards and off: Fold down the grip on the oil tank cap. The oil tank is closed. 0000-GXX-2932-A0 If the oil tank cap can be pulled upwards and off, perform the following steps: ► Place the oil tank cap in the filler opening – in any position.
English 8 Mixing Fuel and Refueling the Chainsaw ► Make sure the two-stroke engine oil you are using meets the requirements. ► Depending on the required amount of fuel, determine the correct amounts of two-stroke engine oil and gasoline in a mix ratio of 50:1.
9 Starting and Stopping the Engine English Starting and Stopping the Engine 9.1 Starting the Engine 2 3 0000-GXX-6455-A0 1 ► ► ► ► Engage the chain brake (2). Pull off the chain guard (scabbard). Depress the decompression valve (1). Move the Master Control lever (3) to posi‐ tion . ► Pull the starter grip slowly with your right hand until you feel it engage. ► Pull the starter grip quickly and allow the starter rope to rewind several times until the engine runs.
English 10.1 Checking the Chain Sprocket 0000-GXX-1218-A0 Shut off the engine. Disengage the chain brake. Remove the chain sprocket cover. Remove the bar and chain. a ► Use a STIHL filing gauge (2) to check the height of the depth gauges (1). The STIHL fil‐ ing gauge must match the chain pitch. ► If a depth gauge (1) projects from the filing gauge (2): Use a STIHL USG to lower the depth gauge (1), 16.3. ► Use a STIHL gauge to check the wear marks on the sprocket.
11 Operating the Saw ► Try to pull the chain along the guide bar by hand. If the chain cannot be pulled along the bar by hand, the chain brake is functioning. ► If the chain can be pulled along the bar by hand: Do not use your chainsaw and contact your STIHL servicing dealer for assistance. The chain brake is defective. 10.5 Checking the Controls Throttle trigger lockout and throttle trigger ► Shut off the engine and engage the chain brake.
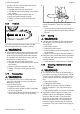
11 Operating the Saw ► Shut off the engine and engage the chain brake. 0000-GXX-3807-A0 3 1 1 A 1 min ► Rotate the shroud fasteners (1) a quarter turn counterclockwise. ► Remove the shroud (2). ► Pull out the shutter (3). 30-60 s B > 30 s C s 0000-GXX-3825-A0 English ► Move the Master Control lever to position . ► Engage the chain brake. ► Start the engine without depressing the throttle trigger. The engine runs and the Master Control lever remains in position .
11 Operating the Saw English ► Turn the oil pump adjusting screw (1) counter‐ clockwise. ► As soon as the engine speed drops noticeably (C): Release the throttle trigger. The engine runs at idling speed. Your saw is calibrated and ready for operation. 11.4 11.5 Adjusting the Depth Limiter The depth limiter can be adjusted to suit the application. Adjustment of the depth limiter deter‐ mines the guide bar’s maximum cutting depth. ► Shut off the engine and engage the chain brake.
English 11.6 12 After Finishing Work 13 Holding and Controlling the Chainsaw 13.1 Transporting Transporting the Chainsaw ► Hold and control your saw with your left hand on the front handle and your right hand on the control handle. Wrap thumb of left hand around the front handle and thumb of right hand around the control handle. 11.7 Cutting WARNING ■ If kickback occurs, the saw can be thrown up in the direction of the operator. This can result in serious or fatal injuries.
15 Cleaning English ► Rinse away coarse dirt from the outside of the filter (3) under running water. ► If the air filter (3) is damaged. Install a new air filter (3). ► Place the shroud (2) in position. ► Rotate the shroud fasteners (1) clockwise until you hear a click. The shroud fasteners are locked. ► Fit the chain sprocket cover. WARNING Cleaning the Bar and Chain ■ Cleaning agent may cause irritation if it con‐ tacts the skin or eyes. ► Observe the information supplied with the cleaning agent.
English 16 Maintenance ► Check the chain sprocket. ► Check and deburr the guide bar. ► Check and resharpen the saw chain. 1 0000-GXX-3809-A0 3 1 ► Rotate the shroud fasteners (1) a quarter turn counterclockwise. ► Remove the shroud (2). ► Pull off the spark plug boot (3). ► If area around the spark plug is dirty: Clean it with a damp cloth. ► Unscrew the spark plug. ► Clean the spark plug with a damp cloth. ► If the spark plug is corroded: Install a new spark plug.
17 Repairing English ► Lower the depth gauges (2) and tie straps (3) with a STIHL USG universal sharpener using the following settings: – Scale A: + 40° – Scale B: 0° – Scale C: 0° 17 17.1 ► If the saw, guide bar or saw chain is damaged: Do not use your saw, guide bar or saw chain, and contact your STIHL servicing dealer. Repairing Repairing the Chain Saw, Guide Bar and Saw Chain The chain saw, guide bar and saw chain cannot be repaired by the user. 18 18.
English 19 Specifications Condition 18.2 Cause Remedy The chain is over-ten‐ ► Tension chain properly. sioned. Chainsaw is not ► Have correct use explained, then practice. being used properly. Clearing the Combustion Chamber ► Place the shroud (2) in position. ► Rotate the shroud fasteners (1) clockwise until you hear a click. The shroud fasteners are locked. ► Engage the chain brake. 19 19.1 1 0000-GXX-3809-A0 3 1 ► Rotate the shroud fasteners (1) a quarter turn counterclockwise.
20 Bar and Chain Combinations 19.5 REACH REACH is an EC regulation and stands for the Registration, Evaluation, Authorisation and Restriction of Chemical substances. For information on compliance with the REACH regulation see www.stihl.com/reach. 19.6 Exhaust Emissions The CO2value measured in the EU type approval procedure is specified at www.stihl.com/co2.
English 23 EC Declaration of Conformity The measured and guaranteed sound power lev‐ els were determined according to Directive 2000/14/EC, Annex V, using the ISO 9207 standard. – Measured sound power level: 119 dB(A) – Guaranteed sound power level: 121 dB(A) The technical documents are stored at ANDREAS STIHL AG & Co. KG Produktzulas‐ sung. The year of manufacture and serial number are applied to the chainsaw. Done at Waiblingen, 03.02.2020 ANDREAS STIHL AG & Co. KG pp Dr.
23 EC Declaration of Conformity 0458-787-0121-B. VA0.M20.
0458-787-0121-B *04587870121B* www.stihl.