STIHL MS 500i 2 - 28 Instruction Manual
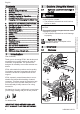
English Guide to Using this Manual 2.1 Symbols used with warnings in the text WARNING ■ This symbol indicates dangers that can cause serious injuries or death. ► The measures indicated can avoid serious injuries or death. NOTICE ■ This symbol indicates dangers that can cause damage to property. ► The measures indicated can avoid damage to property. 2.2 Symbols in Text This symbol refers to a chapter in this instruction manual. 3 Overview 3.
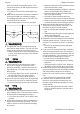
Overview 1 Front Hand Guard Helps protect operator’s left hand from con‐ tact with the saw chain, serves to engage the chain brake and activates the chain brake by inertia in certain kickback situations. 2 Muffler Reduces chainsaw noise emissions. 3 Spiked Bumper Toothed stop for holding saw steady against wood while cutting. 4 Saw Chain Cuts the wood. 5 Guide Bar Supports and guides the saw chain. 6 Chain Catcher Reduces risk of operator contact with the chain if it comes off the bar or breaks.
English 4 Safety Precautions This symbol marks the chain oil tank. The chain brake is engaged or disen‐ gaged in this direction. This symbol shows the direction of rotation of the chain. This symbol marks the oil pump adjust‐ ing screw and the chain oil feed rate. Rotate in this direction to increase chain tension. This symbol marks the handle heating switch. This symbol marks the decompression valve. This symbol marks the stop switch.
4 Safety Precautions ■ Objects can be thrown through the air at high speed during operation. This can result in per‐ sonal injury. ► Wear close-fitting safety glasses. Suitable safety glasses that have been tested and labeled in accord‐ ance with EN 166 or national stand‐ ards are available from retailers. ► STIHL recommends that you wear a face shield. ► Wear a long-sleeved, snug-fitting upper gar‐ ment. ■ Noise occurs during operation. Noise can harm your hearing. ► Wear hearing protection.
English ► Only fit original STIHL accessories designed for this chainsaw model. ► Mount the guide bar and saw chain as described in this User Manual. ► Attach accessories as described in this User Manual or in the User Manual for the acces‐ sories. ► Never insert objects in the chainsaw’s open‐ ings. ► Replace worn or damaged labels. ► If you have any doubts, be sure to consult a STIHL dealer. 4.6.
4 Safety Precautions ► Avoid contact with fuel, gasoline and twostroke engine oil. ► In case of contact with the skin: Wash affec‐ ted areas with plenty of water and soap. ► In case of contact with the eyes: Rinse eyes with plenty of water for at least 15 minutes and seek medical advice. ■ The saw’s ignition system produces sparks. Unconfined sparks may cause a fire or an explosion in an easily combustible or explo‐ sive environment. This can result in serious or fatal injuries and damage to property.
English 4 Safety Precautions a fire in an easily combustible location. This can result in serious or fatal injuries and dam‐ age to property. ► Do not work in an easily combustible loca‐ tion. ■ Note that the saw chain continues to rotate for a short period after you release the trigger. The rotating saw chain can cut the user. This can result in serious injuries. ► Wait for the chain to come to a standstill.
4 Safety Precautions Reactive Forces Kickback can be caused for the following rea‐ sons: – The rotating saw chain in the upper quadrant of the bar nose makes contact with a hard object and is suddenly braked. – The rotating saw chain is pinched at the bar nose. The saw is pulled away from the operator when the bottom of the bar is used for cutting. WARNING ■ If the rotating chain makes contact with a hard object and is suddenly pinched, the saw is abruptly jerked away from the operator.
English 4.10 5 Preparing the Saw for Operation Transporting WARNING 0000-GXX-2733-A0 ■ The saw may turn over or shift during trans‐ port. This can result in serious injuries and damage to property. ► Shut off the engine. ► Engage the chain brake. ► Fit the scabbard so that it completely covers the guide bar. ► Secure the chainsaw with lashing straps or a net to prevent it turning over and moving. ■ The muffler and engine may be hot after a period of operation. There is a risk of burn injuries.
6 Assembling the Saw English ► If you cannot carry out these steps: Do not use your chainsaw and contact your STIHL servic‐ ing dealer for assistance. 6 ► Fit the guide bar and chain on the saw and check the following points: – Chain drive links are seated in teeth of chain sprocket (7). – Collar studs (5) are located in slot in tail of guide bar (6). – Peg of tensioner slide (4) engages hole (8) in guide bar (6). Assembling the Saw 6.1 Mounting and Removing the Bar and Chain 6.1.
English 6 Assembling the Saw 1 1 a ► Loosen the nuts (1). ► Disengage the chain brake. ► Hold the bar nose up and turn the tensioning screw (2) clockwise until the following points apply: – Chain sag ‘a’ in the center of the bar is 1 - 2 mm. – The chain can still be pulled easily along the bar with two fingers. ► Keep holding the bar nose up and tighten down the nuts (1) firmly. ► If chain sag ‘a’ in the center of the bar is not 1 - 2 mm: Readjust chain tension. 6.
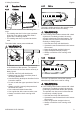
7 Engaging and Disengaging the Chain Brake 6.4 English Mounting the Spiked Bumper 4 ► Pull the hand guard toward the front handle with your left hand. The hand guard engages with an audible click. The chain brake is disengaged. 5 8 3 2 0000-GXX-A338-A0 1 ► Take out the screw (3) and remove the chain catcher (2). ► Place the spiked bumper (1) in position. ► Fit the screw (4). ► Engage the nut (5). ► Place the chain catcher (2) in position. ► Tighten down the screw (3) and firmly.
English 8 Mixing Fuel and Refueling the Chainsaw 1 4 ■ The chainsaw becomes hot during operation, or in a very hot environment. Depending on the type of fuel, altitude, ambient temperature and the temperature of the saw, the fuel expands and can cause a pressure build-up in the tank. Fuel may escape as a spray and ignite when the fuel tank cap is opened. This can result in serious injuries and damage to property. ► Allow the saw to cool down before opening the tank cap.
9 Starting and Stopping the Engine ► Pull the starter grip slowly with your right hand until you feel it engage. ► Pull the starter grip quickly and allow the starter rope to rewind several times until the engine runs. The engine runs at idling speed. Starting the Engine 2 NOTICE 3 Engage the chain brake (2). Pull off the chain guard (scabbard). Depress the decompression valve (1). Press the manual fuel pump bulb (3) at least eight times. ► Disengage the chain brake. Your saw is ready for operation.
English 10 Checking the Saw ► Use a STIHL gauge to check the wear marks on the sprocket. ► If wear marks are deeper than a = 0.5 mm: Do not use your chainsaw and contact your STIHL servicing dealer for assistance. The chain sprocket must be replaced. 2 Checking the Guide Bar 4 0000-GXX-1217-A0 ► Shut off the engine and engage the chain brake. ► Remove the chain and guide bar. ► Measure depth of bar groove with scale on STIHL filing gauge.
11 Operating the Saw English ► If the throttle trigger is stiff or does not spring back to its idle position: Do not use your chain‐ saw and contact your STIHL servicing dealer for assistance. The throttle trigger is defective. Stopping the Engine ► Start the engine. ► Depress the stop switch. The engine stops and the stop switch springs back to the off position. ► If the engine does not stop: Do not use your chainsaw and contact your STIHL servicing dealer for assistance. The saw has a malfunction. 10.
B B ► Observe the following points when planning escape path (B): – Escape path (B) at an angle of 45° to direc‐ tion of fall (A). – No obstacles on the escape path (B). – The top of the tree can be observed. – If the escape path (B) is on a slope, it must be parallel to the slope. ► Engage the spiked bumper and use it as a ful‐ crum. ► Guide the full width of the guide bar into the wood and reposition the spiked bumper as required. ► Take the weight of the chainsaw at the end of the cut. Limbing 11.5.
11 Operating the Saw English E Felling cut The tree is felled with the felling cut. The fell‐ ing cut is 1/10 of the trunk diameter (at least 3 cm) above the bottom of the felling notch. F Stabilizing strap The stabilizing strap supports the tree and helps prevent it from falling prematurely. The width of the stabilizing strap is 1/10 to 1/5 of the trunk diameter. 0000-GXX-1252-A0 3. ► Begin cut with the lower portion of the guide bar nose – with chain running at full speed.
English 11 Operating the Saw the tree diameter is less than the guide bar’s length. ► Shout a warning. 1. 2. 1. 4. 5. 3. 0000-GXX-1254-A0 0000-GXX-1256-A0 2. ► Plunge the guide bar into the felling cut until it is visible at the other side of the trunk, 11.5.5. ► Apply the spiked bumper behind the hinge and use it as a pivot. ► Enlarge felling cut in direction of hinge. ► Enlarge felling cut in direction of stabilizing strap.
12 After Finishing Work English 1. 0000-GXX-1258-A0 2. ► Apply the spiked bumper behind the hinge at the same height as the felling cut and use it as a pivot. ► Hold the saw horizontally and swing it into the felling cut as far as possible. ► Enlarge felling cut in direction of hinge. ► Enlarge felling cut in direction of holding strap. 0000-GXX-1261-A0 ► Plunge the guide bar into the felling cut until it is visible at the other side of the trunk, 11.5.5. ► Enlarge felling cut in direction of hinge.
English ► Remove the bar and chain. Storing the Chainsaw ► Shut off the engine and engage the chain brake. ► Fit the scabbard so that it completely covers the guide bar. ► Observe the following points when storing the saw: – Saw is out of the reach of children. – The saw is clean and dry. 15 15.1 2 Cleaning the Saw ► Shut off the engine and engage the chain brake. ► Allow chainsaw to cool down. ► Clean the saw with a damp cloth or STIHL resin solvent. ► Clean cooling air slots with a soft brush. 15.
16 Maintenance English WARNING ■ Cleaning agent may cause irritation if it con‐ tacts the skin or eyes. ► Observe the information supplied with the cleaning agent. ► Avoid contact with cleaning agents. ► In case of contact with the skin: Wash affec‐ ted areas with plenty of water and soap. ► In case of contact with the eyes: Rinse eyes with plenty of water for at least 15 minutes and seek medical advice.
English 17 Repairing ► Clean the air filter. ► Have oil tank cleaned by a STIHL servicing dealer. ► Have fuel tank cleaned by a STIHL servicing dealer. ► Have pickup body (filter) in fuel tank cleaned by a STIHL servicing dealer. ► File each cutter with a round file so that the following points are observed: – Round file matches the chain pitch. – File from the inside to the outside of the cut‐ ter. – Hold the file at right angle to the guide bar. – Maintain a filing angle of 30°.
18 Troubleshooting English ► If the malfunction still exists: Take the action described in the following table. Cause Insufficient fuel in the tank. Engine is flooded. Poor acceleration The chain is over-ten‐ sioned. Chain lubrication sys‐ tem is supplying insufficient chain oil. Saw chain does not The chain brake is rotate when throttle is engaged. opened. The chain is over-ten‐ sioned. Bar nose sprocket is blocked. Smoke or burning Chain is not properly smell while cutting. sharpened.
English 19 Specifications ► Position the spark plug boot (5) so that the lug (6) points vertically upwards. ► Press the spark plug boot (5) firmly home. ► Place the shroud (4) in position. ► Rotate the shroud lock (3) clockwise until you hear a click. The shroud lock (3) is secure. ► Fit the filter cover (2). ► Rotate the filter cover lock (1) clockwise until you hear a click. The filter cover lock (1) is secure. 19 19.1 Specifications STIHL MS 500i Chainsaw Displacement: 79.
21 Spare Parts and Accessories Pitch Drive link Length gauge/groove width English Guide bar Nose sprocket teeth Number of drive links Saw chain Rollomatic E Rollomatic ES 11 50 cm 72 Rollomatic ES Light Duromatic Rollomatic ES 11 55 cm 76 Duromatic Rollomatic E Rollomatic ES 11 36 RD3 (Type 63 cm 84 Rollomatic ES 3683) Light Duromatic Rollomatic ES 71 cm 11 91 Rollomatic ES Light 75 cm Duromatic 98 Rollomatic ES 80 cm 11 105 Light Rollomatic ES 90 cm 11 114 Light The cutting length of a guide bar depe
English 23 EC Declaration of Conformity The EC type examination in accordance with Directive 2006/42/EC Article 12.3(b) was carried out at: DPLF, Deutsche Prüf- und Zertifizierungs‐ stelle für Land- und Forsttechnik GbR (NB 0363), Spremberger Straße 1, 64823 Groß‑Umstadt, Germany – Certification number K-EG -2017/8346 The measured and guaranteed sound power lev‐ els were determined according to Directive 2000/14/EC, Annex V, using the ISO 9207 standard.
23 EC Declaration of Conformity 0458-809-0121-B. VA0.A21.
English 30 23 EC Declaration of Conformity 0458-809-0121-B. VA0.A21.
23 EC Declaration of Conformity 0458-809-0121-B. VA0.A21.
0458-809-0121-B *04588090121B* www.stihl.