STIHL RE 150 PLUS, RE 170 PLUS 2 - 25 Instruction Manual
English 7 8 9 1 Introduction Dear Customer, Thank you for choosing STIHL. We develop and manufacture our quality products to meet our customers’ requirements. The products are designed for reliability even under extreme con‐ ditions. STIHL also stands for premium service quality. Our dealers guarantee competent advice and instruction as well as comprehensive service support. 2 2.1 Guide to Using this Manual Applicable documents The local safety regulations apply.
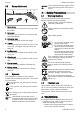
Overview 3 English Overview 3.1 7 Hose reel The hose reel is used to roll up the high-pres‐ sure hose. Pressure washer 8 High-pressure hose The high-pressure hose transports the water from the high-pressure pump to the spray gun. 9 8 7 9 Guide opening The guide opening guides the high-pressure hose from the front onto the hose reel. 10 6 5 4 3 2 10 Connector The connector connects the high-pressure hose with the spray gun.
English 3.2 4 Safety Precautions Spray attachment 1 2 3 These symbols indicate original STIHL spare parts and original STIHL acces‐ sories. 4 4 5 8 7 6 0000-GXX-9164-A0 4.1 Read, understand and keep the User Manual. 2 Spray gun The spray gun is used to hold and guide the spray attachment. Wear safety glasses. 3 Retaining latch The retaining latch unlocks the trigger. – Do not direct the water jet at people and animals.
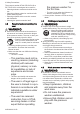
4 Safety Precautions The pressure washer STIHL RE 150 PLUS or RE 170 PLUS is not designed to be used for: – Cleaning asbestos cement and similar surfa‐ ces – Cleaning surfaces painted or varnished with paints containing lead – Cleaning surfaces which come into contact with foodstuffs – Cleaning the pressure washer itself 4.3 Requirements concerning the user WARNING ■ Users who have not received instruction are not aware of and cannot assess the dangers of the pressure washer.
English 4 Safety Precautions ■ If you work in the rain or in a damp environ‐ ment, an electric shock may occur. The user may be seriously injured or killed and the pres‐ sure washer may be damaged. ► Do not use in rain. ► Position the pressure washer so that it will not be wet by dripping water. ► Position the pressure washer outside the wet work area. ■ Electrical components of the pressure washer can produce sparks. Sparks can cause fires and explosions in a flammable or explosive environment.
4 Safety Precautions ■ At temperatures below 0° C water can freeze on the surface to be cleaned and in the com‐ ponents of the high-pressure washer. The user may slip, fall and be seriously injured. Damage to property may occur. ► Do not use the high-pressure washer at temperatures below 0° C. ■ Pulling on the high-pressure hose, water hose or connecting cable can cause the high-pres‐ sure washer to move and topple over. Dam‐ age to property may occur.
English 4 Safety Precautions injured or killed and property may be dam‐ aged. ► Do not direct the water jet at electrical appliances and the high-pressure washer itself. ► Keep electrical appliances and the highpressure washer away from the surface to be cleaned. ■ An incorrectly routed high-pressure hose may suffer damage. As a result of the damage, water under high pressure may escape uncon‐ trolled into the surrounding area. This may result in serious injury to people and damage to property.
4 Safety Precautions If the connecting cord or the extension cord is damaged: ► Do not touch the damaged areas. ► Unplug the mains plug from the socket. ► Make sure your hands are dry before touch‐ ing the connecting cord, extension cord or plugs. ► Plug the mains plug of the connecting cord or extension cord into a properly installed, fused socket with the correct fuse rating. ► The mains connection must be carried out by a qualified electrician and meet the requirements of IEC 60364-1.
English 4.12 5 Safety instructions - Accessories Storage WARNING ■ Children are not aware of and cannot assess the dangers of the pressure washer. Children can be seriously injured. ► Lock spray gun trigger. ► Switch off pressure washer. ► Unplug the mains plug of the pressure washer from the socket. ► Store the pressure washer out of the reach of children. ■ Moisture may cause the electrical contacts on the pressure washer and metal components to corrode. The pressure washer may be dam‐ aged.
6 Preparing the pressure washer for operation English ► Work as described in this manual. 6 WARNING 6.1 0000-GXX-5101-A0 1 The pipe cleaning hose increases the reaction forces. If the spray gun lever is pressed and the pipe cleaning hose is outside the pipe, the pipe cleaning hose may turn uncontrolled. The user may lose control of the pipe cleaning hose. The user may be seriously injured and property damage may occur.
English 7.2 7 Assembling the pressure washer Pulling out and pushing in the handle Removing the spray gun Removing handle 2 1 0000-GXX-5096-A0 7.2.1 7.3.2 0000-GXX-9167-A0 2 1 ► Press trigger switch lockout (1) and pull out handle (2). ► Release trigger switch lockout (1) and pull out handle (2) until it audibly engages. 7.2.2 ► Press and hold the locking lever (1). ► Pull out connector (2). 7.4 7.4.
8 Connecting to a water source 7.5.1 Attaching and removing the nozzle Attaching the nozzle 2 1 0000-GXX-9849-A0 2 ► Push nozzle (1) onto the spray lance (2). ► Twist nozzle (1) until it locks into position. ► If it is difficult to slide the nozzle (1) into the spray lance: Grease the gasket on the nozzle (1) with a fitting grease. 7.5.2 Removing the nozzle 1 0000-GXX-9850-A0 2 1 0000-GXX-9845-A0 7.5 English ► Unscrew connector (1).
English 8 Connecting to a water source ► Turn off water tap. ► To release the coupling: Pull or turn ring (1) and hold. ► Pull the coupling off the connector (2). 8.2 ► Unscrew connector (1). ► Screw water filter (2) onto the water supply and tighten by hand. Connect the water hose Connecting the pressure washer to another water supply 1 The pressure washer can draw in water from water butts, cisterns and flowing or still rivers and lakes.
9 Connecting the pressure washer to the power supply 9 Connecting the pressure washer to the power supply 9.1 10.2 English Switching off the pressure washer Connecting the pressure washer to the power supply ► ► ► ► 0000-GXX-9169-A0 2 3 4 0000-GXX-4358-A0 1 Turn the rotary switch (1) to the 0 position. Swivel lower holder (2) downwards. Remove connecting cord (3). Plug the plug (4) of the connecting cord into a correctly installed socket. 10 10.1 ► Turn the rotary switch to the 0 position.
English 11 Operating the pressure washer 11.2 Unrolling the high-pressure hose 11.4 Pressing and locking the spray gun lever Press spray gun lever ► Move retaining latch (1) to the position. ► Press and hold lever (2). The high pressure pump switches on automat‐ ically and water flows out of the nozzle. Lock spray gun lever 1 2 ► Completely unroll high-pressure hose (1). 11.
English 0000-GXX-9848-A0 11 Operating the pressure washer ► Grasp the recessed grip (1) of the detergent container and remove it. ► Unscrew cover (2). ► Dose and use detergent as described in the Instruction Manual of the surface cleaner. ► Turn the cover onto the detergent container and tighten it firmly by hand. ► Grasp the recessed grip of the detergent con‐ tainer and insert it into the pressure washer. 11.6.2 If the flat jet nozzle is turned in the + direction, the working pressure increases.
English 12 After Finishing Work ► Set the desired dosage. ► Turn dosing handle (3) to the right (up to 5 %). The addition of detergents is increased. ► Turn dosing handle (3) to the left (up to 0 %). The addition of detergents is reduced. ► If the detergent concentration needs to be adjusted accurately: Measure and calculate detergent concentration. ► Soak extremely dirty surfaces with water before cleaning them. ► Press the spray gun lever and spray the deter‐ gent onto the surface to be cleaned.
13 Transporting English 1 0000-GXX-9839-A0 2 ► Swivel lower holder (1) upwards ► Coil the connecting cord (2) on the holder (1). ► Secure the connecting cord (2) using the clip on the support (1). 0000-GXX-9853-A0 3 ► Empty detergent container (3) and insert it into the pressure washer. 5 0000-GXX-9840-A0 4 ► Insert fan-jet nozzle (4) or rotary nozzle (5). 0000-GXX-9841-A0 6 ► Wind up the high-pressure hose (6) evenly distributed. 7 7 7 7 7 7 0000-GXX-9842-A0 ► Clean the pressure washer.
English 14 Storing 15.2 Pulling or carrying the pressure washer Cleaning nozzle and spray lance 0000098883_A1 ► Pull pressure washer using handle (1). ► Carry the pressure washer by the handle (1) and the carrying handle (2). ► Rinse the nozzle and spray lance under run‐ ning water and dry with a cloth. 14 14.1 Storing Storing the pressure washer ► Switch off pressure washer and unplug mains plug from the socket.
16 Maintenance 1 English 16 1 2 3 16.1 4 0000-GXX-4373-A0 5 ► ► ► ► ► Remove gasket (1) from the fastener (2). Unscrew fastener (2) from filter housing (5). Remove gasket (3) from the fastener (2). Remove filter (4) from the filter housing (5). Rinse gaskets (1 and 3), fastener (2) and fil‐ ter (4) under running water. ► Grease the gaskets (1 and 3) with grease for fittings. ► Reassemble the water filter. 18 18.
English 19 Specifications Fault Cause Remedy The circuit-breaker (fuse) or the earth- ► Find and resolve the cause for the leakage circuit breaker has tripped. trip. Engage circuit-breaker (fuse) or The circuit is electrically overloaded or the earth-leakage circuit breaker. defective. ► Switch off other electrical consum‐ ers on the same circuit. The fuse rating of the socket is too ► Plug the connecting cord into a low. socket with the correct fuse rating, 19.1. The electric motor is too warm.
19 Specifications – Max. permissible pressure (p max.): 18 MPa (180 bar) – Max. water supply pressure (p in max.): 1 MPa (10 bar) – Max. water throughput (Q max): 10.2 l/min (612 l/h) – Minimum water throughput (Q min.): 9.0 l/min (540 l/h) – Maximum kickback force: 21 N – Max. suction lift: 0.5 m – Max. water temperature in pressure mode (t in max): 60 °C – Max.
English 20 Spare Parts and Accessories – Max. water temperature in suction mode: 20 °C sample inspection – Length: 383 mm – Width: 380 mm – Maximum height: 981 mm – Minimum height: 792 mm – Length of high-pressure hose: 12 m – Weight (m) with accessory attached: 31 kg Parameters dependent on pressure have been measured at an inlet pressure of 0.3 MPa (3 bar). 19.
22 EC Declaration of Conformity English The measured and the guaranteed sound power level have been determined in accordance with Directive 2000/14/EC, Annex V, and standard ISO 3744. – Measured sound power level: 85 dB(A) – Guaranteed sound power level: 87 dB(A) The technical documents are stored at ANDREAS STIHL AG & Co. KG Produktzulas‐ sung. The year of construction, country of manufacture and the serial number are shown on the highpressure washer. Waiblingen, 03.02.2021 ANDREAS STIHL AG & Co.
English 26 22 EC Declaration of Conformity 0458-663-0121-B
22 EC Declaration of Conformity 0458-663-0121-B English 27
0458-663-0121-B *04586630121B* www.stihl.