
User Manual
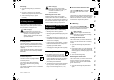
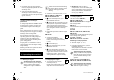
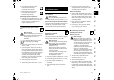

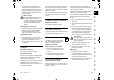
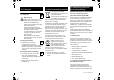
Table Of Contents
- 1. Inhaltsverzeichnis
- 2. Zu dieser Gebrauchsanleitung
- 3. Gerätebeschreibung
- 4. Zu Ihrer Sicherheit
- 5. Symbolbeschreibung
- 6. Lieferumfang
- 7. Gerät betriebsbereit machen
- 8. Bedienelemente
- 9. Sicherheitseinrichtungen
- 10. Hinweise zum Arbeiten
- 11. Gerät in Betrieb nehmen
- 12. Wartung
- 12.1 Allgemein
- 12.2 Gerät reinigen
- 12.3 Messerverschleiß prüfen
- 12.4 Messer aus- und einbauen
- 12.5 Wuchtheit Messer prüfen
- 12.6 Mähmesser schärfen
- 12.7 Seilzug Fahrantrieb einstellen
- 12.8 Verbrennungsmotor
- 12.9 Akku und Ladegerät warten
- 12.10 Räder und Getriebe
- 12.11 Rasenwalze warten
- 12.12 Aufbewahrung und Stilllegung (Winterpause)
- 13. Transport
- 14. Umweltschutz
- 15. Verschleiß minimieren und Schäden vermeiden
- 16. Übliche Ersatzteile
- 17. EU- Konformitätserklärung
- 18. Technische Daten
- 19. Fehlersuche
- 20. Serviceplan
- 1. Table of contents
- 2. Notes on the instruction manual
- 3. Machine overview
- 4. For your safety
- 5. Description of symbols
- 6. Standard equipment
- 7. Preparing the machine for operation
- 8. Controls
- 9. Safety devices
- 10. Notes on working with the machine
- 11. Operating the machine
- 12. Maintenance
- 12.1 General
- 12.2 Cleaning the machine
- 12.3 Checking blade wear
- 12.4 Removing and installing the blade
- 12.5 Checking the balance of the blade
- 12.6 Sharpening the mowing blade
- 12.7 Adjusting the self- propulsion cable
- 12.8 Engine
- 12.9 Battery and charger maintenance
- 12.10 Wheels and gearbox
- 12.11 Lawn roller maintenance
- 12.12 Storage and periods of inoperation (winter break)
- 13. Transport
- 14. Environmental protection
- 15. Minimising wear and preventing damage
- 16. Standard spare parts
- 17. EU - Declaration of conformity
- 18. Technical specifications
- 19. Troubleshooting
- 20. Service schedule
- 1. Sommaire
- 2. À propos de ce manuel d’utilisation
- 3. Description de l’appareil
- 4. Consignes de sécurité
- 5. Signification des pictogrammes
- 6. Contenu de l’emballage
- 7. Préparation de l’appareil
- 8. Éléments de commande
- 9. Dispositifs de sécurité
- 10. Conseils d’utilisation
- 11. Mise en service de l’appareil
- 12. Entretien
- 12.1 Généralités
- 12.2 Nettoyage de l’appareil
- 12.3 Contrôle de l’usure de la lame
- 12.4 Dépose et repose de la lame
- 12.5 Contrôle de l’équilibre de la lame
- 12.6 Affûtage de la lame de coupe
- 12.7 Réglage du câble de commande d’entraînement
- 12.8 Moteur à combustion
- 12.9 Entretien de la batterie et du chargeur
- 12.10 Roues et transmission
- 12.11 Entretien du rouleau de jardin
- 12.12 Rangement et entreposage (hivernage) de l’appareil
- 13. Transport
- 14. Protection de l’environnement
- 15. Comment limiter l’usure et éviter les dommages
- 16. Pièces de rechange courantes
- 17. Déclaration de conformité UE
- 18. Caractéristiques techniques
- 19. Recherche des pannes
- 20. Feuille d’entretien
- 1. Inhoudsopgave
- 2. Over deze gebruiksaanwijzing
- 3. Beschrijving van het apparaat
- 4. Voor uw veiligheid
- 5. Toelichting van de symbolen
- 6. Leveringsomvang
- 7. Apparaat klaarmaken voor gebruik
- 8. Bedieningselementen
- 9. Veiligheidsvoorzieningen
- 10. Aanwijzingen voor werken
- 11. Apparaat in gebruik nemen
- 12. Onderhoud
- 12.1 Algemeen
- 12.2 Apparaat reinigen
- 12.3 Messenslijtage controleren
- 12.4 Mes uit- en inbouwen
- 12.5 Balans van mes controleren
- 12.6 Maaimes slijpen
- 12.7 Kabel wielaandrijving afstellen
- 12.8 Verbrandingsmotor
- 12.9 Accu en oplaadapparaat onderhouden
- 12.10 Wielen en transmissie
- 12.11 Gazonwals onderhouden
- 12.12 Opslag en stilleggen (winterpauze)
- 13. Transport
- 14. Milieubescherming
- 15. Slijtage minimaliseren en schade voorkomen
- 16. Standaard reserveonderdelen
- 17. EU- conformiteitsverklaring
- 18. Technische gegevens
- 19. Defectopsporing
- 20. Onderhoudsschema
- 1. Indice
- 2. Avvertenze sulle istruzioni per l’uso
- 3. Descrizione dell’apparecchio
- 4. Per la vostra sicurezza
- 4.1 Informazioni generali
- 4.2 Fare rifornimento - Trattamento della benzina
- 4.3 Accumulatore e dispositivo di carica
- 4.4 Abbigliamento ed equipaggiamento
- 4.5 Trasporto dell'apparecchio
- 4.6 Prima dell'uso
- 4.7 Durante il lavoro
- 4.8 Manutenzione e riparazioni
- 4.9 Rimessaggio durante periodi di non utilizzo prolungati
- 4.10 Smaltimento
- 5. Descrizione dei simboli
- 6. Equipaggiamento fornito
- 7. Preparazione per la messa in servizio dell'apparecchio
- 8. Elementi di comando
- 8.1 Informazioni generali
- 8.2 Componenti regolabili sul manubrio
- 8.3 Chiusura del manubrio
- 8.4 Regolazione dell'altezza manubrio
- 8.5 Regolazione centralizzata altezza di taglio
- 8.6 Accumulatore e dispositivo di carica (RM 545 VE)
- 8.7 Indicatore livello di riempimento
- 8.8 Aggancio e sgancio del cesto di raccolta erba
- 9. Dispositivi per la sicurezza
- 10. Istruzioni di lavoro
- 11. Messa in servizio dell'apparecchio
- 12. Manutenzione
- 12.1 Informazioni generali
- 12.2 Pulizia dell'apparecchio
- 12.3 Controllo dei limiti di usura della lama
- 12.4 Smontaggio e montaggio della lama
- 12.5 Controllo del bilanciamento della lama
- 12.6 Affilatura della lama
- 12.7 Registrazione del cavo di comando trazione
- 12.8 Motore a combustione
- 12.9 Manutenzione dell'accumulatore e del dispositivo di carica
- 12.10 Ruote e cambio
- 12.11 Manutenzione del rullo da prato
- 12.12 Rimessaggio e sosta prolungata (pausa invernale)
- 13. Trasporto
- 14. Tutela dell’ambiente
- 15. Minimizzare l’usura ed evitare danni
- 16. Ricambi standard
- 17. Dichiarazione di conformità EU
- 18. Dati tecnici
- 19. Risoluzione guasti
- 20. Programma Assistenza Tecnica
- 1. Índice
- 2. Acerca de este manual de instrucciones
- 3. Descripción del equipo
- 4. Para su seguridad
- 5. Descripción de los símbolos
- 6. Contenido del suministro
- 7. Preparar el equipo para el servicio
- 8. Elementos de mando
- 9. Dispositivos de seguridad
- 10. Indicaciones para el trabajo
- 11. Poner el equipo en servicio
- 12. Mantenimiento
- 12.1 Información general
- 12.2 Limpiar el equipo
- 12.3 Comprobación del desgaste de la cuchilla
- 12.4 Desmontaje y montaje de la cuchilla
- 12.5 Comprobación del equilibrado de la cuchilla
- 12.6 Afilar la cuchilla
- 12.7 Ajustar el cable de tracción a las ruedas
- 12.8 Motor de combustión
- 12.9 Revisar el acumulador y el cargador
- 12.10 Ruedas y caja de cambios
- 12.11 Mantenimiento del rodillo
- 12.12 Almacenamiento y parada prolongada (pausa invernal)
- 13. Transporte
- 14. Protección del medio ambiente
- 15. Reducir el desgaste y prevenir daños
- 16. Piezas de recambio habituales
- 17. Declaración de conformidad de la UE
- 18. Datos técnicos
- 19. Localización de anomalías
- 20. Plan de mantenimiento
- 1. Índice
- 2. Sobre este manual de utilização
- 3. Descrição do aparelho
- 4. Para sua segurança
- 5. Descrição de símbolos
- 6. Fornecimento
- 7. Preparar o aparelho para o funcionamento
- 8. Elementos de comando
- 9. Dispositivos de segurança
- 10. Instruções para trabalhar
- 11. Colocar o aparelho em funcionamento
- 12. Manutenção
- 12.1 Generalidades
- 12.2 Limpar o aparelho
- 12.3 Verificar o desgaste das lâminas
- 12.4 Desmontar e montar a lâmina
- 12.5 Verificar o equilíbrio da lâmina
- 12.6 Afiar a lâmina de corte
- 12.7 Ajustar o cabo tirante do mecanismo de translação
- 12.8 Motor de combustão
- 12.9 Manutenção da bateria e carregador
- 12.10 Rodas e transmissão
- 12.11 Manutenção do cilindro de relva
- 12.12 Arrumação e imobilização (período de inverno)
- 13. Transporte
- 14. Proteção do meio ambiente
- 15. Minimização do desgaste e prevenção de danos
- 16. Peças de reposição comuns
- 17. Declaração de conformidade UE
- 18. Dados técnicos
- 19. Localização de falhas
- 20. Plano de manutenção
- 1. Innholdsfortegnelse
- 2. Om denne bruksanvisningen
- 3. Maskinbeskrivelse
- 4. For din egen sikkerhet
- 5. Symbolforklaring
- 6. Produktkomponenter
- 7. Gjøre maskinen klar for bruk
- 8. Betjeningselementer
- 9. Sikkerhetsutstyr
- 10. Informasjon om arbeid
- 11. Ta maskinen i bruk
- 12. Vedlikehold
- 12.1 Generell informasjon
- 12.2 Rengjøring
- 12.3 Kontrollere knivslitasjen
- 12.4 Demontere og montere kniven
- 12.5 Kontrollere kniven for ubalanse
- 12.6 Slipe klippekniven
- 12.7 Justere vaieren for fremdrift
- 12.8 Forbrenningsmotor
- 12.9 Vedlikeholde batteriet og laderen
- 12.10 Hjul og gir
- 12.11 Vedlikeholde plenvalsen
- 12.12 Oppbevaring og vinterlagring
- 13. Transport
- 14. Miljøvern
- 15. Minimere slitasjen og unngå skader
- 16. Vanlige reservedeler
- 17. EU-samsvarserklæring
- 18. Tekniske data
- 19. Feilsøking
- 20. Serviceplan
- 1. Innehållsförteckning
- 2. Information om denna bruksanvisning
- 3. Maskinbeskrivning
- 4. För din säkerhet
- 5. Symbolbeskrivning
- 6. Leveransens omfattning
- 7. Göra maskinen klar för användning
- 8. Reglage
- 9. Säkerhetsanordningar
- 10. Arbetsanvisningar
- 11. Ta maskinen i bruk
- 12. Underhåll
- 12.1 Allmänt
- 12.2 Göra rent maskinen
- 12.3 Kontrollera knivslitage
- 12.4 Demontera och montera kniv
- 12.5 Kontrollera knivens balans
- 12.6 Vässa kniv
- 12.7 Ställa in drivningens wire
- 12.8 Förbränningsmotor
- 12.9 Underhåll av batteri och batteriladdare
- 12.10 Hjul och växellåda
- 12.11 Underhåll av vals
- 12.12 Förvaring och uppställning (vinteruppehåll)
- 13. Transport
- 14. Miljöskydd
- 15. Minimera slitage och förhindra skador
- 16. Vanliga reservdelar
- 17. EU- konformitetsdeklaration
- 18. Tekniska data
- 19. Felsökning
- 20. Serviceschema
- 1. Sisällysluettelo
- 2. Tätä käyttöopasta koskevia tietoja
- 3. Laitekuvaus
- 4. Turvallisuutesi vuoksi
- 5. Kuvasymbolien selitykset
- 6. Toimitussisältö
- 7. Laitteen valmistelu käyttöä varten
- 8. Hallintalaitteet
- 9. Turvalaitteet
- 10. Työskentelyohjeita
- 11. Laitteen käyttöönotto
- 12. Huolto
- 12.1 Yleistä
- 12.2 Laitteen puhdistus
- 12.3 Terän kuluneisuuden tarkistus
- 12.4 Terän irrotus ja kiinnitys
- 12.5 Terän tasapainon tarkastus
- 12.6 Leikkuuterän teroitus
- 12.7 Vedon kytkentävaijerin säätö
- 12.8 Polttomoottori
- 12.9 Akun ja latauslaitteen huolto
- 12.10 Pyörät ja vaihteisto
- 12.11 Nurmitelan huolto
- 12.12 Varastointi ja pitkäaikaissäilytys (talvisäilytys)
- 13. Kuljetus
- 14. Ympäristönsuojelu
- 15. Kulumisen minimointi ja vaurioiden ehkäisy
- 16. Varaosat
- 17. EU- vaatimustenmukaisuusvaku utus
- 18. Tekniset tiedot
- 19. Vianetsintä
- 20. Huolto-ohjelma
- 1. Indholdsfortegnelse
- 2. Om denne betjeningsvejledning
- 3. Beskrivelse af maskinen
- 4. Sikkerhed
- 5. Symbolforklaring
- 6. Medfølgende dele
- 7. Klargøring af maskinen
- 8. Betjeningsdele
- 9. Sikkerhedsanordninger
- 10. Arbejdsanvisninger
- 11. Tag maskinen i brug
- 12. Vedligeholdelse
- 12.1 Generelt
- 12.2 Rengør maskinen
- 12.3 Kontrollér knivens slid
- 12.4 Demonter og montér kniv
- 12.5 Kontrollér knivenes balance
- 12.6 Slib kniven
- 12.7 Indstil kabeltræk til fremdrift
- 12.8 Forbrændingsmotor
- 12.9 Vedligehold batteri og ladeapparat
- 12.10 Hjul og gearkasse
- 12.11 Vedligehold plænetromle
- 12.12 Opbevaring og længere pauser (vinterpause)
- 13. Transport
- 14. Miljøbeskyttelse
- 15. Sådan minimerer du slid og undgår skader
- 16. Standardreservedele
- 17. EC- overensstemmelseserklærin g
- 18. Tekniske data
- 19. Fejlsøgning
- 20. Serviceplan
- 1. Spis treści
- 2. Uwagi dotyczące instrukcji obsługi
- 3. Opis urządzenia
- 4. Zasady bezpiecznej pracy
- 4.1 Informacje ogólne
- 4.2 Tankowanie paliwa – sposób postępowania
- 4.3 Akumulator i ładowarka
- 4.4 Odzież robocza i sprzęt ochronny
- 4.5 Transport urządzenia
- 4.6 Przed rozpoczęciem pracy
- 4.7 Praca z urządzeniem
- 4.8 Konserwacja i naprawy
- 4.9 Przechowywanie urządzenia podczas dłuższych przerw w eksploatacji
- 4.10 Utylizacja
- 5. Objaśnienie symboli
- 6. Wyposażenie standardowe
- 7. Przygotowanie urządzenia do pracy
- 8. Elementy obsługi
- 9. Urządzenia zabezpieczające
- 10. Wskazówki dotyczące wykonywania pracy
- 11. Uruchamianie urządzenia
- 12. Konserwacja
- 12.1 Informacje ogólne
- 12.2 Czyszczenie urządzenia
- 12.3 Sprawdzanie zużycia noża
- 12.4 Wymontowanie i zamontowanie noża
- 12.5 Sprawdzanie wyważenia noża
- 12.6 Ostrzenie noża kosiarki
- 12.7 Regulacja cięgna napędu kół
- 12.8 Silnik spalinowy
- 12.9 Konserwacja akumulatora i ładowarki
- 12.10 Koła i przekładnia
- 12.11 Obsługa rolki tylnej
- 12.12 Przechowywanie i przestój (przerwa zimowa)
- 13. Transport
- 14. Ochrona środowiska
- 15. Ograniczanie zużycia i zapobieganie uszkodzeniom
- 16. Typowe części zamienne
- 17. Deklaracja zgodności UE
- 18. Dane techniczne
- 19. Wykrywanie usterek
- 20. Plan czynności serwisowych
- 1. Kazalo
- 2. O navodilih za uporabo
- 3. Opis naprave
- 4. Za vašo varnost
- 5. Opis simbolov
- 6. Obseg dobave
- 7. Priprava naprave na uporabo
- 8. Upravljalni elementi
- 9. Varnostna oprema
- 10. Napotki za delo
- 11. Začetek uporabe naprave
- 12. Vzdrževanje
- 12.1 Splošno
- 12.2 Čiščenje naprave
- 12.3 Preverjanje obrabe noža
- 12.4 Odstranjevanje in vgradnja noža
- 12.5 Preverjanje uravnoteženosti noža
- 12.6 Brušenje noža za košnjo
- 12.7 Nastavitev bovdena pogona
- 12.8 Motor z notranjim zgorevanjem
- 12.9 Vzdrževanje baterije in polnilnika
- 12.10 Kolesa in menjalnik
- 12.11 Vzdrževanje valja
- 12.12 Shranjevanje in daljša neuporaba (zimski premor)
- 13. Transport
- 14. Varovanje okolja
- 15. Zmanjšanje obrabe in preprečevanje okvar
- 16. Običajni nadomestni deli
- 17. EU-izjava o skladnosti
- 18. Tehnični podatki
- 19. Iskanje napak
- 20. Načrt servisiranja
- 1. Obsah
- 2. O tomto návode na obsluhu
- 3. Popis stroja
- 4. Pre vašu bezpečnosť
- 5. Popis symbolov
- 6. Rozsah dodávky
- 7. Príprava stroja na prevádzku
- 8. Ovládacie prvky
- 9. Bezpečnostné zariadenia
- 10. Pokyny pre prácu
- 11. Uvedenie stroja do prevádzky
- 12. Údržba
- 12.1 Všeobecne
- 12.2 Čistenie stroja
- 12.3 Kontrola opotrebovania noža
- 12.4 Demontáž a montáž noža
- 12.5 Kontrola vyváženia noža
- 12.6 Brúsenie žacieho noža
- 12.7 Nastavenie lanka pohonu kolies
- 12.8 Spaľovací motor
- 12.9 Údržba akumulátora a nabíjačky
- 12.10 Kolesá a prevodovka
- 12.11 Údržba záhradného valca
- 12.12 Uskladnenie a odstavenie stroja (zimná prestávka)
- 13. Preprava stroja
- 14. Ochrana životného prostredia
- 15. Opatrenia na minimalizovanie opotrebovania a na zabránenie vzniku škôd
- 16. Bežné náhradné diely
- 17. Prehlásenie o zhode výrobcom - EÚ
- 18. Technické údaje
- 19. Hľadanie porúch
- 20. Servisný plán
- 1. İçindekiler
- 2. Kullanım kılavuzu hakkında
- 3. Cihazın tarifi
- 4. Güvenliğiniz için
- 5. Sembol açıklamaları
- 6. Teslimat kapsamı
- 7. Cihazın çalışmaya hazır hale getirilmesi
- 8. Kullanma elemanları
- 9. Güvenlik tesisatları
- 10. Çalışmaya yönelik uyarılar
- 11. Cihazın çalıştırılması
- 12. Bakım
- 12.1 Genel
- 12.2 Cihazın temizlenmesi
- 12.3 Bıçak aşınması kontrolü
- 12.4 Bıçağın sökülmesi ve takılması
- 12.5 Bıçağın dengesini kontrol etme
- 12.6 Biçme bıçağının bilenmesi
- 12.7 Sürüş tahriki çekme teli ayarı
- 12.8 Yanmalı motor
- 12.9 Akü ve şarj aleti bakımı
- 12.10 Tekerlekler ve şanzıman
- 12.11 Çim ezme silindiri bakımı
- 12.12 Saklama ve uzun süreli mola (kış molası)
- 13. Nakliye
- 14. Çevre koruma
- 15. Aşınmanın en aza indirgenmesi ve hasar oluşumunun önlenmesi
- 16. Sık kullanılan yedek parçalar
- 17. EU Uygunluk Beyanı
- 18. Teknik veriler
- 19. Hata arama
- 20. Servis planı
0478 111 9940 B - EN
52
● Standard blade:
Place a ruler (2) against the relevant
blade edge as shown and measure
permissible grinding B.
● Multi-blade (RM 545 VM):
Check minimum width C at the
narrowest point behind the blade wings
using a slide calliper.
The blade must be replaced,
– if it is damaged (notches, cracks),
– if the measured values are achieved at
one or more points or are outside the
permissible limits.
1 Wear limits for standard blade:
Blade thickness A: > 2 mm
Permissible grinding B: < 5 mm
2 Wear limits for multi-blade
(RM 545 VM):
Blade thickness A: > 2 mm
Minimum width C: > 55 mm
12.4 Removing and installing the
blade
Removing:
● Use a suitable wooden block (1,
approx. 60x60 mm) to counterhold
blade (2).
● Unscrew blade fastening screw (3)
using an A/F 17 spanner.
● Remove blade (2), blade fastening
screw (3) and retaining washer (4).
Installing:
● Clean the blade contact surface and
blade bushing.
● Check the balance of the blade.
(Ö 12.5)
● Install blade (2) with the curved wings
pointing upwards (towards the
machine).
● Use a suitable wooden block (1,
approx. 60x60 mm) to counterhold
blade (2).
● Install blade fastening screw (3) with a
new retaining washer (4) and tighten.
Tightening torque:
60 - 65 Nm
12.5 Checking the balance of the
blade
● Remove the blade. (Ö 12.4)
● Guide screwdriver (1) through central
bore (2) of blade (3) and align the
mowing blade horizontally.
If the blade is properly balanced it will
remain in this horizontal position.
● If the blade leans to one side, re-
sharpen this side until the blade is
evenly balanced. (Ö 12.6)
12.6 Sharpening the mowing blade
STIHL recommends having the mowing
blade sharpened by a technician.
Operation of the machine is impaired in the
case of an incorrectly sharpened blade
(incorrect sharpening angle, imbalance,
etc.).
Sharpening instructions:
● Remove the mowing blade. (Ö 12.4).
● Cool the mowing blade when
sharpening, e.g. with water. The blade
must not be allowed to display blue
colouring, as this would reduce its
cutting quality.
● Sharpen the blade evenly to prevent
vibrations due to imbalance.
● Observe the sharpening angle of 30°.
● After sharpening, remove any
sharpening burr at the cutting edge
using fine sandpaper if necessary.
● Observe the wear limits. (Ö 12.3)
12.7 Adjusting the self-
propulsion cable
Maintenance interval:
As required
The tension of the cable is adjusted
correctly at the factory.
Adjustment of the cable is necessary
– if, after a lengthy period of use, self-
propulsion does not engage properly
when the self-propulsion lever is
actuated.
25
26
Risk of injury!
The blade (2) must only be installed
as shown. The curved wings must
point upwards.
Observe the specified torque when
tightening the blade fastening
screw, as the secure attachment of
the cutting tool depends on this.
Additionally secure blade fastening
screw (3) with Loctite 243.
Replace retaining washer (4) each
time the blade is installed and blade
fastening screw (3) each time the
blade is replaced.
27
29