JUST CAP IT. • Opera&on REV 12/11 www.s-ngerworld.com CN100 CAP NAILER OWNER’S MANUAL ! • Maintenance • Safety • Warranty PLEASE READ! This manual contains important informa1on about product safety.
TABLE OF CONTENTS • Important Informa1on 1 • Warnings 2 • Tool Specifica1ons 5 • Loading the Tool 6 • Opera1ng the Tool 7 • STINGER™ CN100 Schema1c 9 • STINGER™ CN100 Parts List 10 • Maintenance and Storage 13 • Warranty 14 • Troubleshoo1ng 15
IMPORTANT INFORMATION Please take the 1me to read and understand the informa1on contained in the Owner’s Manual included with this product before opera1ng or maintaining the STINGER™ CN100 Cap Nailer. Improper use of this tool could result in serious injury or even death.
WARNINGS ! PERSONAL SAFETY ITEMS • • Reading the Owner’s Manual prior to using the tool. Always wear eye protec1on that conforms to ANSI requirements (Z87.1) and provides protec1on against flying par1cles both from the front and side.
WARNINGS AIR SUPPLY AND CONNECTIONS • Use only clean, regulated compressed air as a power source for this tool. Do not use bodle gases, combus1ble gases or oxygen as a power source for the tool as the tool may explode. • Do not use air supply pressures that exceed 105 PSI.
WARNINGS OPERATION OF THE TOOL • Never inspect, maintain, repair, adjust, clear a jam or store the tool with the air connected. • Never use the tool in proximity of flammable gases or liquids, as some tools will create sparks that can be an igni1on source for a fire or explosion.
TOOL SPECIFICATIONS Opera1ng pressure 95-‐105 psi Weight 4.9 lb.
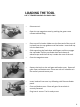
LOADING THE TOOL USE 1” STINGER NAILPAC CAP NAILS ONLY • • • • • • • • • Disconnect air. Open the cap magazine cover by pushing the green cover release tab and liling. Place cap roll in basket. Make sure the front end of the cap roll is placed over the cap guide area of the basket.
OPERATING THE TOOL 1. Read the Owner’s Manual prior to using the tool. 2. Read warning label(s) on the tool. 3. Visually inspect the tool for worn or damaged parts. 4. Wear appropriate eye protec1on. 5.
OPERATING THE TOOL 11. Cycle the tool on a scrap work piece to evaluate the depth of penetra1on by the fastener into the work piece. 12.
STINGER CN100 SCHEMATIC 9
STINGER CN100 PARTS LIST Item No. Ref No.
STINGER CN100 PARTS LIST Item No. Ref No.
STINGER CN100 PARTS LIST Item No. Ref No.
MAINTENANCE & STORAGE MAINTENANCE 1. Disconnect the air hose from the tool when performing inspec1ons, maintenance or repairs. 2. Use air line lubricators. f lubricators are not available, or if hose lengths exceed 10 feet, add 2 drops of non-‐detergent 20-‐weight oil daily into the air inlet of the tool. 3.
WARRANTY WARRANTY ITEMS 1. Warranty for cap assemblies, cas1ngs and housing cas1ngs is one year. 2. Warranty for bumpers, “O” rings, driver blades and piston rings is not applicable as they are normal wearing parts whose life is dependant on applica1on. 3. Warranty for all other parts is 90 days. WARRANTY CONDITIONS 1.
TROUBLESHOOTING Disconnect the air hose from the tool when performing inspec&ons, maintenance or repairs. PROBLEM: 1. Tool operates, but no fasteners are driven. 2. Cap leaks air. 3. Fasteners jam in nose of tool. CORRECTION: • • • • • • • Check magazine for proper fasteners.
Revised 11/07/11 www.na-onalnail.com www.na1onalnail.com JUST CAP IT. 2964 Clydon SW, Grand Rapids MI 49519, USA Phone: 800-‐968-‐6245 Fax: 616-‐531-‐5970 www.na-onalnail.com www.s-ngerworld.com REV 12/11 Contact Inside Sales at 800-‐746-‐5659 to place an order for replacement parts.