
Installation Guide


Stinger HEIGH10 Radio Replacement Kit
for select 2014-2019 Silverado/Sierra Truck
SR-GM14H
© 2020 AAMP Global. All rights reserved. PAC is a Power Brand of AAMP Global.
Pacific Accessory Corporation
Page 13
Rev: V1
Date: 030121
®
®
Section Five: Radio Module Preparation
Part One: Radio Module Side Brackets
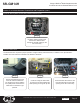
Step 2Step 1 Step 3
Save the cut o end pieces; they
will be used as spacers. From the
HEIGH10 hardware, four M5 x 10
screws will be used to attach the
brackets.
From the HEIGH10 hardware,
mark the two metal brackets as
shown above. Make a 90° bend
at the solid line and cut along the
dotted line.
Align one of the 90° side brackets
to the left side as shown. Bracket,
then spacer and attach with two
M5x10 screws in the locations
shown.
90° Bend
Cut
BracketSpacer
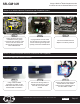
Step 4 Step 5
Align the other 90° bracket to
the right side as shown. Bracket,
then spacer and attach with two
M5x10 screws in the locations
shown.
From the HEIGH10 box, connect
the LVDS (Blue USB) and 10
pin display cables to the Radio
Module.
Bracket Spacer