
Installation Guide


Stinger HEIGH10 Radio Replacement Kit
for select 2014-2019 Silverado/Sierra Truck
SR-GM14H
© 2020 AAMP Global. All rights reserved. PAC is a Power Brand of AAMP Global.
Pacific Accessory Corporation
Page 14
Rev: V1
Date: 030121
®
®
Step 1A
Section 5: Radio Unit Installation
Step 1B
Step 2
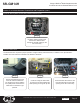
IO3, IO4, IO5, IO6: Connect
the Green and Gray vehicle
side plugs (1) on the RP5 Main
Harness to the matching plugs in
the vehicle.
IO4, IO5, IO6: If equipped,
connect the Yellow CAM-51 Input
RCA to CAMERA RCA (2) and
connect the male green/black
SWC Input to the female SWC
lead (3).
IOB: Connect the Mustard and
Gray vehicle side plugs (1) on
the RP5 Main Harness to the
matching plugs in the vehicle.
After the two vehicle side
plugs are connected, push the
connectors back into the rear
access hole as far as possible
to make room for when the radio
module is installed.
Part One: In-Vehicle Harness and Cabling Connections
1
1
3
2
OR
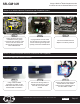
Step 4
Step 5
Temporarily place the RP5-GM51
module inside the CD/DVD
cavity while making the following
connections to the HEIGH10
Radio Module.
Plug in the two USB cables (1)
and the GPS antenna (2).
Plug in the HEIGH10’s 16 pin
Main Harness (1) and 24 pin A/V
Harness (2).
Step 3
1
1
2
2