
Installation Guide


Stinger HEIGH10
®
Radio Replacement Kit
for 2011-2018 Jeep Wrangler JK
SR-JK11H
© 2021 AAMP Global. All rights reserved. PAC is a Power Brand of AAMP Global.
AAMP Global is not aliated with FCA US LLC. Jeep® is a registered trademark of FCA US LLC. The terms
OEM, Jeep®, Wrangler®, and Gladiator® all terms are used strictly for identication purposes only. It is not
implied that any part listed is a product of, or approved by, Fiat Chrysler Automobiles.
Pacific Accessory Corporation
Page 11
Rev: V2
Date:052521
®
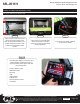
Step 6
Holding the mounting panel at the sides:
1. Position the bottom edge almost touching the air vents.
2. Firmly push the assembly against the dash panel.
3. Slide the assembly up until it snaps in place.
Note: Once the locking clips engage, the panel will stay in place.
1
1
3
2
2
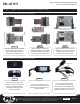
Step 5
To attach the display assembly,
align the location ribs on the sides
of the mounting panel to the side
brackets to center the panel side
to side.
Part Three: Attaching the Display Panel (cont.)
Section 4: Radio Unit Installation (cont.)
Installer Note!
If you are having trouble locking the display
in place, try the tips below...
Conrm the four side mounting screws are ush
and not protruding beyond the thickness of the
plastic. (FIG A)
Press the display assembly harder against the
dash panel as you slide it into place.
(Step 6 / Part 2)
Watch the SR-JK11H Installation Video:
https://www.youtube.com/watch?v=3PqCSjh9jAo
FIG A