
Installation Guide


Stinger HEIGH10
®
Radio Replacement Kit
for 2011-2018 Jeep Wrangler JK
SR-JK11H
© 2021 AAMP Global. All rights reserved. PAC is a Power Brand of AAMP Global.
AAMP Global is not aliated with FCA US LLC. Jeep® is a registered trademark of FCA US LLC. The terms
OEM, Jeep®, Wrangler®, and Gladiator® all terms are used strictly for identication purposes only. It is not
implied that any part listed is a product of, or approved by, Fiat Chrysler Automobiles.
Pacific Accessory Corporation
Page 3
Rev: V2
Date:052521
®
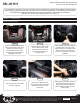
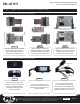
Step 3Step 2
Step 1
Section 1: Disassembly
Part One: Radio Removal
Using a plastic trim tool, gently pry
to release and remove the power
window switches or storage pocket
below the radio. Disconnect the
connector on the back of the switch
assembly.
Remove the two 7mm screws
from the bottom edge of the
radio/instrument cluster trim
panel on both sides of the
steering column.
Remove the knee bolster panel
below the steering column using
a plastic trim tool to release
the upper left and right clips
and swing panel downward to
disengage lower tabs.
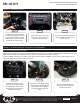
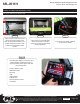
Step 6Step 5
Step 4
Starting below the radio, reach into
the window switch opening and
rmly grasp the lower bezel and
pull the bezel to release the lower
retaining clips.
Remove the rubber mat from
the storage tray above the radio
and remove the 7mm screw
underneath.
Remove the 7mm screw inside
the switch opening.
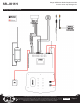
This installation manual will cover the necessary order of procedures to complete the installation eciently and to
avoid redoing any steps along the way. The order will be as follows; Disassembly, In-Vehicle Harness Connections
and Preparation, Display, Radio Module and Harness Preparation, and Radio Unit Installation.
(Directions for removing the display panel are on Page 13)