
Installation Guide


Stinger HEIGH10
®
Radio Replacement Kit
for 2011-2018 Jeep Wrangler JK
SR-JK11H
© 2021 AAMP Global. All rights reserved. PAC is a Power Brand of AAMP Global.
AAMP Global is not aliated with FCA US LLC. Jeep® is a registered trademark of FCA US LLC. The terms
OEM, Jeep®, Wrangler®, and Gladiator® all terms are used strictly for identication purposes only. It is not
implied that any part listed is a product of, or approved by, Fiat Chrysler Automobiles.
Pacific Accessory Corporation
Page 4
Rev: V2
Date:052521
®
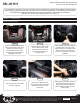
Section 1: Disassembly (cont.)
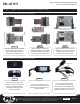
Step 9Step 8
Step 7
Disconnect all wire harnesses and
antenna cables from the back of
the factory radio.
Remove the four 7mm screws
securing the radio and pull the
radio from the sub-dash.
Using the storage tray and area
over the gauges, pull the top edge
of the panel to release the upper
retaining clips. Lower the steering
wheel and remove the panel.
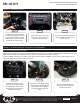
Section 2: In-Vehicle Harness Connections and Preparation
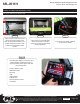
Part One: Dual USB Extension (SSUSB2)
Apple CarPlay, Android Auto, and any Firmware Updates require access to a USB port. The SSUSB2 is designed to extend the
USB ports on the back of the HEIGH10 to where they are accessible once the radio is installed.
For this installation, the factory 12V power outlet will be replaced with the SSUSB2. You may chose to follow these steps, or
mount the USB ports somewhere else in the vehicle.
Step 1
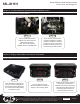
Step 1 Step 2 Step 3
Remove the climate control /
switch panel by pulling outward
and releasing the retaining clips.
Unplug all connectors from the
backside of the panel.
Remove the metal insert from the
power outlet by releasing the two
retaining clips with a small pick
tool and pushing out the front
side.
Remove the plastic sleeve by
depressing the two tabs and
pushing out the front.