
Installation Guide


Stinger HEIGH10
®
Radio Replacement Kit
for 2011-2018 Jeep Wrangler JK
SR-JK11H
© 2021 AAMP Global. All rights reserved. PAC is a Power Brand of AAMP Global.
AAMP Global is not aliated with FCA US LLC. Jeep® is a registered trademark of FCA US LLC. The terms
OEM, Jeep®, Wrangler®, and Gladiator® all terms are used strictly for identication purposes only. It is not
implied that any part listed is a product of, or approved by, Fiat Chrysler Automobiles.
Pacific Accessory Corporation
Page 6
Rev: V2
Date:052521
®
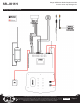
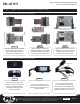
Part Three: AM / FM Antenna Adapter (BAA22)
Step 1 Step 2
Connect the BAA22 Antenna
Adapter to the factory antenna
cable (white connector).
Note: The mustard colored
antenna cable is for satellite radio.
These are the connections for
the basic installation. If adding
cameras, ampliers or external
microphone, those connections
should be made at this point, be-
fore mounting the radio module.
Section 2: In-Vehicle Harness Connections and Preparation (cont.)
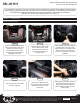
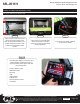
Section 3: Display, Radio Module and Harness Preparation
Step 3Step 2
Step 1
Partially screw in the four M4x10
screws from the SR-JK11H
hardware into the side holes of the
mounting panel. NOTE: Ensure
screw tip is ush and does not
exceed the plastic thickness.
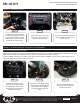
Use four M4x12 from the
HEIGH10 hardware to attach the
display to the mounting panel.
Place the HEIGH10 display into
the front of the mounting panel
and carefully turn the panel over
onto a soft surface while holding
the display in place.
Part One: Display Mounting Panel Preparation