
Installation Guide


Stinger HEIGH10
®
Radio Replacement Kit
for 2011-2018 Jeep Wrangler JK
SR-JK11H
© 2021 AAMP Global. All rights reserved. PAC is a Power Brand of AAMP Global.
AAMP Global is not aliated with FCA US LLC. Jeep® is a registered trademark of FCA US LLC. The terms
OEM, Jeep®, Wrangler®, and Gladiator® all terms are used strictly for identication purposes only. It is not
implied that any part listed is a product of, or approved by, Fiat Chrysler Automobiles.
Pacific Accessory Corporation
Page 8
Rev: V2
Date:052521
®
Step 6Step 5
Step 4
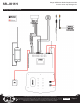
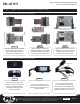
Attach the RP4-CH11 interface to the
top of the radio module using a M4 x
4 screw from the HEIGH10 hardware
in the threaded hole shown.
Connect the 16-pin and 6-pin
connectors on the RP4-JK07-HAR
Main Harness to the HEIGH10
radio module.
From the HEIGH10 box, connect
the blue LVDS and 8-pin display
cables to the radio module.
Part Three: Main Harness Connections (RP4-JK07-HAR) (cont.)
Part One: Harness and Cabling Connections
Section 3: Display, Radio Module and Harness Preparation (cont.)
Section 4: Radio Unit Installation
Step 3Step 2
Step 1
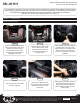
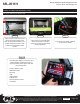
Inside the vehicle, plug in the two
USB cables and connect the GPS
antenna to the radio module.
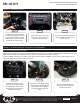
Before attempting to mount the
radio unit into the dash, ensure
that all excess cables, wires and
connectors are tucked into the
sides, not directly behind the
radio.
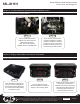
Connect the AM/FM antenna
adapter. Connect the vehicle’s
gray 22-pin radio plug to the
RP4-JK07-HAR main harness.