
Installation Guide


Stinger HEIGH10
®
Radio Replacement Kit
for 2011-2018 Jeep Wrangler JK
SR-JK11H
© 2021 AAMP Global. All rights reserved. PAC is a Power Brand of AAMP Global.
AAMP Global is not aliated with FCA US LLC. Jeep® is a registered trademark of FCA US LLC. The terms
OEM, Jeep®, Wrangler®, and Gladiator® all terms are used strictly for identication purposes only. It is not
implied that any part listed is a product of, or approved by, Fiat Chrysler Automobiles.
Pacific Accessory Corporation
Page 9
Rev: V2
Date:052521
®
Part Two: Mounting the Radio Assembly
Section 4: Radio Unit Installation
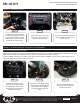
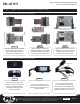
Step 3
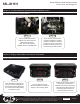
Step 6
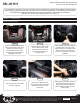
Step 2
Step 5
Step 1
Step 4
With the two display cables routed
over the top of the radio module,
slide the assembly into place. Take
caution that no wiring gets pinched
between metal brackets.
Install the four 7mm screws
removed from the factory radio to
secure the radio assembly.
If the vehicle does not have a
factory radio support bracket,
insert the included clip-on nut
onto the top bracket as shown.
Reinstall the factory 7mm screw
in the upper storage tray. If using
the clip-on nut in Step 3, use the
included #10-24 X ½” Philips
machine screw to secure.
The top support bracket on the
radio assembly needs to go over
the top of the factory radio support
bracket with the factory nut
centered in the bracket cut-out.
Lower the steering wheel and
align and reinstall the instrument
cluster / radio panel. Ensure that
all retaining clips are fully seated.