
Installation Guide


Stinger ELEV8 or HEIGH10® Radio Replacement Kit
for Jeep Wrangler JL and Jeep Gladiator JT Vehicles
SRK-JW18EH
© 2020 AAMP Global. All rights reserved. PAC is a Power Brand of AAMP Global.
AAMP Global is not aliated with FCA US LLC. Jeep® is a registered trademark of FCA US LLC. The terms
OEM, Jeep®, Wrangler®, and Gladiator® all terms are used strictly for identication purposes only. It is not
implied that any part listed is a product of, or approved by, Fiat Chrysler Automobiles.
Pacific Accessory Corporation
Page 12
Rev: v3
Date:100620
Section 4: In-Vehicle Harness Connections and Preparation (cont.)
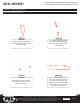
Part Five: AM / FM Antenna Adapter and RPA-HD1
Step 2
Connect the factory camera cable
with an orange or red Fakra
connector into the Cam 1 port on
RPA-HD1, then slide the RPA-HD1
through the radio opening into the
cavity behind the dash that is above
the center left air vent or into the
cavity behind the right side of the
climate control mounting area.
Connect the AM/FM antenna
adapter (BAA22) to the antenna
with the white connector that was
disconnected from the factory
radio.
Step 1
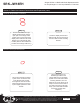
Section 5: Radio Unit Installation
Step 2
Disconnect the two 4-pin
connectors on the RPK-
JW18-HAR, then connect the
MALE 4-pin connector on the
MQS4PT-36 harness into the
FEMALE 4-pin connector on the
RPK-JW18-HAR. The MALE
4-pin connector on the RPK-
JW18-HAR will no longer be
used.
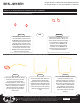
Before attempting to mount the
radio unit into the dash, rst
ensure that all excess cables and
wires are tucked into the sides,
out of the way of the radio. The
radio unit is a snug t and will be
dicult to mount into the dash if
there is anything taking up space
behind the radio opening.
Step 1
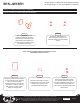
Part One: Harness and Cabling Connections
Step 3
Connect the 2-pin chime speaker
connector to the main harness.
Note: You can also
place the RPA-HD1
into the cavity that
is below the radio
cavity behind the
climate control
panel on the right
side.