
Installation Guide


Stinger ELEV8 or HEIGH10® Radio Replacement Kit
for Jeep Wrangler JL and Jeep Gladiator JT Vehicles
SRK-JW18EH
© 2020 AAMP Global. All rights reserved. PAC is a Power Brand of AAMP Global.
AAMP Global is not aliated with FCA US LLC. Jeep® is a registered trademark of FCA US LLC. The terms
OEM, Jeep®, Wrangler®, and Gladiator® all terms are used strictly for identication purposes only. It is not
implied that any part listed is a product of, or approved by, Fiat Chrysler Automobiles.
Pacific Accessory Corporation
Page 13
Rev: v3
Date:100620
Section 5: Radio Unit Installation (cont.)
Part One: Harness and Cabling Connections (cont.)
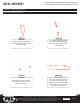
Step 4
Connect the 10P-2-10P-18
connector coming from the RPA-
HD1 interface module into the
open port on the PL1 interface
module, then connect the 52-pin
dock-and-lock connector to the
main OEM radio connector in the
vehicle.
For a complete wiring diagram overview, refer to page 2.
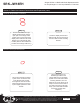
Part Two: Radio Unit Mounting
Step 2Step 1
Connect the Stinger display
cables into the back of the
Stinger radio display and secure
it to the radio unit mounting
bracket against the dash using
the orange clips and the two 7mm
screws below the radio cavity.
While holding the cabling above
the vents in the dash, slide the
radio unit into the radio cavity and
secure it to the dash using the
four 7mm screws that held the
factory radio in place.
Note: Once the radio unit is
slid into the radio cavity, the kit
will not always seat fully into
the dash. There is sometimes
about a 1/4-inch gap between
the screw holes. If the previous
steps of the instructions were
followed, this 1/4-inch gap will
close with the tightening of the
four 7mm screws, allowing the kit
to seat fully into place. If there is
more than a 1/4-inch gap before
installing the screws, slide the
radio unit back out and readjust
the connectors and cables behind
the radio opening until they are no
longer in the way of the radio unit,
then reinstall.
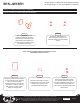
Gray
USB-UN1
adapter cable
Black center console
USB-UN2
adapter cable
1
2
Connect the USBs into the
appropriate ports on the Stinger
radio module. Ensure that the
USB-UN1 is connected to port 1,
and the center console USB-UN2
is connected to port 2.
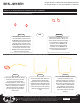
Step 5
5
Connect the AM/FM antenna (3),
the HDMI cable (4), and the GPS
antenna (5).
Step 6
3
4