
Installation Guide


Stinger ELEV8 or HEIGH10® Radio Replacement Kit
for Jeep Wrangler JL and Jeep Gladiator JT Vehicles
SRK-JW18EH
© 2020 AAMP Global. All rights reserved. PAC is a Power Brand of AAMP Global.
AAMP Global is not aliated with FCA US LLC. Jeep® is a registered trademark of FCA US LLC. The terms
OEM, Jeep®, Wrangler®, and Gladiator® all terms are used strictly for identication purposes only. It is not
implied that any part listed is a product of, or approved by, Fiat Chrysler Automobiles.
Pacific Accessory Corporation
Page 6
Rev: v3
Date:100620
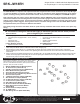
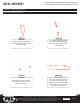
Section 2: Radio Unit Mounting Preparation
Step 2
Step 1
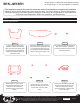
Secure the side brackets to
the main bracket using the four
#10x3/8 Phillips course threaded
screws.
Slide the left and right side
brackets (marked by the letters
LH and RH) into the back of the
main bracket (the orientation of
the main bracket is marked by the
part number at the top).
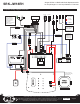
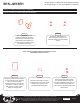
Step 3Step 2
Step 1
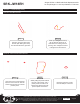
Mount the Stinger radio module
onto the side brackets using the
four M5x10 Phillips screws (only two
shown). Ensure that the ports for
connections on the radio module are
facing down.
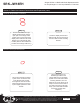
Mount the PAC-LINK module to
the lower part of the CH4A-JW18
module using a piece of the
provided double-sided tape.
Mount the CH4A-JW18 module to
the left and right inner mounting
tabs of the radio module
mounting brackets using zip ties.
Ensure the module is oriented
with the part number (CH4A-
JW18) on the right side.
Part One: Assembling the Radio Module Mounting Brackets
Part Two: Mounting the Interface Modules and Stinger Radio Module
Note: It does not matter what the DIP switches on the
CH4A-JW18 module are set to.