
Installation Guide


Stinger ELEV8 or HEIGH10® Radio Replacement Kit
for Jeep Wrangler JL and Jeep Gladiator JT Vehicles
SRK-JW18EH
© 2020 AAMP Global. All rights reserved. PAC is a Power Brand of AAMP Global.
AAMP Global is not aliated with FCA US LLC. Jeep® is a registered trademark of FCA US LLC. The terms
OEM, Jeep®, Wrangler®, and Gladiator® all terms are used strictly for identication purposes only. It is not
implied that any part listed is a product of, or approved by, Fiat Chrysler Automobiles.
Pacific Accessory Corporation
Page 9
Rev: v3
Date:100620
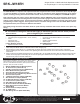
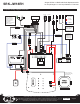
Section 3: Radio Unit Harness Connections and Preparation (cont.)
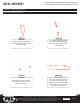
Part Three: Stinger Display Connections
Step 2
Step 1
Route the display harness and
cable through the front opening of
the main radio module mounting
bracket.
Connect one end of the 8-pin
display power harness into the
8-pin port on the Stinger radio
module, then connect the LVDS
display video cable into the LVDS
display port on the Stinger radio
module. (Both of these cables are
provided in the Stinger radio box.)
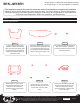
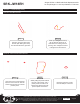
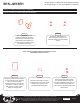
Part Four: Securing the Wire Harness
Step 2
Step 1
Secure each end of one
backstrap (included in the
Stinger radio box) to the plastic
eyelets on the side radio module
mounting brackets, then use
zipties to secure the factory style
52-pin connector and the rest of
the radio unit wiring to the back
strap. (The unit should resemble
the image pictured when
complete.)
Run a zip tie through the metal
eyelet on the connections side
of the Stinger radio module,
then tighten it down around the
main wiring harness to secure it
in place tightly against the radio
module.