
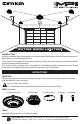
Installation Guide


2 HOUR MOTION SENSOR OVERRIDE POWERING EXTERNAL CAMERA
6
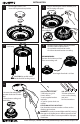
• Position plate and drive screws into drywall
anchors or joists
• Lightly seat screws with a screw driver or
drill.
Do not overtighten
Ensure tabs are
facing down
7
ATTACH POD:
• Position Pod light over ceiling
plate and rotate clockwise,
until locked in place.
TO REMOVE POD:
• Press rmly up on the Pod
• Rotate counter-clockwise
8
• Tighten cable by rotating
Pod counter-clockwise
REPEAT 4-8
For additional Pods.
Make sure not to cross Pod
cables.
• With the Motion Sensor ON and Light ON
• Turn the light switch OFF
(slight pause), ON(slight pause),
OFF
(slight pause), ON within 5 seconds
• Lights stay on for 2 hours (disables motion sensor)
• After 2 hours the motion sensor functions as normal
• Turn light o at the light switch
• Plug USB plug from camera* into
USB port of Main Hub
• Turn light on
*not incl.
IF LIGHT SWITCH IS OFF
CAMERA WILL NOT HAVE POWER
To maintain constant power to
camera, the light switch must remain
in the ON position & motion sensor ON
USB Port
C
A
M
E
R
A
Set motion sensor to
desired sensitivity or leave
o if using like a light bulb.
OFF: Use the light switch
to turn light on/o
LOW-MAX: Twist
clockwise to increase
the sensitivity of the
motion sensor.
ADJUSTING MOTION SENSOR
Striker Concepts | 704-508-1031 | info@StrikerConcepts.com | StrikerConcepts.com
INSTALLATION
DO NOT OVERTIGHTEN
CABLE:
Don’t put undue
pressure on main unit or
light socket