
User's Manual


Wireless Floor Mat Setup
Replacing the Batteries:
The Floor Mat’s transmitter comes with new batteries installed. When it
becomes necessary to replace them, use the following procedure:
1. Use a coin to remove the battery cover on the transmitter by placing it
in the slot and turning it slightly in a clockwise direction.
2. Pry out the old batteries with a pen or small screwdriver.
3. Place three new batteries into position, being sure to align the
polarities correctly. The “+” sign on each battery should be facing
upward.
4. Twist the battery cover back into place. The red LED on the transmitter
should blink briefly if the batteries are installed correctly and are
operational.
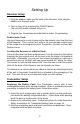
Setting up the Floor Mat:
Connect the Floor Mat transmitter to the jack attached to the mat. Be sure
the transmitter is positioned over the rectangular shape in the plastic case
on the mat, with the battery cover facing up. Reprogram the device if
necessary (see Programming below). Set the mat onto the floor beside the
bed where the patient is most likely to contact it if he or she leaves the bed.
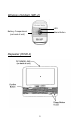
Repeater Setup
1. Plug the AC adaptor into the wall socket and connect the other end to
the jack on the back of the Repeater.
2. Press the POWER button to turn the unit on.
The red LED should be on.
3. Program the Repeater (see Programming below).
4. Once the Repeater has been programmed, it can be placed on a wall
by inserting the two keyhole slots on the back onto the studs of a
telephone wall plate. Alternately, two screws (included) or nails can be
inserted into a convenient spot on the wall, with one screw located 2¾”
above the other. The screws or nails should extend 3/16” from the wall
so that the keyhole slots on the back of the Repeater can be slipped
over them. The Repeater should be located somewhere between the
farthermost Transmitter and the Receiver.
7