Model E112 OWNER’S MANUAL Manual No. 513613 Rev.
Owner's Manual For E112 Stoelting Counter Model Gravity Freezer Shake and Frozen Beverage This manual provides basic information about the freezer. Instructions and suggestions are given covering its operation and care. The illustrations and specifications are not binding in detail. We reserve the right to make changes to the freezer without notice, and without incurring any obligation to modify or provide new parts for freezers built prior to date of change.
A Few Words About Safety Safety Information Read and understand the entire manual before operating or maintaining Stoelting equipment. This Owner's Manual provides the operator with information for the safe operation and maintenance of Stoelting equipment. As with any machine, there are hazards associated with their operation. For this reason safety is emphasized throughout the manual. To highlight specific safety information, the following safety definitions are provided to assist the reader.
TABLE OF CONTENTS SECTION DESCRIPTION PAGE 1. INTRODUCTION 1.1 Description ............................................................................................................. 1.2 Specifications ........................................................................................................ 1 1 2. INSTALLATION INSTRUCTIONS 2.1 Safety Precautions ................................................................................................. 2.2 Shipment and Transit....................
LIST OF ILLUSTRATIONS FIGURE TITLE PAGE 1-1 Model E112 Freezer .............................................................................................. 1 1-2 Freezer Specifications ........................................................................................... 1 2-1 Warning Label Locations ....................................................................................... 3 2-2 Electrical Plug ...................................................................................
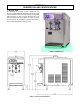
SECTION 1 DESCRIPTION AND SPECIFICATIONS 1.1 DESCRIPTION The Stoelting E112 counter freezer is gravity fed. The freezer is equipped with fully automatic controls to provide a uniform product. The freezer is designed to operate with almost any type of shake or frozen beverage mix. This manual is designed to assist qualified service personnel and operators in the installation, operation and maintenance of the Stoelting E112 gravity freezer.
MODEL E112 COUNTER MODEL GRAVITY FREEZER DIMENSIONS: Freezer: 15-1/4" (33.8 cm) wide x 31-15/16" (81.1 cm) deep x 30-3/8" (77.2 cm) high Crated: 17-1/2" (44.4 cm) wide x 36-1/2" (92.7 cm) deep x 35" (88.9 cm) high WEIGHT: Freezer: 250 lbs. (140 kg) Crated: 270 lbs. (125 kg) ELECTRICAL: Description E112-37 E112-307 Voltage AC 1 PH 115V 60Hz 1 PH 220V 50Hz Total Run Amps 16.00 9.00 Drive Motor 1/2 HP 1/2 HP Use 20 amp HACR circuit breaker.
SECTION 2 INSTALLATION INSTRUCTIONS 2.1 SAFETY PRECAUTIONS If danger, warning or caution labels are needed, indicate the part number, type of label, location of label, and quantity required along with your address and mail to: Do not attempt to operate the freezer until the safety precautions and operating instructions in this manual are read completely and are thoroughly understood. STOELTING, INC. ATTENTION: Customer Service 502 Hwy.
2.2 SHIPMENT AND TRANSIT The freezer has been assembled, operated and inspected at the factory. Upon arrival at the final destination, the entire freezer must be checked for any damage which may have occurred during transit. With the method of packaging used, the freezer should arrive in excellent condition. THE CARRIER IS RESPONSIBLE FOR ALL DAMAGE IN TRANSIT, WHETHER VISIBLE OR CONCEALED. Do not pay the freight bill until the freezer has been checked for damage.
SECTION 3 INITIAL SETUP AND OPERATION 3.1 OPERATOR’S SAFETY PRECAUTIONS 3.2 OPERATING CONTROLS AND INDICATORS SAFE OPERATION IS NO ACCIDENT; observe these rules: A. Know the freezer. Read and understand the Operating Instructions. B. Notice all warning labels on the freezer. C. Wear proper clothing. Avoid loose fitting garments, and remove watches, rings or jewelry which could cause a serious accident. D. Maintain a clean work area. Avoid accidents by cleaning up the area and keeping it clean. E.
B. CLEAN-OFF-ON Switch When sanitizing the freezer, refer to local sanitary regulations for applicable codes and recommended sanitizing products and procedures. The frequency of sanitizing must comply with local health regulations. The CLEAN-OFF-ON switch is used to supply power to the control circuit. When the switch is in the OFF (middle) position, power will not be supplied to the control board or refrigeration system.
H. The freezer is designed to dispense the product at a reasonable draw rate. If the freezer is overdrawn, the result is a soft product or a product that will not dispense at all. If this should occur, allow the freezer to run for approximately 30 seconds before dispensing additional product. I. Do not operate the freezer when the ADD MIX light and MIX OUT lights are on. Refill the hopper immediately. 3.5 MIX INFORMATION Mix can vary considerably from one manufacturer to another.
A. Close the spigot and fill the hopper with 2 gallons (8 liters) of tap water. B. Place the switch in the CLEAN position. The auger will start to rotate. C. Allow the water to agitate for approximately 30 seconds. D. Open the spigot to drain the water. Remember to place a container under the spigot to catch the water. When the water has drained, place the switch in the OFF (middle) position. Allow the freezing cylinder to drain completely. E. Prepare detergent water by mixing 2 oz.
3.10 SANITIZE FREEZER AND FREEZER PARTS A. Use Stera-Sheen or equivalent sanitizing solution mixed according to manufacturer's instructions to provide 100 parts per million strength solution. Mix sanitizer in quantities of no less than 2 gallons (7.5 liters) of 90° to 110°F (32° to 43°C) water. Any sanitizer must be used only in accordance with the manufacturer's instructions. B.
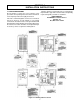
G. Turn spigot body until the ice breaker bar can be inserted. Insert breaker bar and rotate spigot body 90°. H. Install auger support bushing onto front door so beveled edge of bushing is against door (Refer to Figure 3-10). I. Install the white stator support bushing onto the rear of the stator bar and insert stator into spigot. CAUTION Do not place the mix inlet regulator into the hopper before installing the auger.
P. regulator is not required. CLEANING vs. SANITIZING Install hopper cover, drain tray, drip tray, and drip tray grid. It is important to distinguish between cleaning and sanitizing. Although these terms may sound synonymous, they are not. BOTH are required for adequate food safety and proper machine maintenance. 3.12 ROUTINE CLEANING CLEANING To remove spilled or dried mix from the freezer exterior, wash in the direction of the finish with warm soapy water and wipe dry.
• MILKSTONE REMOVAL – Complete removal of milkstone. There are two main factors that contribute to falling chlorine concentrations in a sanitizing solution. • SANITIZING – FDA-approved no rinse sanitizer for food contact surfaces. 1. PRODUCT USE – As the chlorine in the solution is being used, chlorine concentrations fall. Additional Information 2. TIME – As time passes, small amounts of chlorine “evaporate” from the solution. (That is why you can smell it.
2. To remove the condenser filter, remove the thumb screws from under the front panel. Pull down bracket and remove filter. Visually inspect for dirt. If the filter is dirty, shake or brush excess dirt off the filter and wash in warm, soapy water. Once the filter is clean rinse thoroughly in warm, clear water and shake dry, taking care not to damage the filter in any way. 3. Visually inspect the condenser for dirt by shining a light through the coil from the back (inside) of the condenser. 4.
This page left intentionally blank 14
SECTION 4 TROUBLESHOOTING 4.1 MIX LIGHT INDICATORS The following chart shows all possible mix light indicator combinations along with the cause and operation of the freezer.
4.2 TROUBLESHOOTING - CONTINUED PROBLEM POSSIBLE CAUSE REMEDY 1. No vent space for free flow of cooling air. 2. Air temperature entering condenser is above 100°F. 3. Condenser is dirty. Product is too soft. 4. Consistency setting too soft. 5. Stabilizers in mix are broken down. 6. Auger is assembled incorrectly. Product does not dispense. 7. Refrigeration problem. 1. No mix in hopper. 2. Mix inlet regulator tube is plugged. 3. Capacity of freezer is being exceeded. 4. Drive motor overload tripped. 1.
SECTION 5 REPLACEMENT PARTS 5.1 HOW TO ORDER PARTS B. Serial number of model, stamped on nameplate To assure receipt of the proper replacement parts, supply your dealer or distributor with the following information: C. Part number, part name and quantity needed. Common part names and numbers are listed in this manual. A. Model number of equipment.
E112 REPLACEMENT PARTS 18
E112 REPLACEMENT PARTS Part Description Qty 162165 Scraper Blade 2 336546 Molded Door 1 482019 Black Knob 4 570196 Pin - Door 1 624545 O-Ring - Stator Bar 1 624644 O-Ring - Spigot (Bottom) 1 624645 O-Ring - Spigot (Top) 1 624678 O-Ring - Rear Seal 1 625310 Quad Ring - Front Door 1 666786 Rear Seal 1 2183099 Ice Breaker Bar 1 2183444 Stator Support Bushing 1 2183445 Stator Bar 1 2183449 Auger Support Bushing 1 2183475 Auger 1 2183737 Torque Rod 1 2183739 S
WARRANTY SOFT SERVE / SHAKE FREEZERS 1.