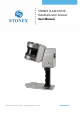
STONEX SLAM XH120 Handheld Laser Scanner User Manual (May 2022)-Ver.2.2 -Rev.2 – Firmware Version 1.4.8.2 www.stonex.
Contents Contents .................................................................................................................................................................................................. 2 1. Legal Notice ................................................................................................................................................................................. 4 Copyrights and trademarks ..........................................................................
5. Operating the STONEX® XH120 ...................................................................................................................................... 16 5.1 Power on the processing unit ..................................................................................................................................... 16 5.2 Wi-Fi connection to XH120 .........................................................................................................................................
1. Legal Notice Copyrights and trademarks STONEX®, the STONEX® logo, and XH120 are trademarks of STONEX® S.r.l. STONEX® Cube-slam, STONEX® Cube-scan and STONEX® Reconstructor are trademarks of STONEX® S.r.l. All other trademarks are the property of their respective owners. 2. Standard Limited Warranty 2.
has to pay for both the return and the original freight fees, regardless of the original freight paid by the Company. All warranty books, instruction manuals, parts and accessories must be included as well as the original box in which the item was shipped. We recommend placing the original carton inside another box, to avoid any additional damage to the carton itself. In some cases, returns of special items will require a re-stock fee.
2.7 Repair/Service procedure for Dealers 1. S/N of the instrument and a detailed description of the defect (sometimes pictures or video) will be required to indicate the cause and problem. 2. If dealer wants to repair an instrument under warranty period on their site: • If dealers don’t have the part in stock, they have to send an official order to STONEX® and pay for it and then so STONEX® will send the new part to them so they can repair the instrument.
The disposal of electric and electronic device as solid urban waste is strictly prohibited: they must be collected separately. Contact Local Authorities to obtain practical information about correct handling of the waste, location, and times of waste collection centers. When you buy a new device of ours, you can give back to our dealer a used similar device. The dumping of these devices at unequipped or unauthorized places may have hazardous effects on health and environment.
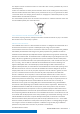
3. Introduction 3.1 General Thank you for purchasing STONEX® SLAM XH120 Handheld Laser Scanner. This manual includes important safety directions and instructions for setting up and using the product. Please read this manual carefully before using, so that our products can serve you better. When you begin to use the product, we assume that you are a competent user who has read through and understood the contents of this manual and is fully aware of the necessary dangers, warnings, and cautions.
Wi-Fi antenna 3.3 Precaution for safety 1. Avoid vibrations: when transporting, keep the instrument in the case and try your best to lighten vibrations. 2. Instrument carrying: when carrying, the instrument handle must be hold tight. 3. Check the battery power: before using the instrument, you should check the battery power whether it is enough. 4. Battery maintenance: if the instrument is not in using for a long time, the battery should be taken out from the instrument and stored in separate place.
5. Taking out the battery: it is not suggested to take out the battery when the instrument is on. Otherwise, stored data may be lost. So, it is better to replace the battery after powering off the instrument. 6. High temperature condition: don’t put the instrument in high temperature condition for a long time, it is bad for the instrument performance, and it can damage the hardware components. 7.
The definitions of the indications are listed below. Be sure you understand them before reading the manual’s main text. Ignoring this indication and making an operation error ATTENTION: could possibly result in death or serious injury to the operator. Ignoring this indication and making an operation error CAUTION: could possibly result in personal injury or property damage. ATTENTION 1. Do not perform disassembly or rebuilding. Fire, electric shock, or burn could result.
this standard, the device is classified as Class 1 Laser Product. 3.9 Battery HANDLING AND STORAGE Use the battery properly according to the product specification, do not disassemble or short circuit the battery. Keep away from sources of heat or ignition: over high temperature will make the cell inflate melt the separator, causing short circuit. The storage area should be cool, dry, well ventilated, out of direct sunlight, away from metal or sharp edge, such as keys pins or wires.
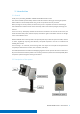
4. Setting up the STONEX® XH120 4.1 Setting up 1. Connect the strap to the processing unit and mount the Wi-Fi antenna 2. Connect the data cable to the processing unit and to the handheld part through the data interface connector (the linear interface should be connected to the processing unit, while the 90-degree angle interface should be connected to the handheld part) 3.
4. Make sure all these parts are connected/inserted firmly. 4.2 Battery charging 1. Plug the charger into an AC power source and the charger LED indicator will light up in green 2. Insert the charger wire firmly into the battery, and the four LED indicators above the battery will flash in sequence. When the four indicators are no longer flashing, the battery is fully charged 3. Disconnect the charger from the battery and AC power source 4.
the scanner via Cube-slam and check in real-time the progress of the scan and remapping steps, the user needs to install the launcher on your device, following the steps below. It is also possible to control the scanner by connecting to the web interface, which can be accessed by reaching IP 192.168.10.1. This allows to perform scanning, remapping and download of the data using any device with an internet browser. 4.5 Installing Cube-slam 1.
4. Operating the STONEX® XH120 5.1 Power on the processing unit 1. To turn on the battery, press once, then press and hold a second time, until the red LED on the power button and the available battery percentage indicator LEDs are lit 2. Proceed with powering up the processing unit of the XH120: press and hold the power button until the blue LED turns on 5.2 Wi-Fi connection to XH120 1. Enable the Wi-Fi connection on your tablet/computer 2.
5.3 Cube-slam: scanning 1. Launch the Cube-slam software and select the “Scan” environment (by default, it will automatically open on this section): 2. Enter an arbitrary name for the scan you are about to perform: 3.
4. During this step, the calibration of the IMU unit is performed, it is then recommended to keep the handheld unit steady. After a while, you will be able to see the real-time preview appearing (NOTE: Cube-slam 1.4.7.4 shows a yellow-colored preview, while older versions show a heightcolored preview. This change was applied to improve visibility): the initialization is complete.
7. Once the “Status” displayed on the interface is “Ready”, you can stop the handheld part by pressing and holding the power button: 8. The scanning process is completed, and the corresponding files will be stored in the processing unit memory.
6. Data download, deletion, and processing The results of the scanning sessions are stored in the processing unit memory and can be managed by accessing them via Cube-slam software or the web interface. Data can be downloaded in order to process them using point cloud processing software. 6.
4. The software will automatically redirect you to the “Remap” environment; you can select the level of density of the resulting point cloud by changing the “Map filter” parameter: 1 corresponds to the higher possible density. The parameter can be set in the “Parameters” page. 5. Click on the “Start” button to begin the remapping and then click “Yes” on the popup appearing 6.
6.2 Cube-slam: data download 1. Launch Cube-slam software 2. Open “Data Manage” and select the scan you want to download; you can select multiple scans with Control button 3. In the right panel, you can choose in which folder you want to save the data: click on “Save Folder” to select to one you prefer on your tablet/PC 4. Select the elements you want to download: a. Raw (the original point cloud not processed by the SLAM algorithm) b. GlobalMap (point cloud data processed by SLAM algorithm) c.
5. Click on “Download”: you can check the progress of the operation in the right panel 6. You can also connect a USB disk to the processing unit using the provided cable, and save the scans directly on it. Udisk format must be NTFS or FAT32 (Recommended NTFS) and the Udisk must contain only one partition.
6.3 Cube-slam: delete scans 1. Open the “Data Manager” and select the scan you want to delete; you can select multiple scans with Control button 2.
6.4 Data processing (XH120 Manager) Data obtained using XH120 are in .pcd or .dat format and can be read by STONEX® Cube-scan. To convert the file into third party-compatible formats, use the XH120 Manager software.
Double click on the Scan project item to load GlobalMap and Trajectory files: Select the scan folder downloaded from Cube-slam (for scans saved in .pcd format, the files "timelist.txt", "GlobalMap.pcd", "trajectory.txt" must be present in the folder; for scans saved in .dat format instead "timelist.txt" and "GlobalMap.
Wait until files are loaded: Operator Masking Click on the “OpMasking” project item to perform the operator ghost deletion: STONEX SLAM XH120 – User Manual 27
In the Item Properties window, tick the Operator mask settings to enable the operation, then set the size parameters and click on Apply: Wait until the filtering is applied: STONEX SLAM XH120 – User Manual 28
Click on Intensity to access the Reflectance histogram and modify it: Modify min. and max.
For later use in Stonex Reconstructor, we suggest using 0-255 extreme values STONEX SLAM XH120 – User Manual 30
Control Points Click on the Control Points project item to detect control points: Tick the Control points settings item properties box to change the cluster detection parameter, then click STONEX SLAM XH120 – User Manual 31
on apply to show the detected CPs: Click on a point name to access the control points settings window: STONEX SLAM XH120 – User Manual 32
The control point, with its coordinates, will be loaded: In the Comment section, you can write a comment for the selected control point (no commas or spaces allowed) STONEX SLAM XH120 – User Manual 33
In the Multimedia file section, you can upload an image or video file to be linked to the selected control point. Click on browse: Select the image or video file: Note: all the image and video files to be used should be stored in your computer in a folder called “media” placed in the same location of the scan files, for the hyperlink generated by XH120 converter is relative to and will be stored in such folder.
The file is uploaded: Click on Save to confirm the changes and move to the next control point: STONEX SLAM XH120 – User Manual 35
If a video file is chosen, XH120 Manager will ask if the user wants to use the video for all the control points: the video will be linked at the correct timestamp for each control point.
The files will be exported in .e57 format, while the control points will be exported in .csv format, ready to be imported as Annotations in Stonex Reconstructor. 6.5 Data Processing (Advanced) Now, scans are ready to be imported in a 3D point cloud software like STONEX® Reconstructor, Cubescan or other third-party softwire to perform cloud filtering, registration, and other useful operations.
Note: If you are using Stonex Reconstructor to further process your scanner data, you can directly display the trajectory control points as “Annotations”.
7. Operational recommendations Before scanning, user should plan the optimal scanning path to identify potential problem areas, such as harsh environments, through doorways and stairwells, etc. The scan path of the plan should also be a "closed loop" as much as possible. Please refer to the guidelines of these chapter in order to achieve the best scanning results. 7.
7.3 Transition between environments When transitioning between environments (for example, passing through a doorway or turning around a sharp bend), extreme care must be taken to avoid introducing errors, because when switching between different environments, the local view may suddenly change, and adjacent contours change too much, making it difficult for the SLAM algorithm to place a new environment relative to the previous environment.
enter restricted or difficult areas (such as narrow passages). It is possible to scan objects in hard-to-reach situations by simply extending/moving the arm holding the handheld part. 7.9 Moving objects in the environment In most cases, the SLAM algorithm can handle moving objects in the environment. To estimate the trajectory of the sensor, the algorithm assumes that the static proportion of the environment is large.
8. Instrument settings and management 8.
Slam Parameters PARAMETER Min Range (m) FUNCTION VALUE RANGE DEFAULT VALUE >=0 m 0.2 m >=5 s 5 or 10 >=50 or -1 -1 >=1 4 Minimum ranging to the Lidar’s center point. Points less than this distance are automatically ignored during SLAM operation. Timeout For If XH120 cannot get any frames from the Quit(sec) Lidar sensor, it will close the SLAM and quit the operations. Frames In How many frames are saved in a Submap GlobalMap file. The bigger value, the larger the GlobalMap size.
Combined with parameter “Max iterations”, you can improve the accuracy of GlobalMap. Save As Choose file saving format 0 = No, 1 = PCD, 2 = DAT Recommended Parameters Lidar Setup PARAMETER FOV (degrees) FUNCTION VALUE RANGE The range of data acquired by lidar. The value range The format is angle1-angle2. of each angle is For example, 0°- 360° indicates that all 0°~ 360°. points within the range of 0°- 360° of The first angle lidar FOV can be obtained.
To edit a parameter, write in the Edit column the new parameter, then click on “Confirm”: 8.
8.3 Language Change the language of Cube-slam by clicking on the button on the upper left part of the interface 8.
8.5 Firmware update Users can update the instrument with a new firmware version when it is released.
Click on “Open” to upload the file: Click on “Update” to start the firmware update: STONEX SLAM XH120 – User Manual 48
Check the progress of the operation in the update log, and wait until the % bar shows 100% and the log displays the “Update OK”. Reboot the instrument, and check that the firmware version is updated.
8. Technical data 8.1 XH120 technical features PERFORMANCE Max Range 120 m Scan speed 655.360 points/s Ranging accuracy Up to 1cm Vertical resolution 32 channels Field of view 360°x360° N° of returns 1 (strongest) Rotation rate 20 Hz Angular Sampling Accuracy Vertical: ±0.01° Horizontal: ±0.01° Safety Class 1 (eye-safe) laser Max Range 120 m Scan speed 655.
Charging environment temperature 5°C to 40°C Maximum charging power 180W 8.2 Bundle components 1. XH120 Handheld Laser Scanner 2. XH120 Processing unit 3. Data and USB cables 4. Processing unit strap 5. 2x Battery 6. Battery charger 7. Wi-Fi antenna 8. USB dongle with manual, software (Cube-slam, XH120 Manager), and video tutorials 9.
STONEX® SRL Viale dell’industria, 53 | 20037 - Paderno Dugnano (MI) | Italy Tel: +390278619201 | Fax: +390278610299 SLAM XH120 – User Manual 52 www.stonex.com STONEX | info@stonex.