
Owner's manual


Clickfree Portable Backup Drive for Macintosh: User Guide Restoring my content
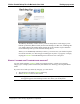
WHAT GETS RESTORED, AND TO WHERE?
When
Clickfree restore runs without you changing any options, it restores all of the
content that was backed up, and puts it in the
Restored Files folder under your Home
folder.
If you prefer, you can easily tell
Clickfree to restore your files to any place on your
computer’s hard disk that is convenient for you.
For details, see:
• “
How do I let Clickfree restore decide what to restore and where?” on page 18
• “
How do I change how Clickfree restores content?” on page 21
HOW DO I LET CLICKFREE RESTORE DECIDE WHAT TO RESTORE AND WHERE?
You can allow Clickfree to make the decisions about what to restore and to where, but you
need to confirm what
Clickfree plans to do.
♦ To let Clickfree decide what to restore and to where:
1. Make sure that your computer is switched on and has finished starting up.
2. Log in, if that is what you normally do.
3. Connect the
Clickfree Portable Backup Drive to your computer by connecting one end
of the USB cable to the drive and the other end to a USB port on your computer.
Please try to connect to a USB port on the computer itself, as using a USB hub may not
provide enough power
Clickfree starts up just as it did when you used it to back up your content.
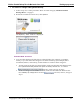
4. Wait for the
Clickfree window to appear – this may take up to 60 seconds.
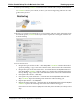
The
Clickfree Welcome window appears with the countdown, just as it did when you
used it to back up your content.
But this time you are not going to allow
Clickfree to start the backup.
Because you have backed-up content on your Portable Backup Drive, the countdown
window now shows buttons at the bottom to allow you to
View Files and Restore files.
Copyright © 2009 Storage Appliance Corporation. 18